I have been working with blender for over a year now, and most problems I run into I have been able to google out the answer. This latest, however has stumped me. Figured I would see if anyone with a fresh set of eyes has an obvious solution. I call it the ‘Threaded Tampon’ for lack of a better description.
What we have here is a simple bullet / tampon shape that can be easily created using a basic spin. Then the shape has to have threads ‘cut out’ at an angle. My idea was to spin the basic shape, then screw the thread outline and somehow do a boolean difference operation to remove the intersecting areas. I have tried twice to no avail, and figured I would throw this problem out to you before attempting a third try.
Maybe the array modifier combined with an empty object. Set up a partial mesh, use the empty to rotate and translate the mesh into your tapered helix shape. (You haven’t just started working for an ad agency have you?)
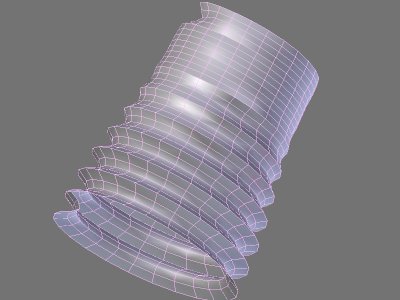
Hopefully this image will clear up my dilemma: What I am attempting to do is cut the yellow mesh where the blue thread mesh intersects. All the yellow area outside of the blue mesh…and all the blue mesh outside of the yellow area needs to go.
Ways I have tried and failed:
Boolean Operations: Even if I make the threads into a ‘cylinder’ with a threaded hole down it’s center (similar to a tap to cut threads)–blender pukes.
The rotated edge profile of both pieces share the same planes… so I have tried to manually edit each profile, then re-skin (manually?) but there must be a better way.
The Array Modifier tied to an Empty helped greatly to create the threads… but as shown above… still stuck.
I have a feeling I am going about this all wrong. Perhaps I am thinking subtraction where I should be thinking addition. Again, any ideas or direction is much appreciated.
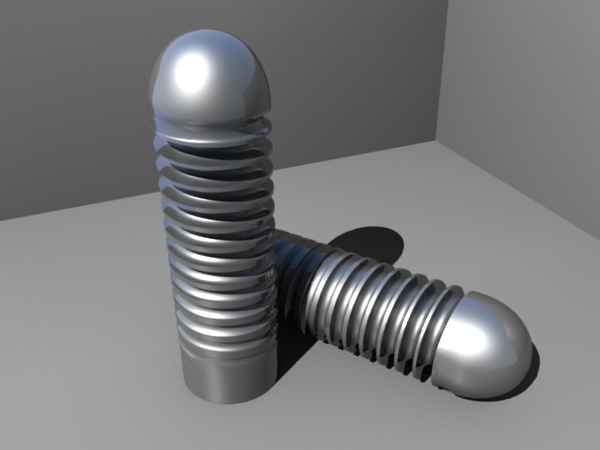
After starting over with the idea of building by addition, I ended up with this:
It looks pretty good, depending on what angle it’s viewed at. I have never had so much trouble with something that looks so simple.
I created the profile of the threads and used an array modifier connected to an empty to spin it 21X and move up in the Z axis so that the ‘grooves’ matched. After I had the basic shape in verts and edges, skinning it was actually not so bad with F > skin faces > segment.
The last part was a mater of creating end caps… and manually sewing them together with tri and quads.
There must be a better way to accurately create such an object in blender. Any feedback is greatly appreciated, as I have 4 more of various lengths to build.
You can make a thread taper with the screw tool. When you model the single thread section to screw, just move the top vertices of the section closer to the screw centre by the amount you want it to taper.
To cut the parallel intersection is a little trickier. I have used the Geom Tool script for adding lead in and lead out profiles to engineering threads. Check my thread tutorial in Part 3 of the V-Roller tutorials.
Modeling with Precision… I like the sound of that!
Thanks the tip… I looked over your tutorial, and it addresses one of the issues perfectly. I look forward to testing out the Geom Tool.
To get the threads to taper was easy enough-- the tricky part is how to have the thread profile change as it builds up the shaft. While the grooves are tapered, the teeth remain level with the head. I am considering using a shape key on the profile and then playing with DupliFrames? Hmmm…
Again, Thank you greatly for tipping me to your tutorial!
I will look into the lattice idea next, good idea–thanks!
Here is the partial results from the latest attempt.
I created a base profile and absolute shape keyed the changes as it moved up the shaft. I then parented it to an empty, rotated and dupliframed to create the thread path edges. Using an great script I found on this thread http://blenderartists.org/forum/showthread.php?t=58593, I then converted the shape shifting dupliframes to new objects. As shown, this creates a precision path than can be segment skinned.
I spent about 6 hours getting to finished piece. The most time-consuming stage was manually connecting all the edges for the thread face. Must be an easier way… but i will look into that next time. VertiLoops issue.
Thanks Pappy! I will keep the lattice in mind. But it looks like it’s tapering the entire thread and body. The dental ‘Implant Schraube’ I am trying to model has a specific shape that must be precise. Note how the edge of the threads are actually level with the body–only the groove is milled on a tapered angle. And there is a special profile to the threads so that the curve at the base is constant. But I will play with lattices next–maybe I can get it tight enough to control what I need.
Funny. I thought this model would take at most 2 hours to build, light and render. Sadly this little conquest has cost me well over 20 hours in trial and error. I now have a process that works… but there MUST be a better way. At least I have tightened up some blender skills.
I keep envisioning how I would build this thing physically. Then using only the tools I know. Now i seek the best way to build such a shape, short of 3D scanning. Blender seems the perfect platform to find out.
thank you, thank you rab! Geom Tool looks to be a much faster and precise way of creating the right verts–much quicker then the shape-key + dupliframes + True DupliFrame Script. I checked out your your website and was very impressed. You see quite the renaissance man. Again, thanks for the direction.
I think this is going to do it! I was experience an issue with not all of the verts being created… but they where, I was just killing them with remove doubles. I zeroed out the Remove Double Limit, and everything worked perfectly. It is a bit of work cutting out the faces I don’t need… but at this point the monkey work is welcomed. Can’t thank you enough Rab.
Hi baden03!
Nice thread and good modeling chalenge!
Here is my attempt (based almost on the blueprint provided). It took me couple of minutes.
I used only Blender internal operations - no booleans or external script tools:
Point extrude
Snap tool
Subdivide
Skin faces
Knife tool for exact and multicut operations
Curve Modifier (circle)
Remove doubles
Smooth
Minor mesh editing
I could try to record a modeling video if this is what you want to acheive.
The basic idea was to model seamless, unwarped mesh of the model first and then to make it cylindrical with curve modifier.
Wow… I would be very interested in seeing how you made that so quickly! The Geom Tool is excellent and and very precise… but there is still quite a bit of clean up to get it finished out. If it is not too much trouble I would appreciate seeing the process you used. It looks like I have burned up all the time set aside for this project… other ones are starting this week. In total there are 4 pieces like this one of different lengths, and 10 other pieces that are much simpler. PM me if you are interested and have a PayPal account.

 What I am attempting to do is cut the yellow mesh where the blue thread mesh intersects. All the yellow area outside of the blue mesh…and all the blue mesh outside of the yellow area needs to go.