Need to render at 300 dpi for the printing office.
How can I do that I can not get it higher than 96dpi.
1 Like
Calculate the size in pixels that you want the final printed image to be and render at that size. Then use a program like the Gimp of Photoshop to set the dpi to 300.
A “dpi” setting in Blender is completely useless, because the Blender rendering is targeted only at standard monitor displays, which will be either 72 or 96 dpi, always.
To obtain your “300dpi” resolution for printing you need to know how big in inches the image will be when printed – multiply those dimensions by 300, then set your pixel size in Blender to match, plus a little extra for what’s often called “bleed” in the printing biz.
Example: the printed image will be maximum 8.5" x 11" in size. Multiply each dimension by 300 and you get 2550 x 3300 pixels minimum image size to be rendered in Blender. Add about 1/8" worth of “bleed” pixels ( 0.125 x 300 = 37.5 ) all around (37.5 x 2 = 75) and you get a final rendering size of 2625 x 3375 pixels.
1 Like
It is just for the printing office I have to delive images in 300 dpi .
I have rendered at 2048x 1536 but it is still 96 dpi.
When I save the image with blender in png format is it then still a vector based image.
PNG is never vector based it is pixel based and the dpi in the file is simply a suggestion for the printing software and can usually be altered by it. As chipmasque has pointed out you need to provide a certain amount of pixels in order to get a certain size of printout.
E.g.: You are supposed to deliver a printable solution of one of your renders. The output is going to be a A4 sized paper. A4 = 21,0 × 29,7 (cm)
For ease of calculation lets assume we are not giving dpi (=dots per inch) but dpc (=dots per cm)
Since your delivery is 300dpis (= 300 dots per inches) 1 dot = 1 pixel. So you calculate your output resolution as pointed out above 21300 = 6300 and 29,7300=8910.
Now you render your result to 6300*8190pixels. The resulting png will be that size and will still have 96dpi set in its header as that is what blender writes into each file it saves.
If the print office cannot change that into 300dpi without resizing the image then open GIMP or Photoshop and simply enter 300dpi in the appropritate place and make sure that your image is not recalculated. (Make dimension in pixels fixed) Save it and the header will say 300dpi.
If you need bleed then calculate that in.
1 Like
then give everyone in the print office a pink slip :ba: . Really, this should be pretty elementary stuff for anyone working with a printer, and if not, then the printer should have enough savvy to help out.
Look guys, it’s extremely simple – the only thing that actually matters when printing a digital image is the number of pixels in the file and the size at which it will print. Using these numbers you can calculate a “dpi” or “dpc” or “dpf” (dots per freckle) or whatever metric goofiness the printer may need or suggest . It’s simple multiplication or division:
pixels per linear inch / measure of printed image in inches = pixels per inch = “dpi”
measure of printed image in inches x “dpi” = pixels per linear inch required at the printed size.
Just make sure you use the same measure when doing the math – width in pixels and width in inches, or depth in pixel and depth in inches, but that should be a no-brainer.
If you look closely at the above math you’ll see that “dpi” is actually a completely variable factor. The same image (i.e., the same number of pixels) printed at different sizes will have a different effective dpi. So “dpi” is only a target, not a hard and fast number that is built into every digital image.
Printers like to use “300 dpi” as a standard because it means they don’t have to think about it too much, it’s a lazy man’s specification. But in truth, effective print resolution for offset printing can range from 200 dpi to 400 dpi and there are few people, even graphic arts professionals, who can spot the difference in a printed image. Many printers doing very high-level jobs like corporate annual reports have said that 200 dpi is a perfectly acceptable resolution because the modern RIP software is so much better than in the bad old days when “300 dpi” was considered a standard.
1 Like
6300 x 8910 it is now a very big image is this still A4 format.
musk forgot that dots per centimeter (“dpc”) and dots per inch (“dpi”) are not the same thing, and mixed up the math by using both centimeters and inches in the same calculations (centimeters for the paper size, inches for the “dots per” calculation). That’s a no-no, like saying that going 35 km in one hour = 35mph.
Always use the same dang units, people!
@antonvdh – what size will your image print? Doesn’t matter what units you use, just gimme the numbers & I’ll show you how to crunch 'em.
Just A4 size.
Solved the problem shrink the size with the gimp the printing office guys says its good now.
Actually I stated in the answer that I’m assuming dpi=dpc for simplicity sakes. Recalculating cm into inches isn’t the easieast as 1inch is only very approximatly 2,5cms.
I just wanted to show how you would go about calculating someting like the size. It’s the math that is important not the units. And I wanted to make clear that what is written in the image has nothing to do with what the actual print will use.
okay thanks for the explanation.
Changing cm to inches is as easy as dividing by 2.54. If you can’t do it on paper (:spin:), use a calculator.
Units are part of the math!
And it does make a difference because it affects the size of the rendered image and hence the filesize as well. If you can render an image at 2575 x 3375 pixels and have it meet the requirement, why then render it at more than twice that linear size and thus more than 4X the filesize? For a full-color image in CMYK format (commonly used for image aimed at print) that can mean a very big file. Most printers don’t appreciate delivering files that bloated, I know by experience.
There is no CMYK support with the gimp.
That’s surprising, given that it’s so popular, but the printer can probably make the conversion in Photoshop. But even in RGB format, there is no sense in rendering and delivering a file that’s twice the pixel dimensions and 4X the file size necessary – it increases render time substantially and can make delivery slower as well depending on the method.
I know that it makes a difference if you use cm or inch but it doesn’t chagne the forumlar
dpu = dots per unit and d=pixel
Conversion: targetSize in u * dpu = source resolution now simply use the unit you have to target. Or to be more precise it is actually
su * 1/u = x
where s is the targetSize, u=units, 1/u = dots per unit If you want to assign a unit to dots then revise the above to su * d/u = xd
Working as a graphic artist and web designer, plus running a print shop, this is dependent on what you print and to which purpose. To help those whom stumble on this thread, here is a simple bit of help.
When speaking about edge blur, the above statement would hold true. Business logos which are deliberately designed to be simple and elegant do not need as high of a DPI 200-400 looks similar in small formats (such as letterheads and business cards). If you are printing a sign or banner, you will see the difference. Though you need to take into consideration how far the finished product will be seen from. Further away, better it looks.
The above statement is false when you are printing a high quality giclée. High end professional graphic artists whom work with diverse color shading know to build images with high DPI for printing.
(Hire Digital Graphic Designers for Digital Art)
(Hire Graphic Designers whom specialize in printed goods for Physical Art)
Minimum and industry standard IS 300 DPI in order for the printer to print effectively. More detail per inch, tighter dots, cleaner printed product. Also, less angry customers whom pay a lot of money for prints.
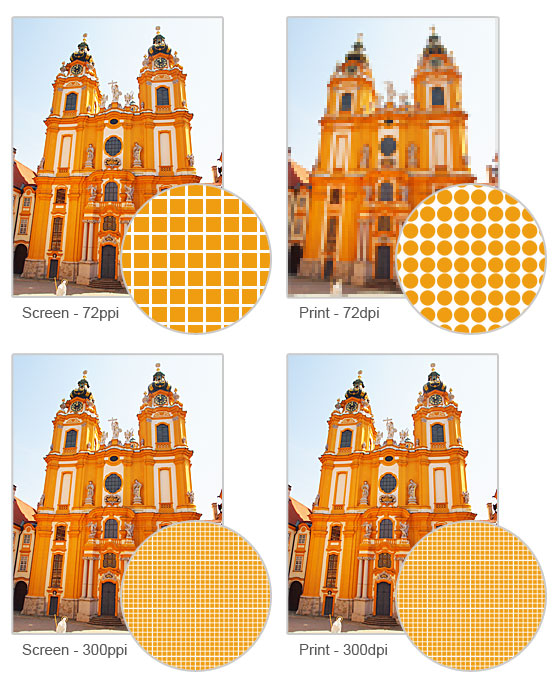
The important thing to know about the information given is DPI is for printing. PPI is for monitor display. Monitors will show images crystal clear at 72 DPI or 96 DPI. Their use of pixels versus dots is as different as apples to oranges. Pixels are “digital dots” on a screen. Dots are “microscopic dots” of color on paper.
It is also important to know that what you see on your monitor in terms of a specific shade of color will almost never be perfectly reproduced an a printer. For an example, Navy blue on a monitor will be a different shade on paper.
You can make bigger images smaller without loosing quality. You cannot make small images bigger keeping the quality. BIGGER IS BETTER when creating. Just remember your aspect ratios.
This is also important for creators. To avoid someone stealing your work, compress and display your art 72 DPI as a 4x6 (288x432) online. If someone steals this and tries to print it larger then a 4x6, they will have a horrible quality image.
Should they purchase the image, send it to them CREATED at 300 DPI with the intended print size - 8x10 (2400x3000) and be sure to add a signed letter of authorization to print at said size with restrictions (else they will buy the image and we will NOT print it).
As for the initial question. Using Blender for 300 DPI and retaining said print quality. Remember, you can shrink and image without loosing quality. Though you cannot make a 2D Render at 300 DPI any more. Download an older version of Blender, or use a simple trick.
The below conversion process will leave your finished work the same physical size. However, the way the software and firmware handle the placement of toner or ink will be more specific and result in a higher quality.
8x10 @ 300 DPI = 2400 x 3000
8x10 @ 96 DPI = 768 x 960
so… try…
- 25x31.25 @ 96 DPI = 2400 x 3000.
- Open in Photoshop and click Image>Image Size “Image Size”
- In dialog box change resolution to 300 DPI and choose pixel/inch from the drop down.
- Make sure "Resample Image is NOT selected. and click OK.
You now have an 8x10 created at 300 DPI within Blender. The printer will now add more dots per inch of the printed material.
For good source material and information including a visual difference in quality between PPI and DPI here are some links I use when teaching new staff. This will cover the basics. To explain everything, I would have to type a book. Good luck in creating!
Google: “visual difference between 96 dpi and 300 dpi” and click images.
https://www.techwalla.com/articles/how-to-convert-to-300-dpi-in-photoshop
http://www.chicagonow.com/the-photo-ninja-blog/2010/10/the-difference-between-72-dpi-and-300-dpi/
3 Likes
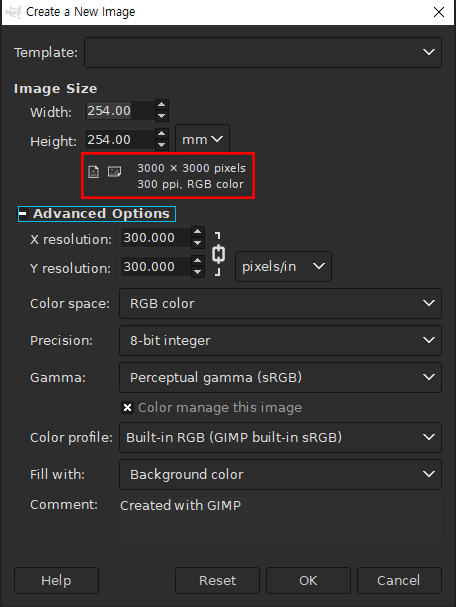
use gimp as a dpi converter
In Gimp, you can check the pixel value by entering the desired size + resolution for creating a new page.
※ Search [GIMPCMYK plugin] for CMYK support in gmp.
Friends, sixteen years have passed and this problem has been resolved.
No one needs to convert DPI in other software anymore