I know of course that Blender has DOF, but since I´ve got a long animation, the only realistic solution timewise- I am afraid - is to do the DOF in After Effects using a depth map.
So I was happy when I found the Zutilz float plugin http://sites.google.com/site/paprmh/zutilzfloat I installed in but when I click on it in the sequence editor and press N, no strip properties pop op??? The problem is the same on my other pc:( I can open all other strip properties.
Can anyone else help me? or does anyone know of another similar plugin? or alternatively, an easy way to DOF, - perhaps a node tutorial to such a shadow map… :o
Agreed. By doing this, you will ensure that the necessary data-set is available in the output file. Provided that you already know that After Effects can properly read and understand that file-format, you’re ready to move on with the remainder of the process that you have devised.
Now, for whatever it might or might not be worth … over the years I have become quite reluctant to use “a multitude of tools” to do what I know that Blender can do. I do use Final Cut Pro to do all of the final video editing, but I do all of the compositing work within Blender because I know that I’m using “the same familiar Devil” for all of the steps involved in preparing the final video that I eventually edit.
So… I personally would do (and in fact, do…) all of the compositing work in Blender if at all possible. Yes, this involves multiple steps.
Yeah, but what effect are you going to apply to that After Effects layer to get your Depth Of Field?
The 3D effects only work with RPF or RLA file formats, which Blender can not generate.
You are better off just rendering your DOF out of Blender as a pass and mixing it in as needed. The DOF calculation, in my experience, is not that CPU intensive and adds little to render time.
In After Effects (CS4 and later, I think) you can do it. Make sure you check the “Zbuf” option for the EXR settings in Blender (in the output section of the render properties). Then, in AE, you can use the “EXtractoR” plugin (a 32-bit plugin) to convert the EXR into a greyscale z-depth image. EXtractoR allows you to set the black and white points, so you can control where the dark & light sections are; or you can use other filters, like levels or curves, to get the z-depth to where you want it.
Once you have the Greyscale z-depth image where you want it, make a new composition with the original footage and nest your z-depth composition inside it. On the original footage you can use the “Lens Blur” plugin (set the “Depth Map Layer” to your nested composition with the “Depth Map Channel” to luminance). Lens Blur is pretty slow, however, and isn’t 32-bit, so if you want to move a little faster (at the price of having fewer options) and/or want a plug-in that is 32-bit, then use the “Compound Blur” filter, setting the “Blur Layer” to your nested composition.
The way that I would approach the problem is that I would not choose to “switch products” at this particular junction, unless I had established that AE was producing better results (or was appropriate due to other factors such as mixing-in other video sources and so on). I would render the components out into MultiLayer (OpenEXR) files and then build other .blend files which performed the post-production passes, each one generating other MultiLayer files as their output, until I had the “final print” MultiLayer file. When you start mixing products it can become quite difficult to make fine adjustments because you spend so much time trying to figure what’s the best way to do it without having one product interfering with the other. I don’t want to have to do too much “debugging,” especially not where I have to “wear two smarty-hats at the same time.”
@benu: Thanks for the tip on the greyscale depth map using Lens Blur.
But we really do not need special plugins or file formats. If you route the Z channel output from the render layers through a Math node set to the Power of -1, the Z-Channel is converted to greyscale (it appears.)
Then you can just use the file output node to get your Z depth channel as a standard greyscale image.
Wow! Thanks for all the good answers!
I tried to dof in Blender(as I have done before) and yes, perhaps it is not so slow, as I remember. But I think there might be an issue about hair particles. I have got a wheat field of particles and when I zoom in, the resolution is not good around the edge where the particles end and another mes is seen in the bacground, but that might be a question of the particles setting, of course.)
@atom: very nice screen shot, I will try to do it in 2.49, hope it works there too…
Cool – I didn’t know about the -1 Power trick. I have used “Map Value” a lot, and the “Normalize” node is good if you’re not animating (it won’t return correct values if the camera is moving, e.g.). One reason en embedded Z in EXR is good is that it is 32-bit, which means you have more options for fiddling with it in AE later on.
That said, I should admit I prefer to do the DOF in blender wherever possible.
The only thing I’d note about Atom’s post is that, when I’m doing “combining stuff together” work like this, I am working in a new blend-file and reading previously-generated OpenEXR files as the inputs. I want to get all of the component inputs “clean and saved,”then deal with the “mix-down” into the final product… a procedure which once again might involve intermediate files. Most of the actual production work is mixdown, not rendering.
when i use the depth pass here’s i set them up, it may not be the best way but its been working for me. i connect the the z out to a normalize node and then i hook that into the color socket of an invert node(because this will get the depth pass to look like they would in other 3d apps) and to get it into after effects i set up a file output node to generate my image sequence (i always use pngs since OpenEXRs can take a lot of space, or least they did in all my tests that ive done with 'em)
when i import the depth pass sequence i use the lens blur effect for the depth of field blurring, the results it produces are really good.
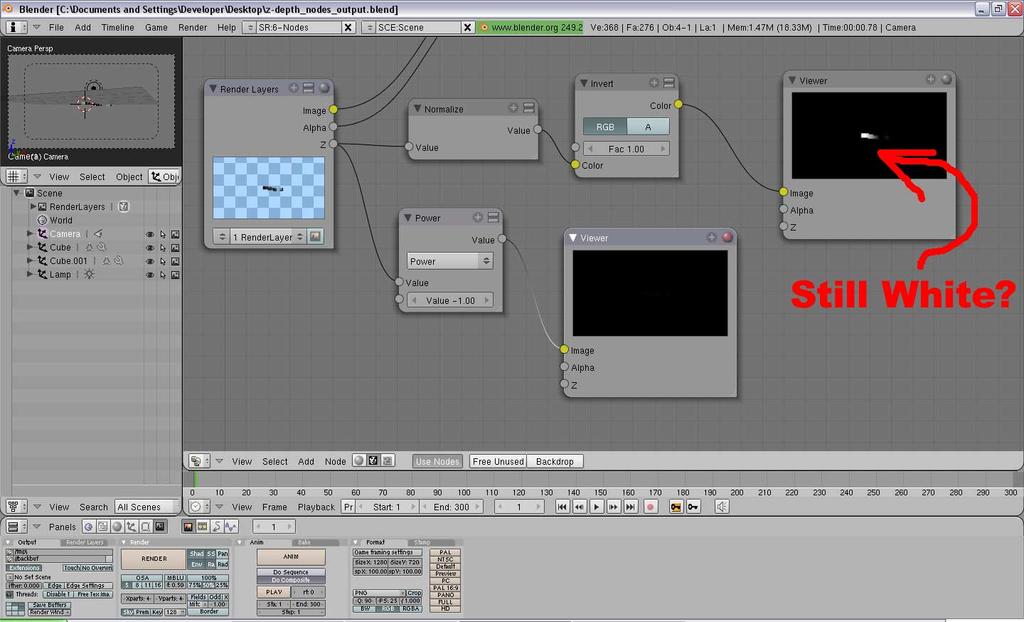
I tried out snowcovered’s technique and provide a 2.49 scene with the node setup compared to my power -1 setup.
From what I can tell, neither of them actually works correctly. Take a look at the pictures. I assumed that as I zoomed the camera back from the objects that they should fade in greyscale. But this is not the case.
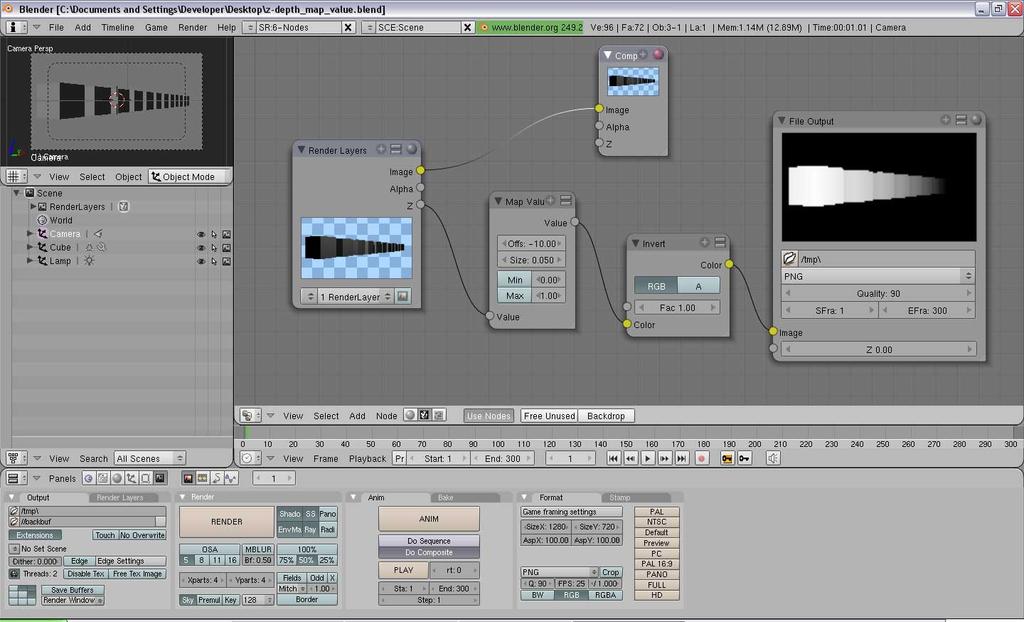
The “Map Value” node will give solid results when things are moving (as opposed to Normalize or – it seems – the -1 power method, which dynamically adjust the image depending on what’s in it), but the settings can be difficult to manage IMO. Here’s a screenshot of a setup that allows you to control on both ends of the z-axis (blend also attached):
What’s nice about this is it exists entirely in relation to the camera – it doesn’t care how far away objects are, what values are being returned, etc.
However, I’ve found this clumsy to animate, so I don’t use it much, though I like the results for stills. For animating scenes (where the camera’s focal distance changes) using the “defocus” node to adapt dynamically to a DOF object for your camera is effective, or send out a 32-bit z-depth image (exr, for instance) and use the post-process I describe above in AE.
Thanks again for another lesson in nodes. I took benu’s map value and snowcovered’s invert and came up with a solution that seems to work for my needs. As the camera move away from the cubes, they now fade in greyscale value as they should.
As a thread starter I have spend much time on this matter. I am trying to learn the method explained in the last post. And I hope that this method will be a success. After having worked a lot with Blender defocus in 2.49b, I must conclude that there is one good thing about it and one bad thing:
the good thing is that is is actually not that much of a time robber:) It increases render time but in most cases not that much actually.
the sad thing is that it does not provide a professional quality:( It bleeds from weird places and somehow takes on an ugly appearance. Even with the best node settings and rendering full HD. If defocus is to be of any value to me, it should at least be able to manage an over the shoulder shot, where the “shoulder” guy is blurred out, and the person sitting next to this guy is in focus/crystal clear. In between them there may be a table with a candle or a bottle.
Well, even with the best setting this kind of scene does not work out well with defocus. At first sight the rendered images look fine, but when one starts to scrutinize the objects, one sees that there are a lot of mistakes as far as DOF is concerned, and I I doubt very much that a commercial client would accept it:( but I will try the workaround
I’ve found that enabling “Full Sample” with the Anti-Aliasing works WONDERS for DOF effects. For some reason the z-depth pass looks nasty without Full Sample turned on.
As a matter of fact, I always use 256 samples…, well I just made a new render and this time the DOF was very fine looking, I think that it appears as though there are some scenes that dont work out well with defocus, and others which actually DO. I will upload one of these days 2 defocused pictures(one beautiful “doffed” and one ugly “doffed”)…, and perhaps someone can then explain to me what might cause the ugly one.
@ atom: when i upen your last file z-depth_map_value_works!.blend and press render, it renders the picture in the box “render layer” to the left and NOT the picture in the box to the right called FILE OUTPUT(in png) But this is what I want to render of course- so how do I fix this problem?