Hey Guys! I’m pretty excited about this render and how it turned out:yes: I really tried to push Blender and the internal renderer to try to come up with something simalar to what you might see done with V-Ray scatter and 3dsmax. I just cant get enough of Blenders instance processing/rendering possibilities. This work is in preparation for a tutorial I’m going to be posting in the Blending Nature thread in the WIP forum called Part 3 Terrain Small Vegitation .
UPDATE Revised Shadows and color corrections very subtle per Michalis suggestion:yes:**
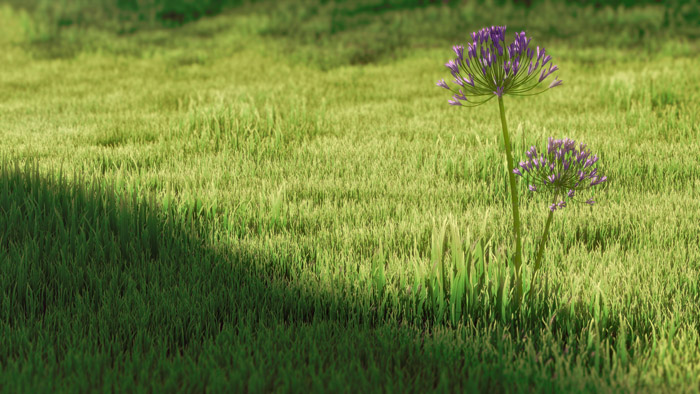
This scene is 27 million faces, two particle systems (using 18 core grass blade objects) and 3 weight paint vertex goups. Fairly simple lighting and AO. Everything utilizes translucency. It took 1h37min to render at 3840x2160 resolution:eek:.
This has also probably been my most complex compositor setup. I wanted DOF to blur the forground as well as the background which the standard Defocus doesnt do. So I searched the web and came up with a solution. Also had issues with the flower and its transparent petal textures with DOF so had to do several render layers which worked great:)
Hope you guys like it and get that warm sunshine feeling haha!
Very nice. I sometimes create custom depth of field setups as a post process in Photoshop, using layers masks, for the reason you mentioned. Its got its limitations however, so your method is certainly better.
What will be interesting is, after you complete your tutorial (and show us how to set up a scene like this), figure out how to render it in Cycles. I’m a total Cycles fan/maniac/nutcase so anything nowadays I see being done in Blender Internal, I immediately think, "Oh hey, lets go do it again…IN CYCLES!!! :evilgrin: "
Very much looking forward to the tutorial, and on collaborating on a project. I’ll PM you
Thanks a lot everyone I had high hope for this one:) Joshua is right for now…I still feel Blender internal is the way to go for realistic exteriors with lots of vegitation. On the other hand Cycles is already amazing at internal renders and product rendering. I too am a bit of a BI die hard but change is good and thats how we push our self to be great:)
I’ve never done grass or scene with comparable poly counts, but I have some general observation to share that I only recently noticed.
When the sun is behind the grass, backlighting it, the grass appears a lot more greener. If you stand at a big grassy place. and look at the grass, you will see that the grass on one side is greener than the other side, depending on where the sun is.
You may already know this, and rendering this with translucency may be overkill even if possible. This was just something I thought was worth sharing.
Excellent work. Bravo.
DOF issue in BI, I know what you mean. To edit the dof mask isn’t the best but all we have.
You probably noticed a cycles setup for grass? Of course DOF is much better there, excellent I could say.
@DerekG1080 thanks for kind words.
BTW I forgot to say that this could be a gallery stuff.
The weak point here (just saying) its this ochre like halo effect in the front shadow casting.
Just a Ps touch, what do you say?
Please click to view, the blenderartists engine for thumbnails discards color profiles and adds a horrible sharpening effect.
@Draguu - Again hearing good words from another excellent cg artists means a lot. I’m trying to develope my skill as much as can, I’m glad to hear its paying off:)
@Michalis I like:), could you tell me what you adjusted in PS? I only have GIMP, but I’m sure I can probably make the same adjustments to the high resolution original.
Great job! my only complaint is that the grass looks too uniform on the bottom left, and the black underneath makes it look fake, because there is no way there would be that much shadow. I don’t know how to fix it, but IMHO i think hair particles are the way to go with grass. It does look very good except for those two things.
@DerekG1080
Select by color, choose the bottom left shadows area. I used saturation panel in Ps (ctrl/cmd+U), greens, selected this ochrebrown greenish hallo-like there, made it a bit greener. Gimp has similar tools.
@ michalis - I see now, I’ll work on the shadowing area a bit and repost. Also I think I might change the ground surface color and make is a bit brighter and possibly use a “Grass Thatch” type of image texture just so it will help avoid and black spots and add a bit more realism. Right now it is just a dark dark green color. I will still do some post processing with Gimp using the technique you described:)


