Ok, I sculpted this in tris, I know need to change to quads, and alt+j isn’t going to fix all that. So I plan to retopology this. This mesh is extremely detailed and I know reducing the polys and just using a subsurface modifier will make weight painting smoother. I know retopo-ing with proper loops for facial expressions will help too.
Even so… I don’t need this creature to make complex expressions. If there’s a way to -smooth- weight-painting somehow I think everything will be just fine, since I just need to pose this thing for reference anyway, and want to learn more about weight painting before I move on.
Question 1: Is there a way, if we’re going by color, to paint only green/yellow, etc. intensity, rather than intensity that stacks when I overlap verts with the brush? If I overlap an area I have already painted, even one vert, then the intensity stacks and I can’t get an even gradient. Going so delicately is going to take forever if I want a smooth transition in intensity.
I know, simple low poly meshes, with subsurface modification and bump maps/baking will produce meshes that animate better and take up less space, I’m just curious about what I can get away with.
A smoother, more rounded mouth as it opens would look better. Another thing I’m not sure about is… should I even be adding a jaw rig like this? I haven’t gotten to facial rigging and expressions yet in my learning… just kindof doing research as I go. Would mouth opening and all that stuff be a different area than skeletal bones? Sorry, total newb!!
I might be using the wrong terminology! As I said, I am completely new to Blender, even though I am able to make some pretty models because of previous artistic practice, I’m jumping from 2D art to Blender and learning as I go.
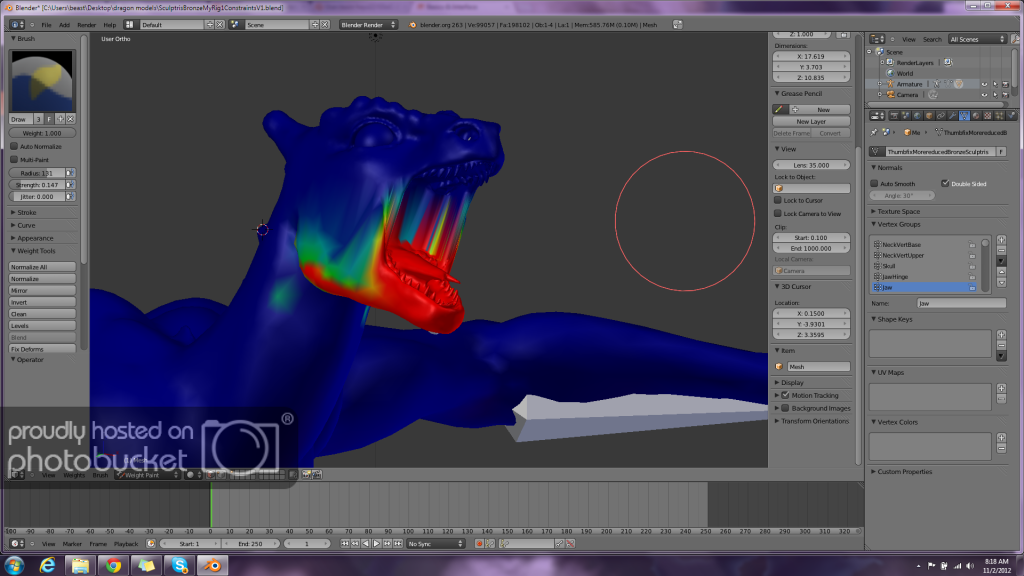
When I assigned the mesh to the armature, the automatic weights weren’t quite wise enough. (I understand this is common.) The jaws and teeth were following the opposing bones in the head, when I opened the mouth, and a little cleanup was necessary. Areas I increased the influence of to red are now fully assigned to the proper bones, however, because there are so many vertices in the face, it looks “hairy” when I overlap weight for both bones. That’s the best way I can explain it, and I’d love to make a video but I have more important things to take up my time than troubleshoot why my screen-capture software isn’t working right now.
All I want to know is, is there something in the interface for weight painting that I don’t know about that allows smoothing or a solid intensity level, rather than intensity that adds up every time the brush goes over the same vert? If not, no big deal, I will retopology my model and use another method to have details like wrinkles around the mouth.
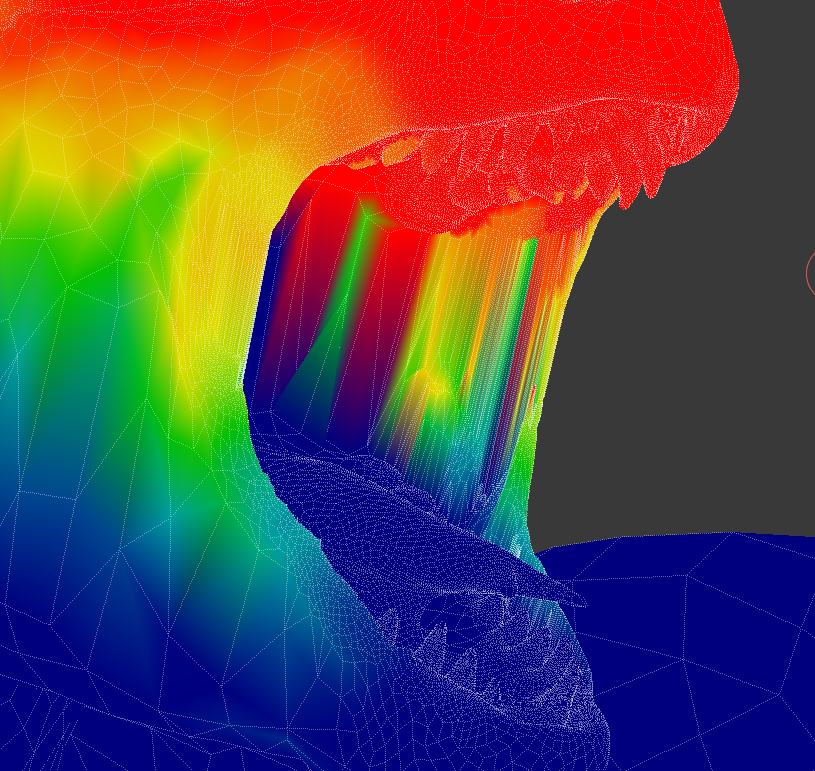
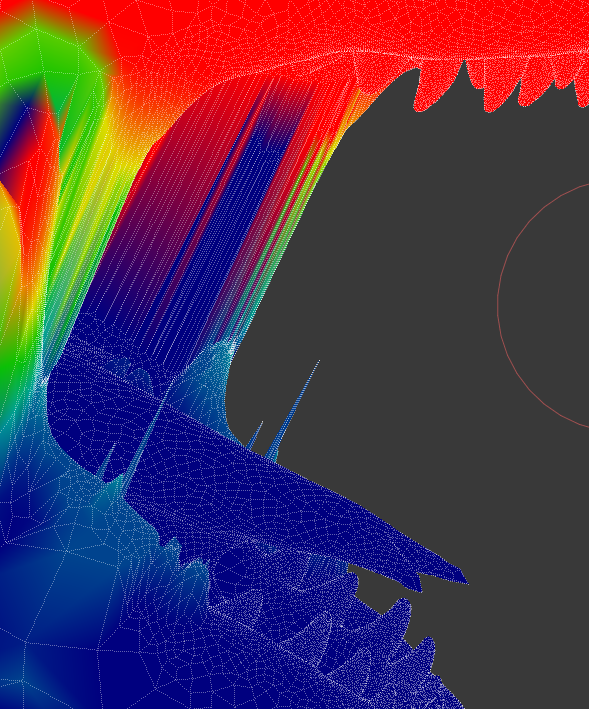
As you can see here, the complexity isn’t getting along well with weight painting, and it always becomes choppy, no matter how cautious I am. The only time it’s smooth is while the automatic weights are left alone, but this is one of those times cleanup is needed. If this is one of those limitations because this is freeware, that’s cool, just want to know if it is or not.
Any tips about weight painting, tips in general, and corrections to my terminology would be greatly appreciated.
Blending between various weights can be done with the Blur tool. It is finicky, takes a while to get used to, but can be very useful.
In the Object Data>Vertex Groups panel are a number of tools for selecting vertex groups and assigning specified weights to selected vertices in a particular group. This can be very useful for “cleaning up” some the auto-weighting errors.
Vertices sharing weights with a number of bones can be problematic (but also necessary sometimes) – in the Properties panel (N-KEY in a 3D Window) the weights assigned to the active vertex (last-selected) are displayed and can be reset vertex-by-vertex and bone-by-bone if necessary. Best for troubleshooting and fine-tweaking.
A dense base mesh can make make vertex weighting problematic, easier to get a good distribution of weights (and smoother deformations) if you keep the mesh as lean as possible in terms of mesh loops. Your base mesh may look very low-poly, but Subsurf can smooth this all out and does an great job of keeping the weights properly assigned in the high-rez render-time model, much better than you can do with any kind of weight assignment…
Thank you so much! I will look into the Blur tool, and see how far it gets me. And thanks for confirming me too. I edited my post with more info just before I saw your response here, as I thought an image would be helpful. As you can see… it is very dense. For the version I animate with, I’ll use a subsurface modifier, learn more about retopology, and bump-mapping and other things for texture like facial wrinkles. Still, I’ll give blur a try, and mess with it some more. I’ll settle for any imperfections in this model, and use it for 2D art reference.
Learning to use loops and quad mesh architecture is a huge bonus! It makes for much cleaner deformations and your base “cage” mesh can be quite lean yet still provide for much detail. When planning things like facial deformations, use of proper quad topology is critical. It takes some time to understand how it all works, but it’s worth the effort. A well-planned quads-based mesh is also easier to rez-up with Multires for sculpting and eventually baking normal maps, etc. The Sculpt tools in Blender seem to respond better to quads.
Well, we can definitely consider this a resolved case, thank you again. I just wanted to update with a final screenshot.
This is by no means an excuse to get all complicated, I totally get where you are coming from. In this individual case, having sculpted a mesh in Sculptris like I did, and needing something quick, and the blur brush setting did serve a useful purpose. I had no idea what I was looking for and still feel a little like I’m trying to fly a space-ship and have no clue what anything does, but tip by tip I find my way. THANKS!
When one model and rig a head, you do that with mouth closed. That way when you open the mouth you can control the jaw muscle stretch. Making mouth open means you need to compress jaw muscle. That is not easy to do.
Also in head modeling / rigging, one creates sets of meshes that is not connected to main head mesh; separate jaw / lower denture, upper denture, tongue, and eyeballs. You need to do this for weigh painting. Each part can be made to show / hide as you paint. This is a must for head model with mouth closed. It is next to impossible to paint mouth cavity from outside, even with mouth open. As you found out.
Yeah, I see what you mean about it being harder to control the collapse of a mesh than the expansion. Those weren’t the pose I sculpted it in. It was after I opened the mouth to demonstrate the influence of the weights. But I did have to have the mouth cracked when I made it, enough to do the teeth. Right now, all I need is for the mouth to open and close, because I’m not animating, just using it as a model for study. But I was curious if I should take out the jaw bone, and just use the special facial rigs for expressions. I just haven’t gotten that far. I’m sure I’ll have more questions about that when I make a mesh with proper loops and want to animate expressions.
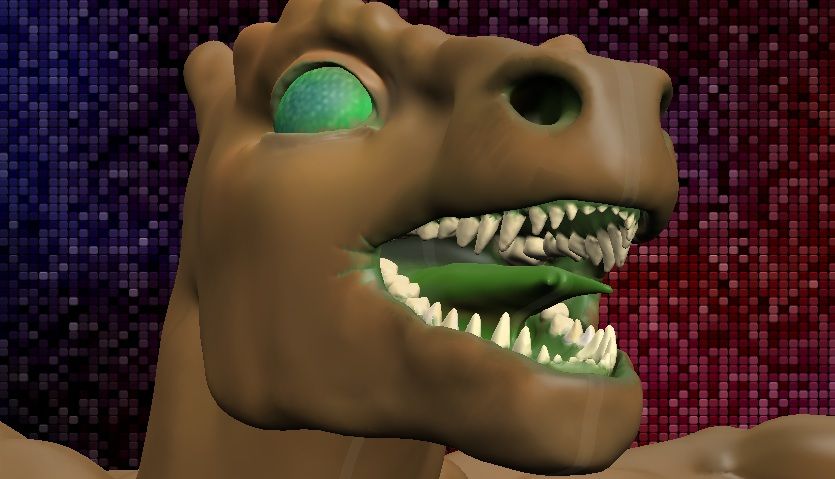
This is a painted version of the mouth I did just to try out the painting feature in Sculptris. This is the model’s normal pose. I don’t really know much about dentures yet. I also suppose I could have closed the mouth after doing the teeth, before exporting to Blender.


 And thanks for confirming me too. I edited my post with more info just before I saw your response here, as I thought an image would be helpful. As you can see… it is very dense. For the version I animate with, I’ll use a subsurface modifier, learn more about retopology, and bump-mapping and other things for texture like facial wrinkles. Still, I’ll give blur a try, and mess with it some more. I’ll settle for any imperfections in this model, and use it for 2D art reference.