Mouthy - My project to learn Blender

Hey Gang, this is my first time using Blender… well, any 3D software for that matter.

Let me introduce myself first (you can skip this, just thought intros were nice):
Professionally I am a Graphic Designer and Art Director, but I like to do a little bit of everything in my spare time (illustrate, animate (2D), “code”, build things, etc… and now “3D” I hope). I remember seeing some stuff about Blender a couple of years back and needed to drop some 3D type into something that I was experimenting with… so I downloaded Blender! Woo! …and proceeded to get lost. I got the 3d type down pretty easily, but as most seem to… I got hooked. I also concepted and Art Directed a 3D animated TV spot (unfortunately, no, not created with Blender) which only further sparked my interest. So I have been watching some tutorial videos here and there, and starting to teach myself. I recently grabbed two Blender books as well to start chipping away at.

Now, the work:
I wanted to start a project that I could do from start to finish to try to get a decent grasp of several key features of Blender. I know from experience that the best way to learn is to do. So I plan to model/sculpt this character, then retopo him, then texture, then rig him, animate him, then either composite him into a camera tracked footage or build an environment to interact with, and finally do some compositing and fixing before rendering out the final video. I know this can be a daunting task, so I forced myself to make this thread so it is public and staring me back in the face any time that I am lazy.

So here is some of what I have done so far. I am going to be throwing up random images and videos of my progress along the way here. I know some things that I have already done wrong, and I hope to make lots of mistakes along the way, because that is the best way to learn.

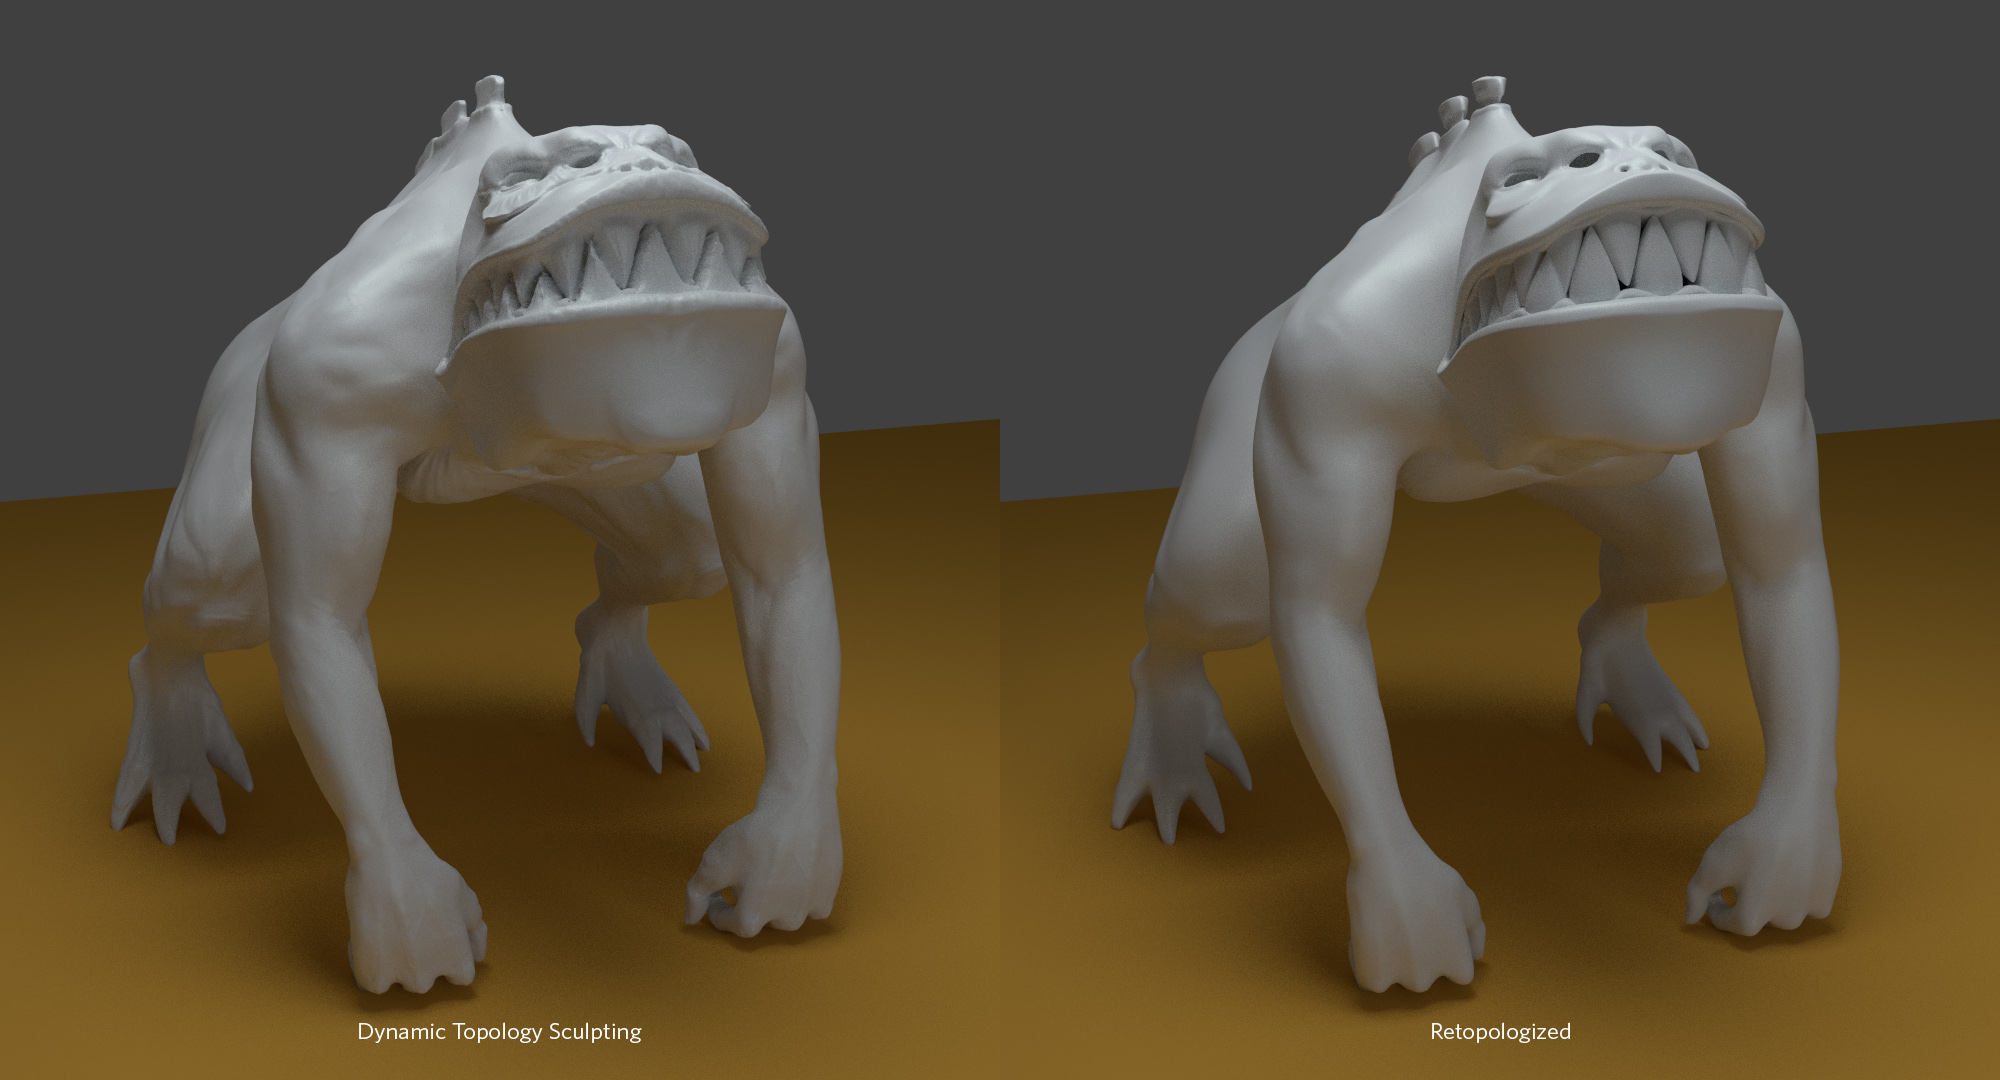
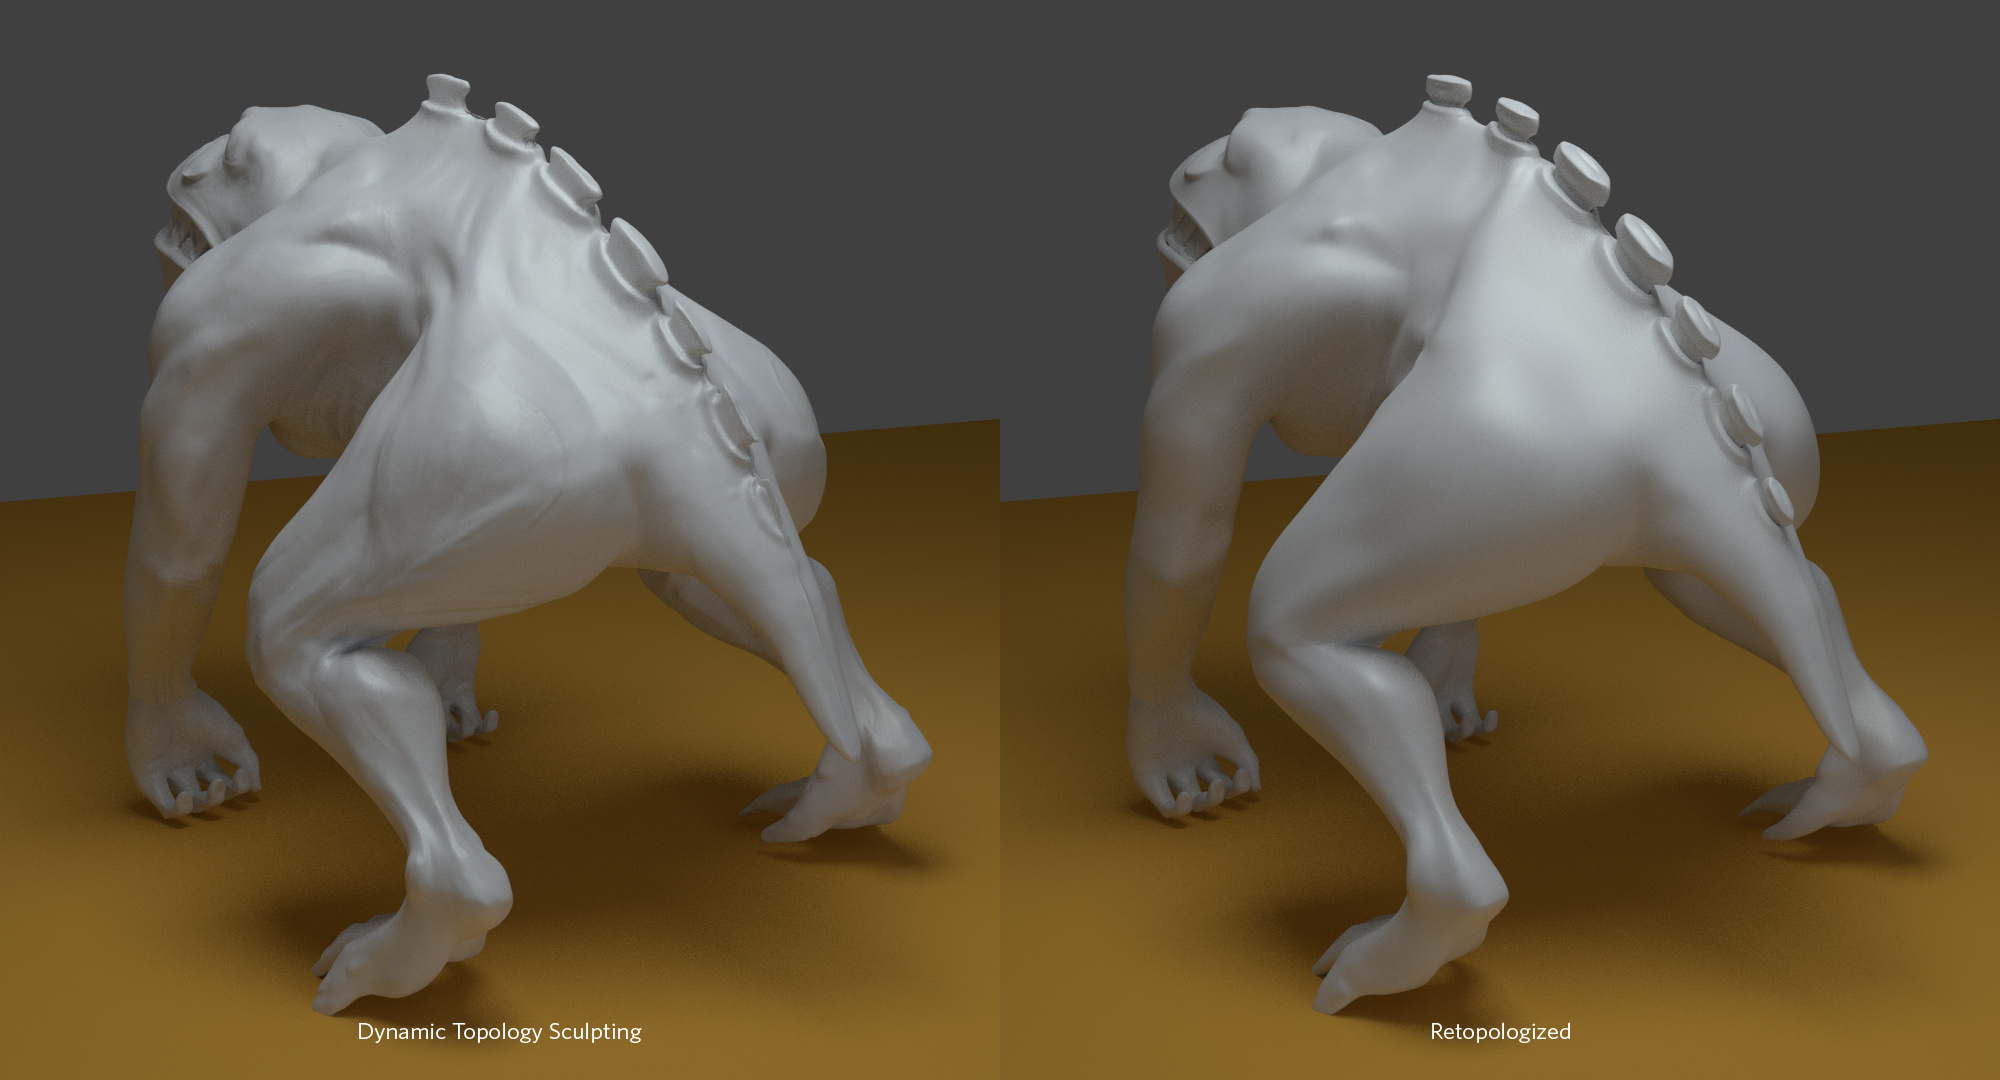
Here he is so far as an overall sculpt:


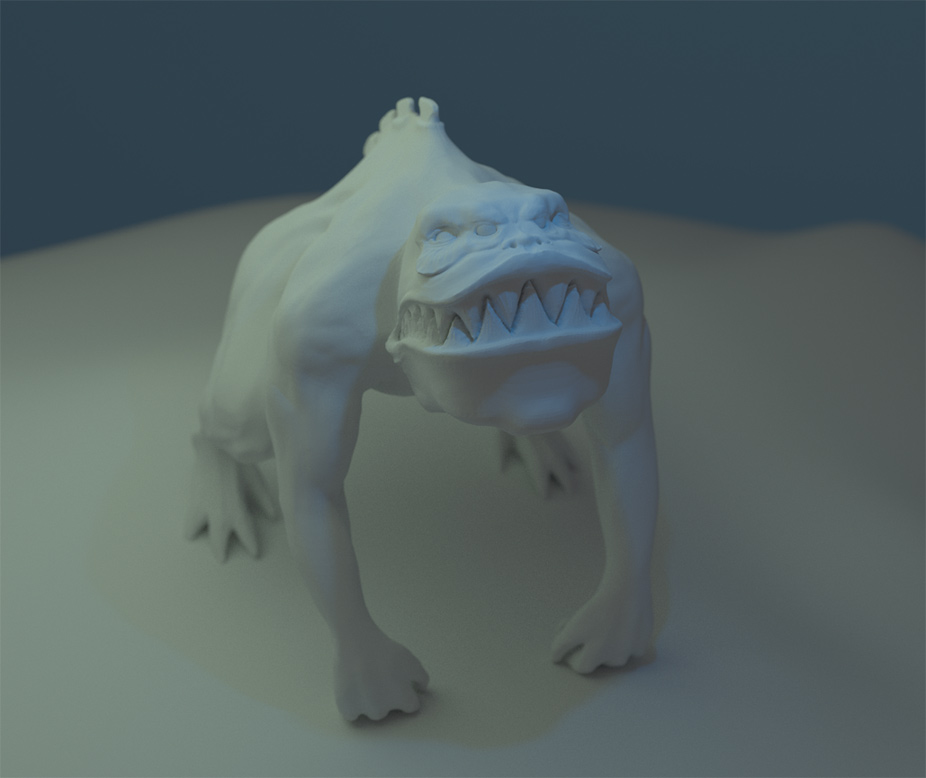
Here is a 360 vid (sorry for the poor lighting across the board):

Here is a very random screencast of me starting to sculpt in the details of his hands:

Oh, in case you are wondering why I put this here… 1) Just showing some of the detail I am adding (you might have to pause it) and 2) because I just learned how to screencast (something new to check off my learning list).

So I am currently sculpting away from my original modeled mesh and am going to keep chipping away at that.

Very nice work. It is great for everyone and especially a beginner. I really hope to see it finished, good luck.

looking good, keep it up.

Thanks guys, I hope I can keep working along and not fall out. It is tough to stay motivated and manage your time when you have a full time job and other commitments. I will try to update this as frequently as possible.

I am really digging the screencast feature, it is a really cool way to show work/progress. Unfortunately because of the immense detail of the sculpt, every once in a while I get a little hang up for a second in blender and every time that happens the screencast stops and I have to restart it. Oh well.

Here is another. Hopefully I will have more to post tomorrow.

I think I have finished all of the main sculpting and muscle type detailing, attached below (view fullscreen - 1080p):

I plan on baking the normals of this sculpt to a low poly re-model I will be working on next. I want to eventually have some skin texture throughout his surfaces (pores, small bumps, etc) is this something that I should be sculpting now (as in sculpt it with a texture brush and bake it with the overall sculpt) or is that something that I do with an image texture later in the mixing of nodes/shaders?

Like I said, this is my first time at this and although i have some general knowledge of the workflow I will need to follow, I do not know the exacts of everything…

Thanks!

*bump

Any help? Incase you didn’t see the post above, I have sculpted all the major geometry and details… but I will want to add some skin texture (pores, bumps, etc). Should I be sculpting it on the model above to normal bake it all together? or should I be using an image texture later in the node set up and mixing it in then?

Sorry, like I said, I am still green and not sure of the best way at it.

It depends a bit on your computer. I believe you will get better results if you can sculpt those details and bake them, as long as you don’t mind having a really big image file. But some of us (cough) can’t manage enough subdivisions to do things as fine as pores. On the other hand, there are advantages to mixing in an image: smaller image files and the ability to control the mix. So…12 of one, half a dozen of the other? Maybe a slight advantage to the sculpt option.

It’s looking good by the way.

Thanks a bunch. I don’t really think my machine is an issue, I probably have processing capacity past my ability. I think I might try to do two versions, maybe bake one as it is and try mixing texture later with nodes, and then another bake that has sculpted textures that I add to this sculpt so that I can use either one depending on how it turns out.

Thanks again, this will be a large learning curve for me.

You can sculpt out the ‘big’ little details. I wouldn’t bother on pore size stuff. That’s definitely easier with textures. Although, clearly some else disagrees with me. There’s certainly no problem sculpting that small of stuff, but it’d probably be easier (can’t tell exactly what you’re talking about) to use normals.

I wouldn’t say my opinion is strong enough to consider it “disagreeing” with you. I said maybe a slight advantage. More a shrug than a disagreement. I’m just as inclined to go with a painted texture. In fact that’s exactly what I’m doing for my current project. I just feel like it sure would be nice to have a beefy enough computer to sculpt those details. :stuck_out_tongue:

Well, I used disagree without a better word (with the .5 seconds I was looking for one). But also, just because you can handle it, doesn’t mean you should. Just because you can add real grass on that mountain 5 miles in the distant, doesn’t mean you should. Obviously, that’s an over-exaggeration, but you get my point.

Hey this is coming along just fine. It’s funny because I did actually see this a while ago but I was waiting until you got farther. Overall, the character is really weird looking… In a good way. It’s odd making comments on a character that’s not based anything from the real world. But anatomically it seem like it could work. :wink: As far as the detail workflow, normally what you would do is make a general sculpt of the overall proportions. Then you retopo it. So then you can take that new model and sculpt in the details. But… don’t forget to UV map it first. You can either bake those details into a normal or displacement map… or both really. The normal map should be better for capturing ultra fine details like pores and wrinkles.

However, you have already taken the time to detail out the model so you’ll need to modify that workflow a bit. Just retop, UV map, and then bake from the high-detial sculpt onto the new retop model. Make sense? I’m actually in the process of doing the exact same thing. So, your next step is to retop the sculpt.

By the way, this is probably the single best tutorial for doing exactly this whole process and it really helped me out a lot:


can’t say enough good things about it.

I expect to see progress soon! Good luck! :wink:

Thanks everyone, I will consider it all as I continue along.

Thanks, I was trying to make something that was unique, weird, and slightly stylized, while still being realistic enough that I could have the ability to drop it in some tracked footage without it looking too cartoony and out of place (if that is something I end up doing with it).

It’s funny that this tutorial exists, because it seems to outline exactly (more or less) what I am doing (even down to the quadruped-type monster, haha). I think I will have to grab it to help me along, seems like if could be a really good asset for me.

I know right?! If you end up liking this one, just about other Kent Trammell tutorials are worth watching. The thing I really like about his tutorials is that he goes through the whole process and at the end, what he makes looks amazing. He shows you every little detail and every little process no matter how long it take (via time laps when needed). A lot of times the tutorials I see are like, “I’m not going to wast your time making this look cool but you get the idea.” No, actually you are wasting my time by not showing me. :wink:

Anyway, one thing I was thinking while looking at the model is that the teeth kind of bother me. They are a little cartoony. When you get around to the retopo, I would remake them as more realistic teeth with gums and all. You’ve put so much energy and creativity into the rest of the model it seems a shame to just leave them as big triangles in the mouth. Does that make sense?

Yea, I actually just really roughly sculpted them so they were there. I was planning make them a separate object, same with the bone/spikes protruding on the top of the back. So yea, they look pretty flat and have some weird geometry right now, but hopefully when I retopo the rest of him and then add in those objects again it will look a lot better.

Thanks again.

Been a while since I have touched this project… I have been busy after switching jobs about 7 months ago now (wow, time flies).

Anyhow, I got around to finally retopologizing it, still have a bit to learn, but I think it will serve it’s purpose. Obviously I lost some of the nice little details that I sculpted in, so from here I will unwrap the mesh, bake out some textures (AO, Normals) to use for the materials, sculpt out some of the imperfections, and then add in a multiresolution modifier to sculpt some details back in. I think that is the right order to work in, right?


Don’t sweat the small stuff…well, not really true but for a learning project you shouldn’t get too crazy with detail as you are just getting going. That’s my take anyway and I’m in the same boat as you. Doing a large project for a newbie to learn…not get it all perfect first time out of the box.

Thanks for your nice intro…I wish more folk did them. (smugly) I did one. :slight_smile:

Love your work so far. Nice design for the creature. I really like the cartoony teeth. I would have gone even more so…just cause its fun.

Keep’em com’m.

J

Very cool! The first thing that drew my attention was the teeth. Like James_Z said their comic look is cool, quite a reminder of the “darkness” comics to me - I loved those.

Hey Guys, thanks for the comments, I wanted him to be aggressive looking, but with some exaggerated features (like the teeth and jawline, obviously this guy is a biter).

Attached is my first pass at very rough materials and more detailed texturing - The materials still have a long way to go and only the skin is textured - none of the other elements have real texture or materials.

Obviously the lighting isn’t ideal, I will tweak it next time that I do a render

Looking good…can’t wait to see your polish.

-j