Dicer - a blender slicer for 3d printing.

Here is a .blend, blender_slicer.blend (669 KB), with a script in side it … if you click run script it will slice the monkey twice.
It uses a new function called bpy.ops.mesh.bisect() to do the slicing, if you dont have bisect in your mesh tools ( edit mode tool bar)
Then grab a more recent build of blender from http://www.graphicall.org/

Im having trouble using bisect() more that twice in a row, basically if i call it more than twice it just uses the
very first values I gave it every time its called … giving me lots of slices that are all identical.

Can any one help me out?

and would anyone like to join me in writing this slicer?

PS here are some links of intrest
http://developer.blender.org/T37254
http://www.blender.org/documentation/blender_python_api_2_69_1/bpy.ops.mesh.html
http://wiki.blender.org/index.php/Doc:2.6/Manual/Modeling/Meshes/Editing/Subdividing/Bisect

2 Likes

Just for the records, here is a code that works:

import bpy  
scn = bpy.context.scene

objToSlice = bpy.context.active_object.name

for i in range(0, 5):  
    bpy.ops.object.duplicate()
#    print("->", bpy.context.active_object.name)
    bpy.ops.object.editmode_toggle()
    bpy.ops.mesh.bisect(plane_co=(0.0, 0.0, i/5.0), plane_no=(0.0, 0.0, 1.0), use_fill=False, clear_inner=True, clear_outer=True, threshold=0.0001)
    bpy.ops.object.editmode_toggle()
    scn.objects.active = bpy.data.objects[objToSlice]
    # Note: Edit mode toggle works on *active* object, but duplicate op works with *selected* objects!
    #       So we have to be sure active object is the only selected one as well.
    bpy.ops.object.select_all(action='DESELECT')
    scn.objects.active.select = True
#    print("---->", bpy.context.active_object.name)

The issue was that duplicate affects selected objects, while editmode affects active object. So after the bisect in edit mode, when back in object mode, you have to reset the active object, but also the selection states (you want your first “slice” object to be deselected, and your org active object to be selected). Else, you would duplicate your first slice, and then bisect() for the second time your org object (this explains why it looks to work up to 2 loops)…

and a bmesh slicer:

import bpy
import bmesh
from mathutils import Matrix

scene = bpy.context.scene
ob = bpy.context.object
me = ob.data

bm = bmesh.new()
bm.from_mesh(me)
#bm.from_object(ob, scene)
bm.transform(ob.matrix_world)

#bmesh.ops.triangulate(bm, faces=bm.faces)

cut_verts = []
cut_edges = []

for i in range(-10, 10):
    ret = bmesh.ops.bisect_plane(bm, geom=bm.verts[:]+bm.edges[:]+bm.faces[:],
              plane_co=(0,0,i), plane_no=(0,0,-1))
    
    cut_verts.extend([v.index for v in ret['geom_cut'] if isinstance(v, bmesh.types.BMVert)])
    cut_edges.extend([e.index for e in ret['geom_cut'] if isinstance(e, bmesh.types.BMEdge)])
    
    
    """ TODO: fill layers
    ret = bmesh.ops.holes_fill(bm,
              edges=[e for e in ret['geom_cut'] if isinstance(e, bmesh.types.BMEdge)])
        
    ret = bmesh.ops.triangle_fill(bm, use_dissolve=True, normal=(0,0,1),
              edges=[e for e in ret['geom_cut'] if isinstance(e, bmesh.types.BMEdge)])
    
    bmesh.ops.face_attribute_fill(bm, use_data=True,
        faces=[f for f in ret['geom'] if isinstance(f, bmesh.types.BMFace)])
    """


bm2 = bm.copy()


for e in bm2.edges:
    if e.index not in cut_edges:
        bm2.edges.remove(e)

for v in bm2.verts:
    if v.index not in cut_verts:
        bm2.verts.remove(v)

bm2.to_mesh(me)
ob.matrix_world = Matrix()
me.update()


Ok wow this is moving along quite quickly
Thanks for all your help guys, as Im sure you can all tell from my code i dont really have the skills to do this myself!

so we have two solutions … which one is better at getting to our end goals.
lets keep in mind the goals of this slicer.

  1. We dont bake the hole model into g code all at once , instead we stream the slices in to g code as we need them during the print
    of course bake can be an option later but streaming the slices real time allows the computer the printer to share time ( the slicing computation can happen during the same time the actual printing happens) This makes for a printer that starts immediately after clicking print
    and alows the user to change any part of the printed object that has not yet been printed.

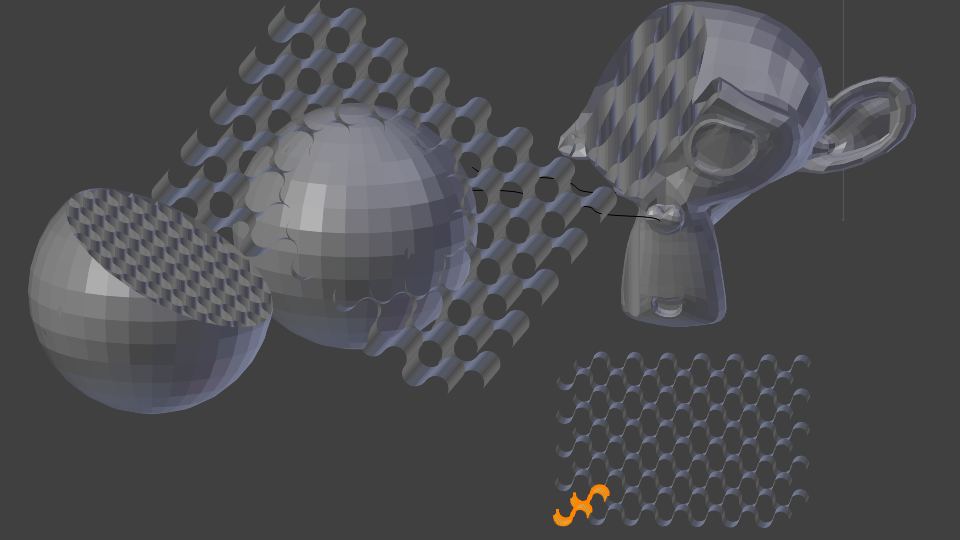
  2. fill can be created by using a Boolean op between the model to be printed and a big block of infill material

  3. We will detect faces with normal’s near (0,0,1) and raster them to prevent the slicer from missing them completely.

  4. Evan tho our end goal is a wav file, we will leave g code as a step in the tool chain so that blender will be
    able to slice for all 3d printers and so that all slicers can slice for the peachy printer.

Ive asked James to describe in detail how the blender slicer functions will talk to ower Gcode encoder and our Gcode to wave encoder functions.

Here is what he wrote:

“”"
Interface between Blender slicer and Peachy Printer

The Peachy Printer works by drawing one layer at a time, each layer on top of the other. The software that drives the printer expects GCODE instructions, like those made by other slicers such as Skeinforge and Slic3r (and intended for other FDM 3D printers). The important gcodes that the Peachy Printer’s gcode-to-wav conversion software interprets are (taken from http://reprap.org/wiki/G-code):

G0 X? Y? Z? – Moves the tool rapidly to the given X/Y/Z location. The movement speed is determined by the machine itself. This is used for moving quickly between paths. NOTE: We treat this the same as G1 because the RepRap firmware does and we’ve found slicers may use either G0 or G1 interchangeably.

G1 X? Y? Z? F? – Moves the tool to the given X/Y/Z location at the given feed rate. X, Y, and Z are in millimeters and F is in millimeters per minute. There may also be an optional E parameter that determines the speed of the extruder feed, but we don’t support that parameter. Note that common FDM printers don’t use the G0 (rapid) command, but instead specify different F speeds for rapid and feed movements, so we are currently working with that same format.

For both G commands, parameters are optional. If unspecified, it uses the last value specified. For example, these commands are equivalent:

G1 X0.0 Y1.2 Z3.4 F100

and

G1 F100
G1 X0.0 Y1.2 Z3.4

M101 – Turn extruder on – This is used by RepRap to indicate when to turn on the extruder. We interpret this to mean that we are now feeding (attempting to draw) rather than rapiding (attempting to move without drawing).

M103 – Turn extruder off – This is used by RepRap to indicate when to turn off the extruder. We interpret this to mean that we are now rapiding (attempting to move without drawing) rather than feeding (attempting to draw).

We can build our own GCODE instructions based on knowledge of the machine, but we need to know the paths to follow while doing so. This is where the Blender slicer comes in. We want the following:

  • a list of X,Y vertices, in order, following a polygonal path. Each drawn path should be its own list. Rapids will automatically be inserted between paths.
  • A separate indication of when we move up the Z axis to a new height and what the height is. Note that we can only move up the Z axis, not back down.

An example interface that we will provide on our end is:

def drawPath(path):
“””path – list of vertices, (x,y) tuples, where x and y are floats representing millimeters from the origin”””

def moveToHeight(height):
“””height – float – height of the new layer in millimeters from the base of the object”””

Here’s an example what would be input and what would be generated. Given calls of the following:
moveToHeight(0.1)
drawPath([(0.0, 0.0), (1.0, 0.0), (0.5, 0.5), (0.0, 0.0)])
drawPath([(0.0, 1.0), (1.0, 1.0), (0.5, 0.5), (0.0, 1.0)])
moveToHeight(0.2)

The generated GCODE will be something like this (assuming feed rate is 100mm/min and rapid rate is 900mm/min):
M103
G1 Z0.1 F900
G1 X0.0 Y0.0 F900
M101
G1 X1.0 Y0.0 F100
G1 X0.5 Y0.5 F100
G1 X0.0 Y0.0 F100
M103
G1 X0.0 Y1.0 F900
M101
G1 X1.0 Y1.0 F100
G1 X0.5 Y0.5 F100
G1 X0.0 Y1.0 F100
M103
G1 Z0.2 F900
“”"

Thanks again CodExman and mont29 ! you guys ROCK!

Ok, just a few nighty questions. :slight_smile:

  1. From that text above, I infer we need to give (generate) some kind of hatching pattern to fill plane parts? i.e. for a dummy cube, each Z level generates a square, so you have to hatch it to fill it - if so, is there a preferred kind of pattern? Concentric loops? Simple forth-and-back lines? And in this case, we need an additional parameter - the width of the hatching (would be the width of the laser beam, minus some kind of ‘safe margin’ I guess?).
    Or do you always generates empty volumes (to save resin, but then, how would you empty closed volumes :wink: )? Your point 3) however sounds like this is what you do (else, horizontal faces would not be an issue I think…).

  2. Point 2) above is rather unclear to me… Why to you want to fill the slices? And if you really want to, why not just use the ‘fill’ option of bisect? Boolean ops are rather unsafe (one could even say unpredictable) when applied over non-manifold meshes…

Apart from that, think things are pretty much clear. :slight_smile:

@mont29: do you know how to do the same as bpy.ops.mesh.bisect() with fill option enabled in bmesh module?

1 The Hatching pattern you speak of is called “in fill”, we dont need it right now, but we would like it in the future, many pattern options should be supported
for now id like a pattern made from simply rastering back and forth, basically a grid. The grid lines must lay directly ontop of each-other from one layer to the next. Yes if we are going to generate this pattern we need to take in to acount the width of the laser beam which could be a parameter called “wallThickness”
and it could use another parameter called “overLap”. to make sure the infill overlaps and joins to the walls of the object.

In fill is more an an issue for other printers, with the peachy printer we have much less need for it. Yes to print a solid object with the Peachy Printer you can save A LOT of time by simply printing a manifold shell which traps liquid resin inside! Then after you can cure the traped resin in the sun or in a uv chamber.

Horizontal faces may lay so flat that they fit in between two slices and may get missed completely, we need to detect such faces, and raster them in a back and forth pattern movng over (wallThickness - overLap) each pass. This is a compleatly differnt problem than infill, alto the two problems may both end up using the same rastering function as their
solutions… we shal see.

  1. Hmm “fill” or “in fill” if important in some prints as it ads strength to the print, It needs to be an option eventual and for now im ok if our slicer dosent do it. Or if the only way to do it is to have a manifold object and a boolean op. Its up to you guys if you want to tackle coding in fill now or not but the boolean way of getting infill can already be done in blender, no coding required but ya sometimes it dose funny things, but as you can see it dose work:


Just found another sliceing script!
This one is ment for a laser cutter and was writen by Ryan Southall.
Not only did he write a script but its an add on with a little gui too!
very usable.

http://thingiverse-production.s3.amazonaws.com/assets/49/4d/c4/dd/c4/FromBlenderToLaser.pdf

I can confirm that the code works well… my laser cutter is using it as i type :wink:

here is the code just as i found it :
LaserSlicer.zip (3.26 KB)

check out what Ryan did with it!


Hey guys,

Sorry for the silence, I just had no time for this last weekend, but found some (!) hours past few days…

So, here is a WIP code. What it does currently is:

  • For each slice, it plane-bisects twice, slightly below and above theoretical plane, and only keeps geometry between those cuts.
  • It flattens this geometry.
  • It cleans it (removing overlapping faces, inner faces, etc.) - that was the Hell Part™, took me hours to get it working.

From this point, all that is remaining is to generate the alternate hatching for the beam to fill the “solid” parts of the slice, which should not be that hard with the cleaned geometry, will try to finish this asap.

Note that this approach automatically handles all cases of more or less horizontal faces.

I had to switch to bmesh because of all the complex operations done in cleanup func. This code is still quite rough, sometimes ugly - and I’m not sure it is enough quick to match the printer needs… Tests will say. And there are still some points to enhance.

Note that I shut off the slicing loop for tests (so that I can control which slice is computed, and examine it later in Blender).

Also, that code won’t behave as expected with non-manifold meshes (do not try it on Suzanne, some slices will be OK but some will have glitches), not really an issue imho as I think one is expected to print manifold-only geometry?

PS: code in another post, as it excessed the 10k chars limit… :confused:

import bpy
import bmesh
import mathutils

import math


def clean_slice(bm, me):
    # First, remove any double vert!
    bmesh.ops.remove_doubles(bm, verts=bm.verts[:], dist=0.001)
    bmesh.ops.recalc_face_normals(bm, faces=bm.faces[:])

    # Add common verts at each intersection of existing edges.
    if 1:
        edges = set(bm.edges)
        # Find all intersections.
        new_co = {}
        while edges:
            e1 = edges.pop()
            for e2 in edges:
                e1_co1, e1_co2 = (v.co for v in e1.verts)
                e2_co1, e2_co2 = (v.co for v in e2.verts)
                co = mathutils.geometry.intersect_line_line_2d(e1_co1, e1_co2, e2_co1, e2_co2)
                if co not in (None, e1_co1, e1_co2, e2_co1, e2_co2):
                    co = tuple(co)
                    if co in new_co:
                        new_co[co] |= {e1, e2}
                    else:
                        new_co[co] = {e1, e2}
        # Compute cut factors for each cut and each affected edge.
        edges_cuts = {}
        for co, eds in new_co.items():
            co = mathutils.Vector(co + (0.0,))
            for e in eds:
                e_co1, e_co2 = (v.co for v in e.verts)
                e_x = e_co1.x - e_co2.x
                e_y = e_co1.y - e_co2.y
                if e_x == e_y == 0.0:
                    print("Zero-length edge!!!")
                    continue
                f = ((e_co1.x - co.x) / e_x) if (abs(e_x) > abs(e_y)) else ((e_co1.y - co.y) / e_y)
                if f < 0.001 or f > 0.999:
                    continue
                if e in edges_cuts:
                    edges_cuts[e].append(f)
                else:
                    edges_cuts[e] = [f]
        # Finally, split the edges.
        # We may have several cuts per edge, makes things a bit more tricky...
        new_verts = []
        for e, factors in edges_cuts.items():
            factors.sort(reverse=True)
            prev_f = 1.0
            v = e.verts[0]
            for f in factors:
                f /= prev_f
                ne, nv = bmesh.utils.edge_split(e, v, f)
                if v in ne.verts:
                    e = ne
                new_verts.append(nv)
                prev_f = f
        bmesh.ops.remove_doubles(bm, verts=new_verts, dist=0.001)

    # Now, (try to!) split all faces with all edges using the newly created verts.
    # This way, we should not get anymore any faces overlapping partially each other.
    # At worst, we'll have some smaller faces completely overlapped by biger ones.
    if 1:
        new_verts = set(new_verts) & set(bm.verts)
        for v in new_verts:
            for e in v.link_edges:
                bmesh.ops.connect_verts(bm, verts=e.verts)

    # At this point, we have to remove all those ugly double edges and faces we just created!
    # Use Mesh.validate(), much simpler than re-creating the whole code for bmesh!
    bm.to_mesh(me)
    me.validate(False)  # XXX Set to False for release!
    bm.clear()
    bm.from_mesh(me)

    # Try to dissolve as much inner verts as possible.
    # This will drastically reduce the overall number of faces.
    if 1:
        for v in bm.verts[:]:
            if not v.is_valid or v.is_boundary or not v.link_faces:
                continue
            dissolve = True
            ref_n = v.link_faces[0].normal
            for f in v.link_faces[1:]:
                if f.normal.dot(ref_n) < 0.0:
                    dissolve = False
                    break
            if dissolve:
                try:
                    bmesh.ops.dissolve_verts(bm, verts=[v])
                except:
                    pass

    # Detect "face islands" (connected faces sharing the same normal).
    if 1:
        faces_todo = set(bm.faces)
        faces_done = set()
        islands = []
        while faces_todo:
            f = faces_todo.pop()
            faces_done.add(f)
            edges_todo = set(f.edges)
            edges_done = set()
            isl = {f}
            while edges_todo:
                e = edges_todo.pop()
                edges_done.add(e)
                for ff in e.link_faces:
                    if ff in faces_done:
                        continue
                    if f.normal.dot(ff.normal) > 0.0:
                        isl.add(ff)
                        faces_done.add(ff)
                        edges_todo |= set(ff.edges) - edges_done
            islands.append(isl)
            faces_todo -= faces_done

    # And now, we want to remove all faces that are completely inside another island than theirs.
    if 1:
        face_map = {f: [] for f in bm.faces}
        face_map_tmp = {}
        new_islands = []

        # First, get triangulated islands.
        for isl in islands:
            faces = {f.copy(False, False): f for f in isl} #tuple(f.copy(False, False) for f in isl)
            face_map_tmp.update(faces)
            ret = bmesh.ops.triangulate(bm, faces=tuple(faces.keys()))
            new_islands.append([isl, set(ret["faces"])])
            for tri, fc in ret["face_map"].items():
                face_map[face_map_tmp[fc]].append(tri)

        islands = new_islands
        del face_map_tmp

        # Remove from our islands faces contained into other islands.
        for isl, isl_tris in islands:
            for f in tuple(isl):
                f_in_isl = False
                for _, tris in ((i, t) for i, t in islands if i != isl):
                    f_in_this_isl = True
                    f_all_verts_shared = True
                    for v in f.verts:
                        v_in_isl = False
                        v_is_shared = False
                        for tri in tris:
                            if v in tri.verts:
                                v_in_isl = True
                                v_is_shared = True
                                break
                            cos = (v.co,) + tuple(v.co for v in tri.verts)
                            if mathutils.geometry.intersect_point_tri_2d(*cos):
                                v_in_isl = True
                                break
                        if not v_in_isl:
                            f_in_this_isl = False
                            break
                        if not v_is_shared:
                            f_all_verts_shared = False
                    # We do not want to remove faces that share all their verts with the other island
                    # (real duplicates have already been removed, so only remains those on the boundary
                    #  of the islands).
                    if f_in_this_isl and not f_all_verts_shared:
                        f_in_isl = True
                        break
                if f_in_isl:
                    # remove face from its island, and the related tris!
                    isl.remove(f)
                    for tri in face_map[f]:
                        isl_tris.remove(tri)

        # And finally, remove faces we don't want (together with temp geometry created by triangulation).
        faces_to_keep = set()
        faces_to_del = set()
        for isl, tris in islands:
            faces_to_keep |= isl
            faces_to_del |= tris
        faces_to_del |= set(bm.faces) - faces_to_keep
        for f in faces_to_del:
            bm.faces.remove(f)
        for e in bm.edges[:]:
            if not e.link_faces:
                bm.edges.remove(e)
        for v in bm.verts[:]:
            if not v.link_edges:
                bm.verts.remove(v)

    # Final cleanup: set all faces to same normal, and try again to dissolve as much inner verts as possible.
    # This will drastically reduce the overall number of faces.
    if 1:
        ref_n = mathutils.Vector((0.0, 0.0, 1.0))
        for f in bm.faces[:]:
            if f.normal.dot(ref_n) < 0.0:
                f.normal_flip()
        for v in bm.verts[:]:
            if not v.is_valid or v.is_boundary or not v.link_faces:
                continue
            try:
                bmesh.ops.dissolve_verts(bm, verts=[v])
            except:
                pass


scene = bpy.context.scene
obj = bpy.context.active_object
obj_name = obj.name

slice_height = 0.05  # Will be much smaller IRL, of course!

beam_width = 0.05
beam_overlap = 0.5  # factor, [0.0, 1.0[

# Create our bmesh object.
ref_bm = bmesh.new()
ref_bm.from_mesh(obj.data)

# Temp mesh, used to clean up things (validate(True))...
tmp_me = bpy.data.meshes.new("__TMP__")

min_z = max_z = None
for v in ref_bm.verts:
    z = v.co.z
    if min_z is None or min_z > z:
        min_z = z
    if max_z is None or max_z < z:
        max_z = z

#for i in range(0, math.ceil((max_z - min_z) / slice_height)):
i = 24
if i:
    h_low = min_z + (i - 0.5) * slice_height
    bm = ref_bm.copy()

    bmesh.ops.bisect_plane(bm, dist=0.0001, geom=bm.verts[:]+bm.edges[:]+bm.faces[:],
                           plane_co=(0.0, 0.0, h_low), plane_no=(0.0, 0.0, -1.0),
                           clear_inner=False, clear_outer=True)
    bmesh.ops.bisect_plane(bm, dist=0.0001, geom=bm.verts[:]+bm.edges[:]+bm.faces[:],
                           plane_co=(0.0, 0.0, h_low + slice_height), plane_no=(0.0, 0.0, 1.0),
                           clear_inner=False, clear_outer=True)

    for v in bm.verts:
        v.co.z = 0.0

    clean_slice(bm, tmp_me)

    bm.to_mesh(obj.data)


# We are done with this one!
bpy.data.meshes.remove(tmp_me)

Ok Great solution mont29!
I can see exatctly the flatening would work. look forward to printing with it!

We will definitely need a version that works with non manifold objects, but it can just be a shell slicer that dosent do any infill to make things
easy.

so I tryed running the above code but it didnt work for me (blender 2.9)
here is the error

^[^[^[1^[^[^[^[Traceback (most recent call last):
File “/Text”, line 258, in <module>
File “/Text”, line 139, in clean_slice
KeyError: <BMFace(0x7f5567d0e130), index=5, totverts=3>
Error: Python script fail, look in the console for now…

Really Hope to See Ryan in this Tread soon… He just sent me an email with so code that works really well!!

Check it out
Here is his blend file peachytest.blend (524 KB)
and Here is what he wrote:

It was a bit of a fiddle but I think this basically does what you need. Run the script in the attached blend file with the object you want sliced selected in the 3D window. The routine will create a new object and place the polygon ring slices within it. The routine slices depending on the parameters layer thickness, first layer number, last layer number. If you just want one slice give it first layer number = 1, last layer number = 2 (or 50, 51 etc). If you keep running the script with a new range of layer numbers the new slices will get added to the slices object.

At the end the x, y coordinates of the ordered points get printed put for each layer. I have commented out the print statement on line 80 for speed, so just comment to see the printout.

When the rest of your blender add-on is up and running it should be pretty easy to integrate this into your code.

Hope it helps

Ryan

In the end I think we may end up supporting different slicer scripts in a drop down menu inside blender.
This would make alot of seance as each method has its strengths and people have very different objects to slice as well as computing power. Ie net books vs Hi end GPU, manifold vs non manifold objects.

looks like it this thread alone there are already 3 methods, ( im not sure how different they are at a low level)
And there are many more methods to be explored

I have also done VERY fast slicing with a Shrink Wrap modifier.
and there is Voxle based slicing Both me and Lunpa working on.
I Think you can do it really well with ray tracing also.

I have no clue if any one of these will ever be the best solution for practically all slicing,
Time will tell!

Great work everyone!!!
This will mean a lot to the 3d printing community!!

Hi all.
I have updated my code to also use the bisect method. It is now much faster on complex meshes than my previous version.
Regards
Ryan

import bpy
import mathutils
from mathutils import Vector


# Layer thickness, first layer, last layer
lw, fl, ll = 0.0025, 1, 20


original = bpy.context.active_object
origme = original.to_mesh(bpy.context.scene, apply_modifiers = False, settings = 'PREVIEW', calc_tessface=False, calc_undeformed=False)
original.data = original.to_mesh(bpy.context.scene, apply_modifiers = True, settings = 'PREVIEW', calc_tessface=False, calc_undeformed=False)
omw = original.matrix_world
zps = [(omw*vert.co)[2] for vert in original.data.vertices]
maxz, minz = max(zps), min(zps)


o = 0
for sob in bpy.context.scene.objects:
    try:
        if sob['Slices']:
            ob, me, o = sob, sob.data, 1
    except:
        pass


if o == 0:
    me = bpy.data.meshes.new('Slices')
    ob, ob['Slices']  = bpy.data.objects.new('Slices', me), 1
    bpy.context.scene.objects.link(ob)
    
bpy.context.scene.objects.active = original


vlen = len(me.vertices)
try:
    for ln in range(fl, ll + 1):
        lh = minz + ln*lw
        
        if lh &lt; maxz:
            bpy.ops.object.mode_set(mode = 'EDIT')
            bpy.ops.mesh.select_all(action = 'SELECT')
            bpy.ops.mesh.bisect(plane_co=(0.0, 0.0, lh), plane_no=(0.0, 0.0, 1), use_fill=False, clear_inner=False, clear_outer=False, threshold=0.0001, xstart=0, xend=0, ystart=0, yend=0, cursor=1002)
            bpy.ops.object.mode_set(mode = 'OBJECT')
            coords, vlist, elist = [], [], []
            sliceverts = [vert for vert in original.data.vertices if vert.select== True]
            sliceedges = [edge for edge in original.data.edges if edge.select == True]


            for vert in sliceverts:
                me.vertices.add(1)
                me.vertices[-1].co = omw*vert.co
       
            for edge in sliceedges:
                me.edges.add(1)
                me.edges[-1].vertices[0] = me.vertices[[vert.index for vert in sliceverts].index(edge.vertices[0])+vlen].index
                me.edges[-1].vertices[1] = me.vertices[[vert.index for vert in sliceverts].index(edge.vertices[1])+vlen].index
            vlen = len(me.vertices)
                
            elist.append(sliceedges[0]) # Add this edge to the edge list
            vlist.append(elist[0].vertices[0]) # Add the edges vertices to the vertex list
            vlist.append(elist[0].vertices[1])
            while len(vlist) &lt; len(sliceverts):
                va = 0
                for e in sliceedges:
                     if e.vertices[0] not in vlist and e.vertices[1] == vlist[-1]: # If a new edge contains the last vertex in the vertex list, add the other edge vertex
                         va = 1
                         vlist.append(e.vertices[0])
                         elist.append(e)
                     if e.vertices[1] not in vlist and e.vertices[0] == vlist[-1]:
                         va = 1
                         vlist.append(e.vertices[1])
                         elist.append(e)
                     elif e.vertices[1] in vlist and e.vertices[0] in vlist and e not in elist: # The last edge already has it's two vertices in the vertex list so just add the edge
                         elist.append(e)
                         va = 1
                if va == 0: #If no new edge was added a new ring of edges needs to be started
                     e1 = [e for e in sliceedges if e not in elist][0] # Select a new edge not in the edge list
                     elist.append(e1)
                     vlist.append(e1.vertices[0])
                     vlist.append(e1.vertices[1])
            for sv in vlist:
                coords.append((omw*original.data.vertices[sv].co)[0:2])
            print(coords)
    original.data = origme
except:
    original.data = origme

Ahh Great to see you here Ryan !

just tried the code above works great for me and I had James look at it hes says its all on track
and probably only needs trivial changes such as, it needs to also output the height of each layer.

I also tryed it on non a non manifold (Suzanne) with an applied solidify modifier and it worked great!
It made 2 shells just as expected… although i havent actually checked the order in which the verts were returned.
next perhaps ill write a visualizer script to test its output … im curious to know how it will handle the boolean method of infill i posted above…
my guess is we may need ether vertex groups or separate object so slice the in fill in a way that it puts out clean paths.

Ok as promised James has written a bit of code that takes the vertex and height data we have been creating and turns it into gcode
The peachy printer software will in turn take this gcode and turn in into an audio wave form or it can be used by any other printer as well.
Its important to leave gcode in the process so that all 3d printer/laser cutter/ cnc projects can benifit from this work.

So as soon as we have the code snippet below talking to the code in the above posts we have a usable slicer!!
Anyone up for the task?
Once done we will be much closer to blender having a “3d print” button in blender, allowing you to 3d print your blender modles very easily!
To test it out just throw the resultant g code into this online gcode visualizer:
http://gcode.ws/

Great work everyone!
here is the code
and as a side note peachy hardware development took a turn for the better at about 4am yesterday so
many of you working on this will be getting peachy printer kits sooner that I thought!

class MoveModes:
    RAPID = 'rapid'
    FEED = 'feed'

class GcodeWriter(object):
    """Takes layer information from the Blender slicer and saves it to a file in GCODE format."""
    def __init__(self, file, feed_rate, rapid_rate):
        self._file = file
        self._feed_rate = feed_rate
        self._rapid_rate = rapid_rate
        self._move_mode = None
        self._current_height = None
        self._current_location = None

    def moveToHeight(self, height):
        if self._current_height is not None:
            if height &lt; self._current_height:
                raise AssertionError('Requested to move back down from height %f to height %f!' % (
                    self._current_height, height
                ))
            if height == self._current_height:
                return
        self._set_move_mode(MoveModes.RAPID)
        self._file.write('G1 Z%.2f F%.2f
' % (height, self._rapid_rate))
        self._current_height = height

    def drawPath(self, path):
        if self._current_location is None or self._current_location != path[0]:
            self._set_move_mode(MoveModes.RAPID)
            self._move_to_location(path[0])
        self._set_move_mode(MoveModes.FEED)
        for location in path[1:]:
            self._move_to_location(location)

    def _set_move_mode(self, mode):
        if self._move_mode != mode:
            if mode == MoveModes.RAPID:
                self._file.write('M103
')
            elif mode == MoveModes.FEED:
                self._file.write('M101
')
            else:
                raise AssertionError('Unknown move mode "%s"' % mode)
            self._move_mode = mode

    def _move_to_location(self, location):
        if location == self._current_location:
            return
        if self._move_mode == MoveModes.FEED:
            rate = self._feed_rate
        elif self._move_mode == MoveModes.RAPID:
            rate = self._rapid_rate
        else:
            raise AssertionError('Unexpected move mode "%s"' % self._move_mode)
        self._file.write('G1 X%.2f Y%.2f F%.2f
' % (location[0], location[1], rate))
        self._current_location = location

Hello, as promised I am now checking the code(with the christmas time inbetween just disappeared.)
Regarding slicing -
In Blender CAM, i have a fast slicing algorithm, which is able to get sliced loops from manifold mesh very fast, because it doesn’t use any blender bmesh operators, it only goes through all faces once.

However, I don’t see how this by itself can be a useful slicer, since you have to:

  • offset paths at least by half of the thickness of your laser path, or the width of the line the laser cures.
    -make more of these, bigger objects should probably be more solid.
  • try to make the patterns optimal( I have quite good path sorting in blenderCAM)
  • solve the thickness problem also for flat faces.
  • inner supports to make objects more solid - some other patterns than pure infill - hexagons would be nice i think.

I still don’t see the reason not to use Cura as backend, it’s got everything of this…

Well We have never tried using Cura as a back end … we did try using skienforg and slicer but it didnt look very easy to do.

I think the Dicer gui in blender could just let you pick different slicing backends from a menu …

any way if you think Cura is a great way to go im all for it. but for now I really wanted a quick and simple blender internal slicer that could do streaming
and on that note we have some more advancements…

I took the liberty of moving all the code in this thread to a repo … I did a good job of crediting everyone for there bits of code
then I asked James Townly to help put all the pieces together and its all working now

check it out :

it works and for now it could use a little gui so one can enter in things like number of slices and a file path to save the gcode to and more.

feel free to fork it and work away adding Cura as an optional slicer and or anything else you guys see fit.
pull requests are very Welcome !!

1 Like

Hello, I am now on a slow and expensive connection for 2 weeks(next 5 or 6 days will be completely off)
so theres hardly anything practical to do.
Streaming the slices as you told me during modeling process seems not doable, I think a fast slicing + streaming in background is more reasonable. Remember, e.g. if you would stream from blender, loading another file into blender would stop printing. It’s best to run a separate thread. Still then, if the user closes blender = ending the process… not good too…
We should think about this more. I will now do a non-streaming gui for cura as backend, then we see what we can do next… :wink:

Hi everyone!
My name Ed Aylward. I’ve developed and built a full color 3D printer that I want to open source but I’m having a problem finding an open source full color slicer. Would anyone be interested in writing a blender script to accomplish this? I do not have a whole lot of money but I’m willing to pay someone for their time. I can be reached at eaylward73 at gmail dot com

Hi there. I know this is a pretty old thread, but…

I’m moving to SLA printing which has an inherent problem. Slicers don’t create infill for SLA printers, or at least I haven’t found any.

Yes, you have the problem id trapping unset resin, but this can’t be insurmountable. With a simple vertical triangular infill most of these problems could be eliminated.

Any ideas?