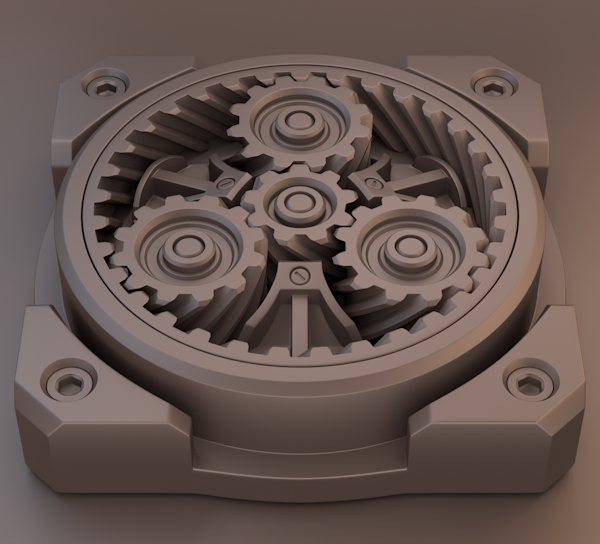
A planetary gear animation, all done in Blender.
I tried uploading an animated gif, but I think I hit the size limit. You can see it animated (along with some higher-resolution versions) here and here.


1 Like
Nice. Very neet with the light in the back. The movement is realy convincing to.
This is really cool, everything looks good and like the lighting as well. How did you achieve this effect?
Top notch work, derGoldstein! Your modeling is superb, and the lighting and materials (as well as the light rays) really make these images sing. The animation of the gears moving is an added bonus; how did you achieve such precise movement? Did you have to calculate the correct sizes before beginning?
Again, brilliant job. I know that planetary gears are used in monster truck axles to help reduce the stress of the forces on the axle, but this is the only real-world example I can think of. Do you know of others?
Wow, that’s so cool! And really nice lighting and renders. 
very sharp-looking renders, and excellent modeling. i think a Freestyle render of that would be very cool (hint, hint  )
)
i can’t stop watching, awazing.
Thanks guys 
About gear timing – you can easily look up the ratios for the different types of planetary gears (just google “planetary gear ratio”). To get a design that fits together you need to calculate the number of teeth of each gear beforehand, and determine the geometry of the teeth themselves. Once you do that, the motion itself is done with constraints – there’s only one part that moves (that is, one part that’s animated), the rest are connected to it with “copy rotation” and “transformation” constraints.
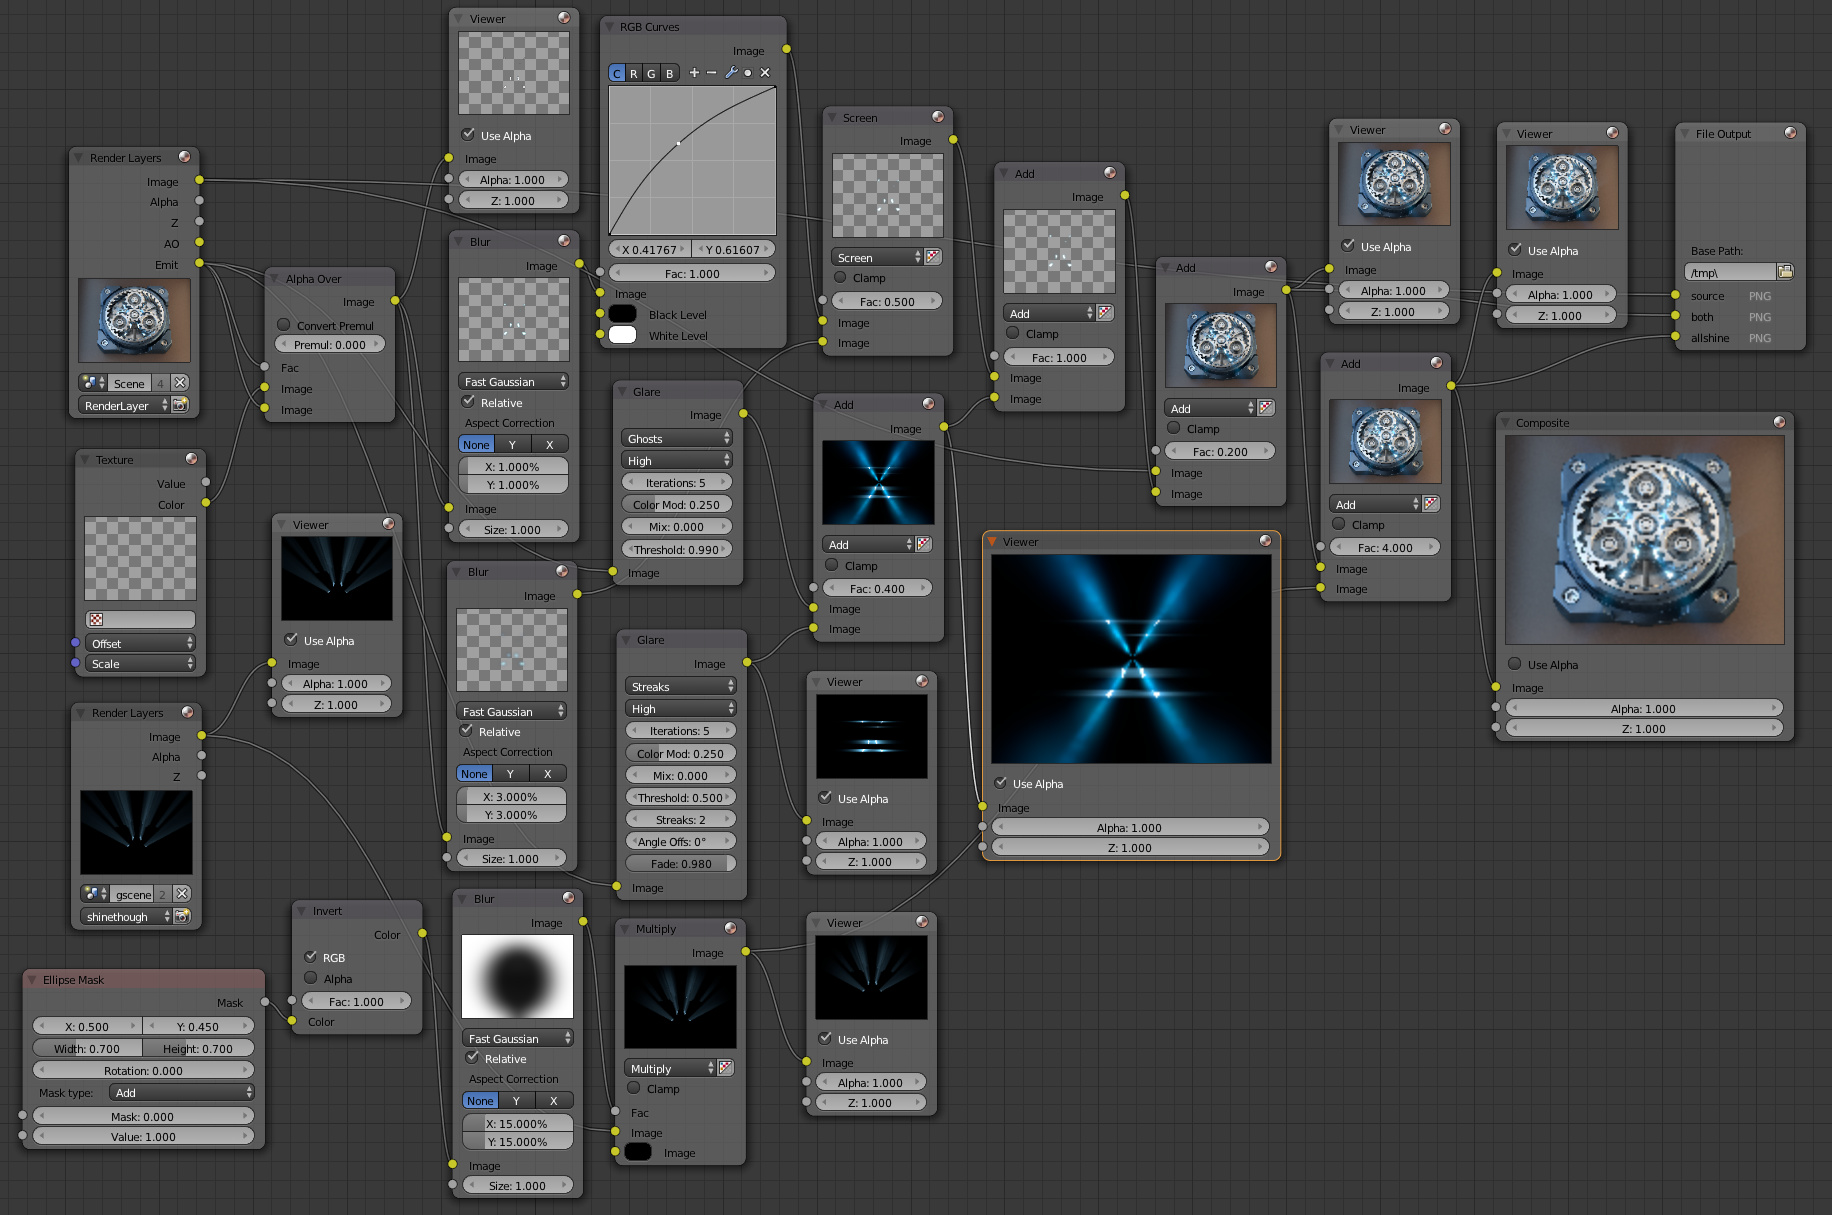
The shining volumetric effect is rendered separately using blender internal render (and everything else is rendered in Cycles). It’s a hack really, this would be very limited if you needed a camera to fly over, for example.
Here’s the compositor setup:
Regarding planetary gears in real life – automatic transmissions are made up of several layers of compound planetary gears. You’ll also find them in cordless drivers, and many home appliances.
Just out of curiosity, does your planetary gear constraint system allow for variable speed of the input and output gears?
I only ask because I had to do a load of work rigging planetary gears when I rigged some Torotrak IVT’s for an animation in Lightwave.
And i find this kind of work interesting.
I also redid some of the work in Blender:
and made a tutorial “probably out of date now”:
My only other comment would be that your render looks awesome, well done 5 stars :P!
If I had to make a criticism it would be that your gear teeth look odd. I used to work as a technical illustrator so I can be totally anal about all things gear related. Gears have a very specific mathematical shape for maximum performance, and your gears seem to deviate form that model a fair bit. I think that your Involute profile is the culprit.
Your gear contact point should move like this:
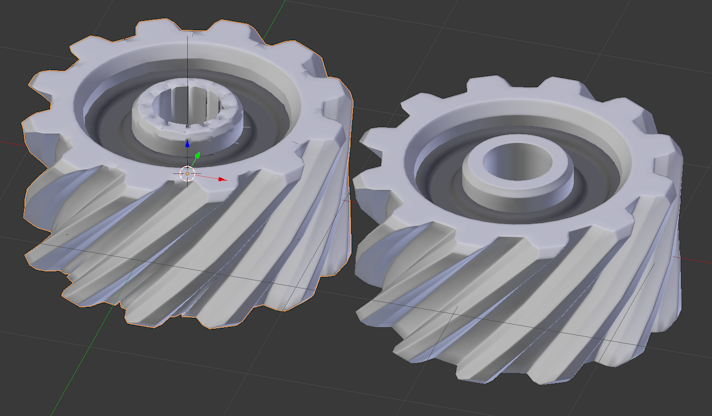
MCHammond : I have a background in mechanical engineering as well. I use solidworks and inventor a lot, and I have plenty of experience with real gears. I chose to use this particular tooth geometry (like this), mainly due to aesthetic reasons.
At a certain point, however, I had to compromise on the accuracy of the geometry since helical gears are extremely high-poly. If I used geometry that was very close to accurate (that is, to a point where you wouldn’t be able to tell visually), I would have had to use stand-ins, since the actual mesh would be so heavy it wouldn’t allow me to move around the viewport at a reasonable frame rate. The result are gears that would “work” (at no point do they overlap, and they have a pretty consistent distance between interlocking teeth), but are far from optimal. Of course once you take the helical angle into account, which was also chosen purely for aesthetic reasons, I’m sure that a real-life fabrication of this mechanism wouldn’t be able to bare significant torque.
About the constraints, the whole thing is meant to be one-directional. There’s one driving element – the planet carrier. The sun and planets derive their motion from that. I would have used the sun as the driving element, but the “constraint skip” bug kicked in, so I opted to move the carrier instead. I think what you’re talking about is a dynamically responsive model, which I don’t know if blender can do without scripting. If this were autodesk inventor (or solidworks, or any engineering software), it would be easy, but I’m not sure how flexible the constraints in blender are.
Maybe the blender game engine would allow you to do that? Or possibly drivers? I’d like to try to construct more involved mechanical system in blender, so I’ll probably have to tackle this problem at some point, but right now I don’t have the answer.
@ derGoldstein
If you are running into issues with poly count while modeling something like a gear, you might want to look into using the modifiers mirror, array and subsurf. When I model a gear it has less than 120 faces per section before modifiers:
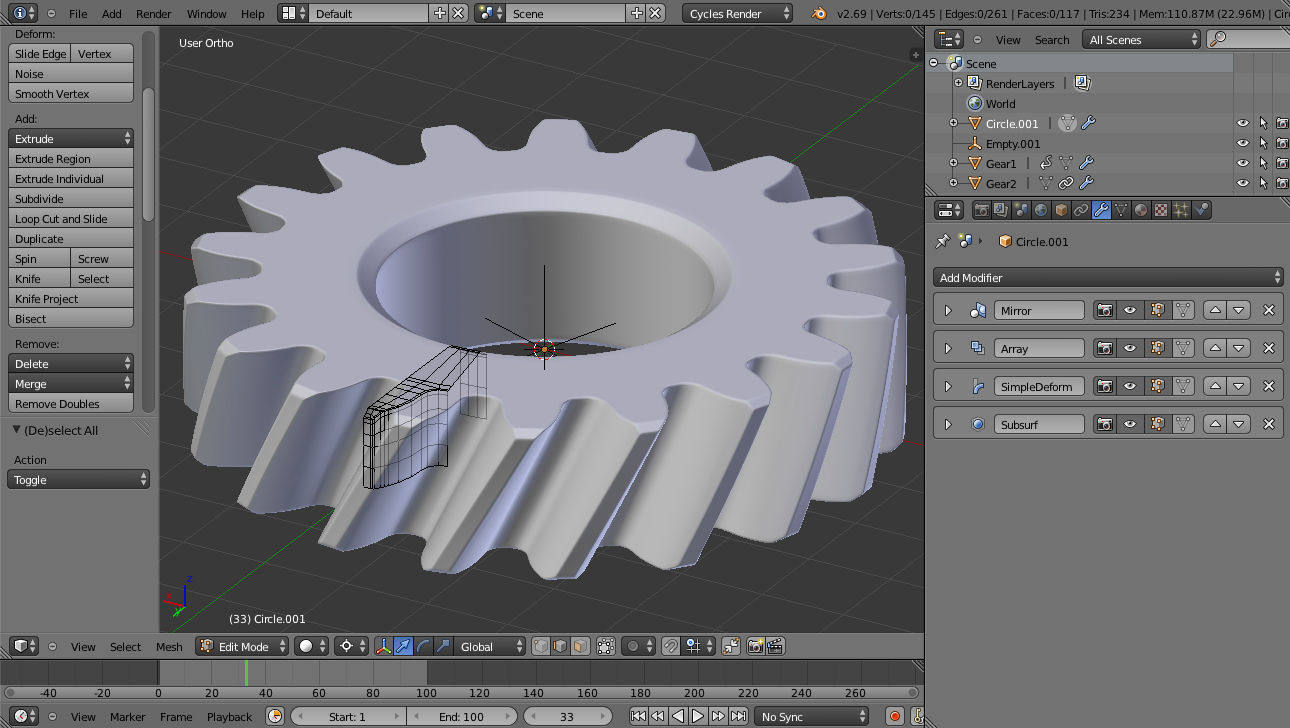
Not sure if this is something you have explored / are using already? I will include a .Blend called Gear.blend for you to look at, i will also include a version of the gear with the modifiers applied on layer 1.
As for the constraints, the method I used to animate a planetary gear system was by using pyDrivers in 2.4x. In the latest version of blender it has been replaced by the normal drivers system. You no longer have to convert rotations from radians into degrees which makes things easier, but you do now have to declare your variables outside of the expression.
Here is an image of the planets driver:
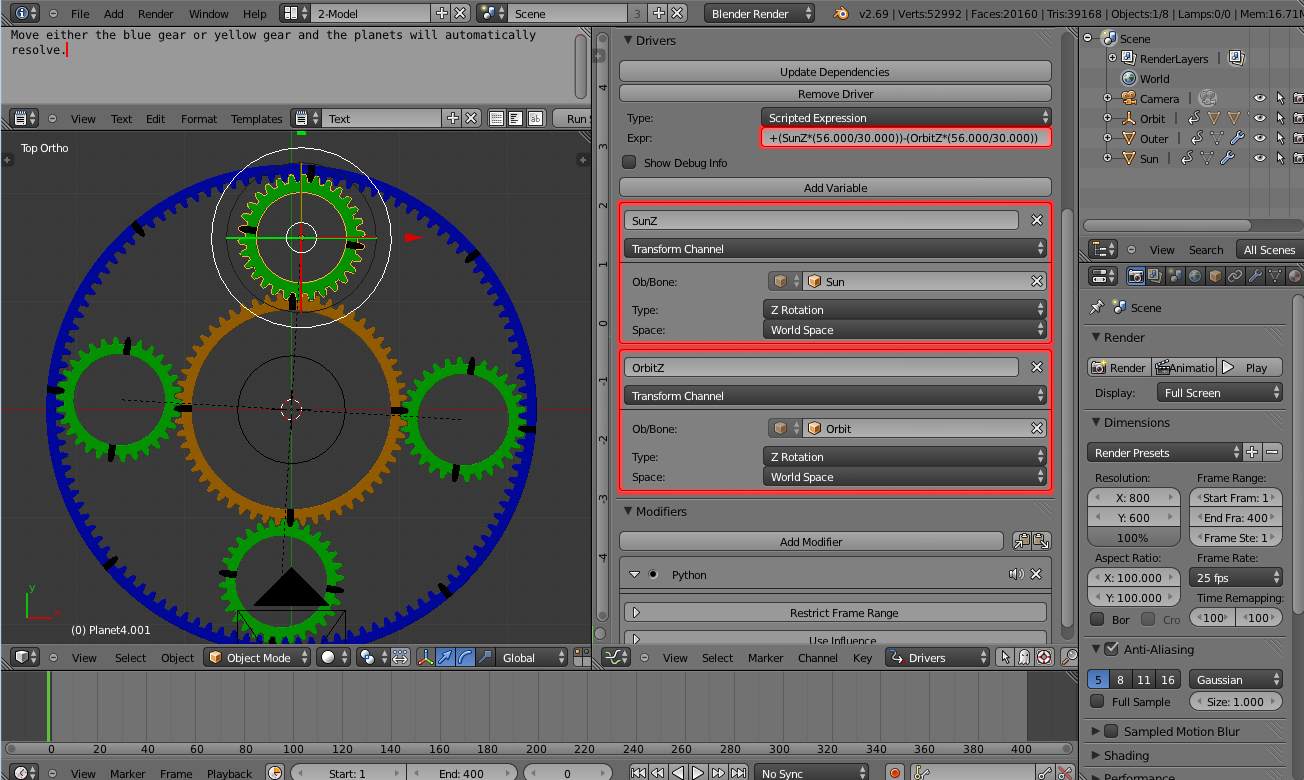
I have included a .Blend “SolarGears5.blend” so that you can have a play with it yourself 
Attachments
SolarGears5.blend (801 KB)

I found the animation to be quite hypnotic. I’m in awe of the precision necessary to pull this off. Too awesome.
Very nice.
@MCHammond
That’s a lot of great info, thanks! I’m going to have to learn exactly how those drivers work, your file (SolarGears5.blend) pretty much mimics the way that mechanical constraints work in engineering software, which I wasn’t sure that Blender was able to do. Now I’m wondering if it’s possible to pull off an entire automatic transmission in blender…
About the viewport speed, I use similar techniques. The problem is that the mirror and array modifiers don’t help speed things up, since the geometry does actually have to exist for you to see it in the viewport. Subserf is the one that helps things, since you can set the view to 1 (or 0) and the render to anything else (usually between 2 and 4).
The mirror and array modifiers do help with the file size, though. Another thing that shrinks the file size (and possibly speeds things up a bit) is instancing. Whenever you have more than one duplicate part, point them to the same mesh. There should only be one mesh of the planet gear, no matter how many of them exist in the scene.
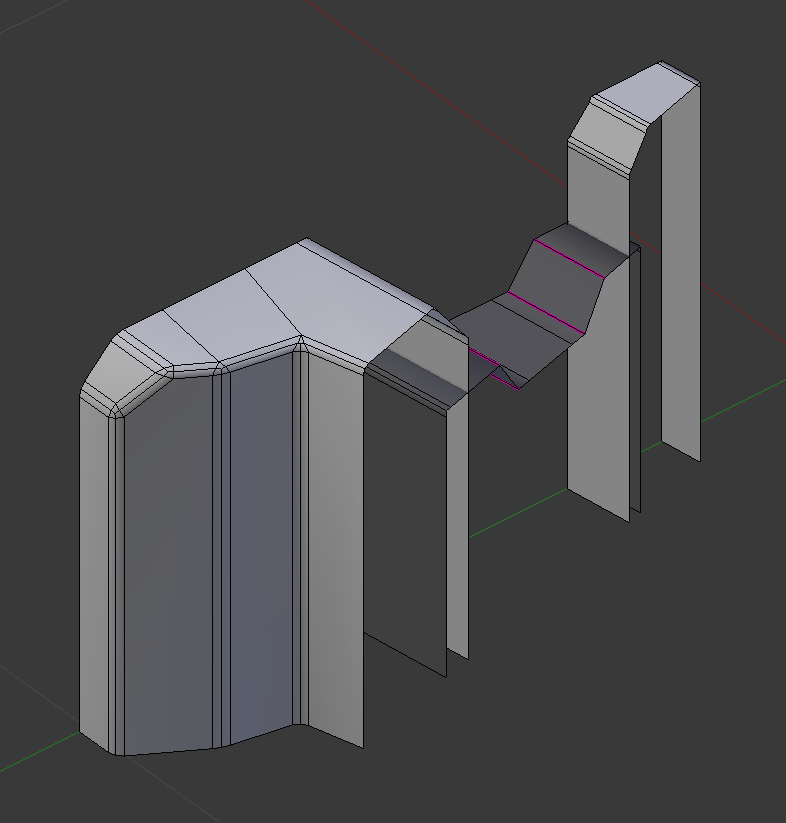
Another problem I have is that the Array modifier doesn’t always behave. Often I have to either apply it, or use Alt-R to get the entire gear geometry, and then “remove doubles”. Here’s an example of the bug:
As you can see the “merge” and “first last” options in the array modifier mess things up. I opened up your file (Gear.blend) and I think I’m doing the exact same thing. I can’t spot the difference, except that yours works and mine doesn’t.
Here’s the gear geometry I used, by the way:
Anyway, thanks for all this info, it’s a big help ![]()
Looks amazing!
@MCHammond:
Turns out I had to set the distance to 0.00005 to get it working properly. I’m very meticulous when it comes to precision, so it didn’t occur to me that setting the distance to “0” would mean that rounding errors would prevent it from working (or possibly it was due to “loss of significance” with floating-point numbers). Thanks, that’s another problem you solved for me
The viewport frame rate usually isn’t a problem since I know how to manage scenes and separate large complex parts into layers. Still, when I watch blender tutorials I get the feeling that other people can get away with way more polygons than I can. I’d already read the post you linked to, when googling how to speed things up. I have a GTX 780, so that can’t be the problem. I usually try to keep things under 500000 faces, the upper limit (for a reasonable frame rate) for me is 1 million faces. If I have no modifiers I can go up to 4 million, but that’s not really applicable since most meshes have a bunch of modifiers applied to them. I did pretty much everything that was mentioned in that thread, and only got a slight improvement. I’m sure that if they ever implement directx it would solve the problem, but you can’t really expect the developers to implement a feature that would only help one OS (even if most blender users use windows according to polls).
I have only one question.
How did u get such nice quality in gif?
@derGoldstein
Awsome
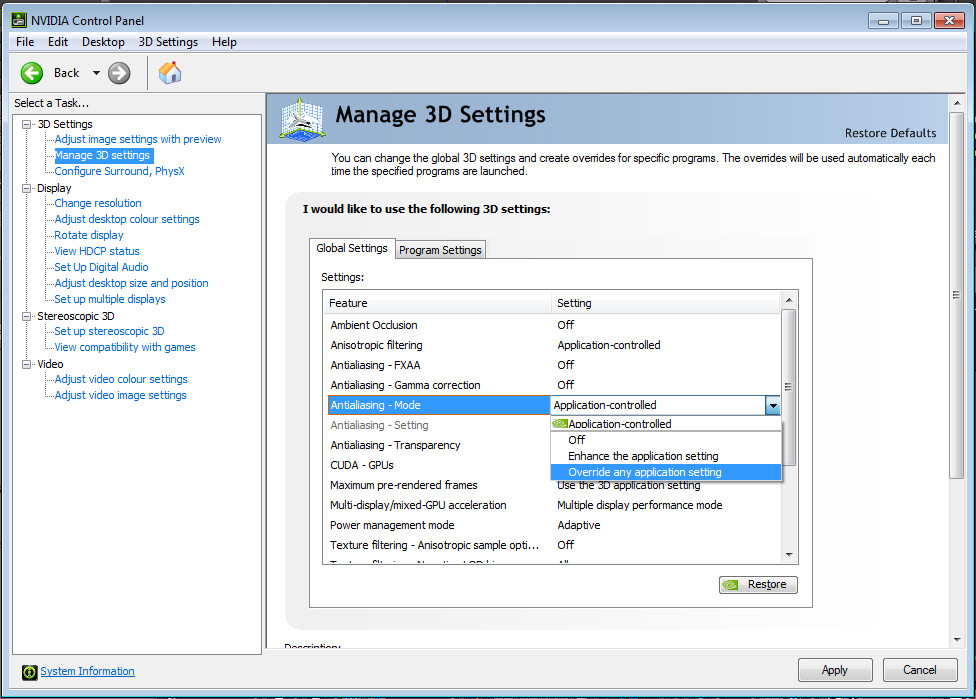
Only other thing I can think of is that your GPU drivers could be set to AA openGL by default. Its normally set to use application-controlled, but there is a setting in your drivers to over-ride that and apply AA to the view-port. I used to do it because it gave the mesh a nice smooth feel while you worked, but it kills performance.
They will never implement DirectX in blender as it contradicts too many of blenders core design philosophies, so don’t hold your breath. They are currently working on integrating OpenCL as an alternative to Cuda for some of the same reasons.
If you are really “meticulous” you may want to look into proper subdivision mesh topology. I noticed on your screen shot that the mesh you use has Ngons and tris in it. The subdivision modifier works best on quads only, triangles and Ngons “faces with more than 4 sides” will cause odd creases in your mesh, if you look really close. Its not much of a problem on a static mesh like a gear but its good practice to use only quads when modeling something you are going to subdivide. There is an interesting article on the blender wiki about good loop flow Link. It also makes selecting and editing the mesh far easier because you will have nice loops to select and slide :P.
i really like the animation and the light ray effects look really cool