Hi all,
I’m currently trying to model this sphere:

I already tried it using curves and duplicates. Nothing worked :(. Does one of you have an idea how to create a sphere that looks like the one above? Many thank in advance!
Best regards
Schoppe
Hi all,
I’m currently trying to model this sphere:
I already tried it using curves and duplicates. Nothing worked :(. Does one of you have an idea how to create a sphere that looks like the one above? Many thank in advance!
Best regards
Schoppe
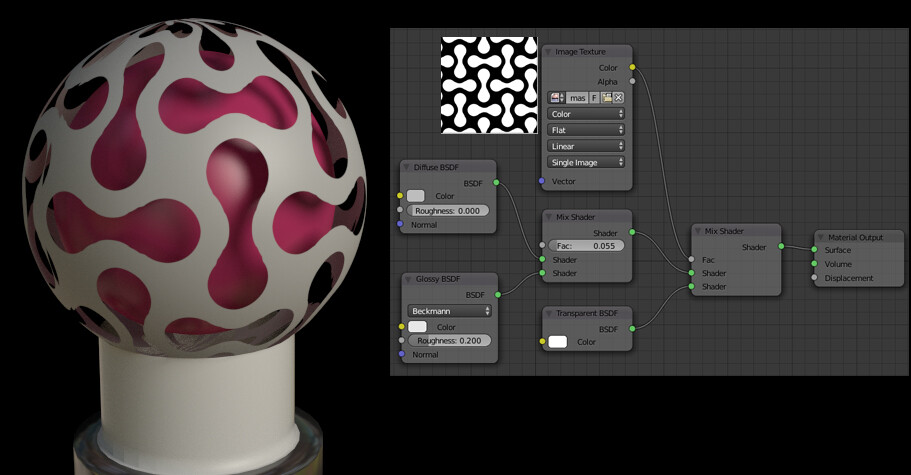
I think these are two spheres but second one is textured (with transparency). I would do the same: create texture, and apply on the sphere. If u really need topology like this, try retopology part of the model on top of textured sphere and mirror. I think this might work.
Hi Photox,
I’m really amazed that you could model this so fast! Thank you for the blend file. I’ve downloaded it and checked how the mask is applied. However, I still have one problem: The model initially was planned to be printed. Therefore, I need a “real” solid mesh. Sorry, I guess my initial request wasn’t precise enough :(.
Does someone have an idea how to create a mesh that looks like the sphere?
Best regards
Schoppe
sorry he use an alpha texture
so it is not a real model !
try to use the knife tool to cut holes in a sphere then
just add a solidify modifier and give it some thickness and apply it
happy bl
you can use the retopo / surface snapping tools to build a solid mesh over your sphere.
Good idea developers to invent texture boolean or texture knife project.
Yeah Juha, this also came to my mind :).
I’ll go on and try what Ricky and Modron suggested…
You can try shrinkwrap modifier but it can be difficult to snap to non-main axis directions.
Kind of ugly at the top, don’t you think? Why not model something that’s geometrically prettier?
Edit: see below! Very cool solution from Photox…,
So now you say the geomtry must be real! Well I guess it was in the modeling section…
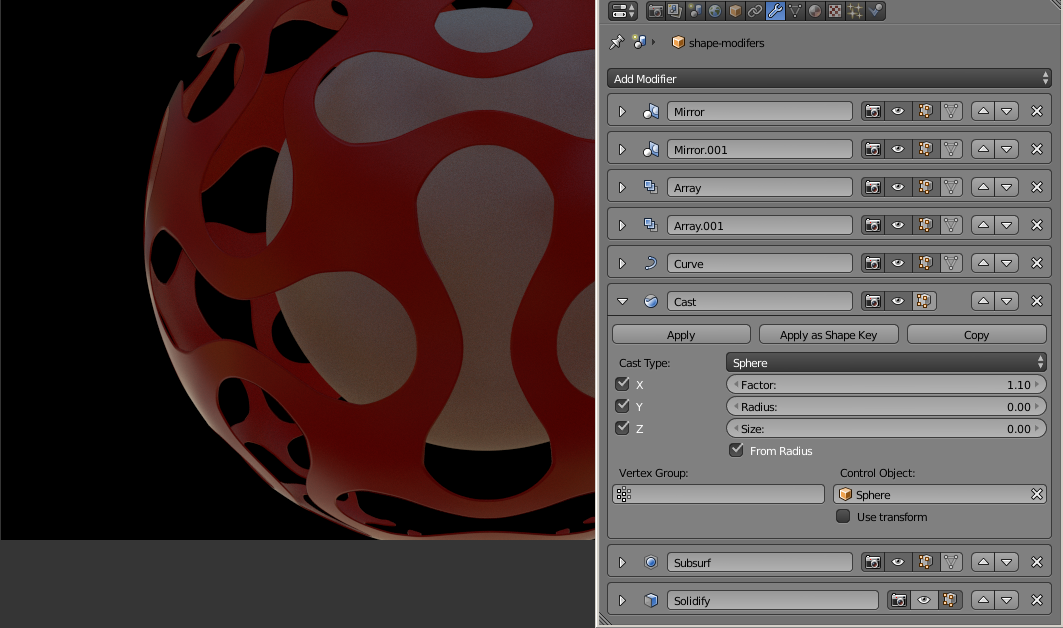
Here’s a fun method: 69 Verts, 9 modifiers.
To finish you would apply modifiers from top to bottom except the last one, solidify.
Fill (merge) the 6 face gaps left by the curve modifier. (select 4 verts press f)
and ultimately apply the solidify.
edit:correct blend:
To understand what each one does, disable every modifer (click eyeball) and then enable them one by one top to bottom
mirror x
mirror z
array, merge
array, merge
curve (circle)
subsurf
lattice
shruinkwrap
solifidy
Photox, That was a very clever solution!
I think you have shared the same .blend file again. Could you fix the link?
I think you forgot to invert the normal to get nice red color !
but nice use of modifiera
thanks
happy bl
Wrong again ricky. The normals are correct. The curve modifier flips them, so they are in proper orientation on the final modifier stack mesh. Although they do appear incorrect when viewed from the front without any modifiers.
Thanks Photox, I will learn many things with that example.
Hi Photon,
I had no time yesterday to check the file :(. However, from what I’ve seen from the pictures it looks great. As Yafu wrote it seems to be a clever solution from which there is a lot to learn. I hope I have time this evening. Anyway, I will have time tomorrow. Many thanks again!
That’s similar to my first try, Tim. But with the helix, the spacing between the stripes is varying.
Edit.
Edit.
Hi!
I checked the file. Great! I could follow the steps, reproduce and understand them. My initial try was wrong in a basic point: I tried to duplicate/array the hollow “8” (or infinity), instead of the space in between. This lead to results far away from what I expected, not worth showing here :).
While playing with model I made one change: Instead of the lattice and shrinkwarp, I directly applied the “cast” modiifer (with a sphere as control object). This also seems to work fine. Or did I miss something?
Anyway, the problem solved. Maybe I’ll try to create some other shaped spheres at some point.
Greetz
Schoppe