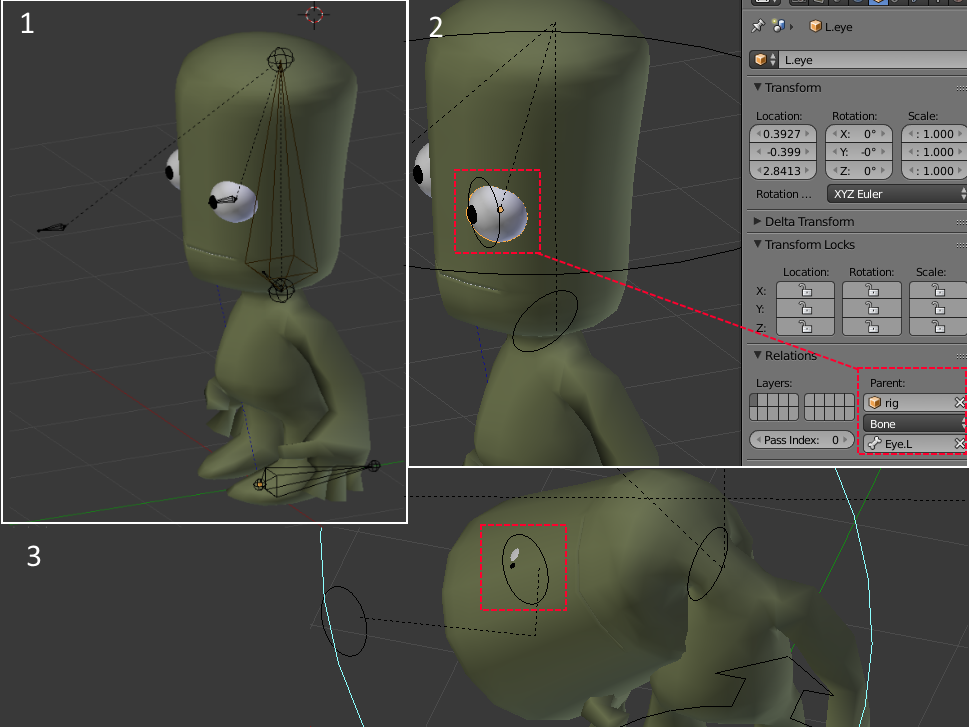
I’m modelling my first real attempt at a basic character, but am having problems keeping everything lined up correctly when the armature is posed - in particular, moving the armature seems to be affecting some things more heavily than others. I’ve been using rigify to generate the base rig, and I’ve compiled a screenshot to illustrate the problem:
A bone on the eye, and in front of the eye, both parented (with offset) to the main head bone (from rigify). The eye bone is pointed towards the target via IK, as per http://cgcookie.com/blender/lessons/creating-an-advanced-face-rig-part-one/ - though I have also cleared the IK and it doesn’t make any difference
I’ve parented the eye also to the head bone of the armature - Ctrl-P, Parent to Bone (parenting to the eye bone directly also has this same result)
When moving the armature to extreme poses, the relative position of the eye seems to drift relative to the skin??
I’ve tried selecting all the vertices around the eye area, and they are only in the DEF-HEAD group (as per the n side panel vertex weights display). I had a similar-looking problem with the mouth that I fixed by clearing all vertex groups and rig associations and redoing them, but the eye problem seems to have stuck.
You say that “I’ve parented the eye also to the head bone of the armature”, can it be that you have the eyes (objects) parented to the armature both as children and through the armature modifier?
Forgive me if I misunderstood.
you may have to post a file… if you can’t do it here on BA… try using pasteall.org…
Some things to check however…
Select your eye > Tab into edit mode > Properties Panel > Object Data (triangle Icon) > Vertex Groups… there should zero vertex groups on your Eye Object… if there are any… delete them…
second… check to make sure your axis on your bones aligned… (misaligned bone axis cause all kinds of crazy problems from my experience)…
all though David Ward is one of the better Rigging Guys in the Blender community
I also always recomment you see Nathan Vegdahl’s stuff…
Go here…
at about 4:40 in the video…
Be sure you watch the sections talking about ‘Damped Track’ vs ’ Track To’ constraints…
also note where he talks about eye Riggs and the turning of the head bone…
I much much much prefer the Nathan Vegdahl Eye Rigg…
you may very well too…
It should be setup to grab the big head handle. I’ve done in both 2.71 and the 2.72 beta, just in case it wasn’t my fault
There were vertex groups on the eye - evidently left over from some early parenting experiments. Unfortunately, removing them didn’t help. I also had a look, and to me, it doesn’t look like the bones are misaligned, but I’m not exactly sure I know what I’m looking for.
Also, thanks for the link - I’ll check that out later today and see about restructuring to follow it - this video I was using is quite useful, but in general some of his videos tend to annoy me, for various reasons.
Yeah, but it happens when I remove IK still anyway
Hummm…
downloaded your file…
not getting any odd behaviour out of your Rigg…
even though you still have lots of vertex groups on your Eye mesh that could cause problems…
Okay… I believe what the problem is that you may have the “auto run python scripts” disabled… Blender needs this to run when using Armatures and constraints…
when your in Pose mode and start to move your bones around… look up on the Top line about just a bit left of mid screen … is there a small bright yellow “alert” type triangle there saying “Auto-run disabled: Driver…etc…etc…etc…” ?
is so
Goto …
File > User preferences > File > at the bottom of the List of File Paths > check “Auto Run Python Scripts” > save user settings > exit the preferences window…
see if that has any effect…
and clean up your vertex groups on your eye… those can only cause you head aches later…
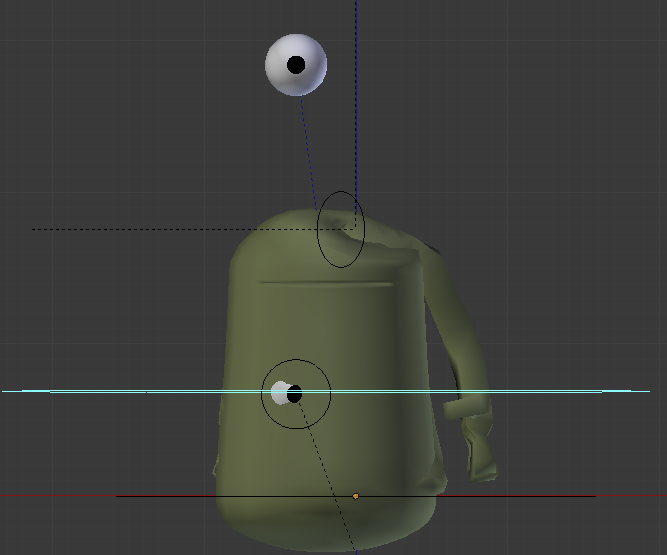
Strange - what version are you running? I’ve tried back to 2.69 and it still happens. Exact procedure - select the large circular head handle in pose mode, Hitting NumPad-1, R,Y,179,- gives the attached screen image (and hitting - repeatedly causes it to snap back and forth between two different neck orientations - and the eye to toggle between sunken and raised - something to do with it?)
You have your eye bone parented to the wrong bone. You’ve parented it to your controller bone (head) while you shouldv’e parented it to the DEF-head bone, at least in this particular case.
I hadn’t realised that armature visibility layers were different from the general scene layer filter. This also explains why the weight painting when selecting bones were apparently empty, despite the fact that deformations were working. And also why the vertex-weights names didn’t seem to match the bone names. AND why my manual weight painting screwed up with this same problem!
A lot of stuff suddenly makes sense, thanks a lot!