Hi all,
It’s been a while since I’ve posted. I thought I would post a project I’ve been working on in the last year or so. I should preface this by saying that I am in no way a professional. And I will be making up some terminology here because I don’t actually know it… If anybody does, please let me know.
The concept of the project is to figure out a way to blend and rig multiple normal maps to deform whatever is being rigged. In this case, I am rigging an Orc bust. This method isn’t limited to character work though. This project was inspired by one of the god of war 3 unlockable featurettes. Other huge inspirations include Azog from the hobbit, Caesar from the newer Planet of the apes films… and actually pretty much any digital character created in recent years that has very complex and realistic facial distortion. I know I’m not the first one to do this within blender. but I found that when it came to complex face rigging with blended normal maps, documentation and video was seriously lacking. So this is my meager attempt to mimic the kind of stuff I see in movies and games.
In order to create the different normal maps, I sculpted an initial bust of the character with as much detail as I could put into the sculpt. A disclaimer on the Sculpt, It was a rather quick sculpt I did with as much facial detail as I could put into it. I also forgot to sculpt the eyes closed… which actually leads to some problems with the eyebrows as you might notice later on… but, whatever this is just a test.

I didn’t model the teeth. Instead I used a file from blendswap made by the user lucasfalcao. Here is the link:
Once I had a main object I could start making some shape-key objects. Starting with the obvious choices (to me at least) Brow up and Brow down. The thought was that I would move the whole brow up (and down) and then separate them into left, right, inner and outer later on.
Brow up is in on the left and brow down is on the right. (I had to link this image because it was too big, also sorry for the nasty aliasing…)

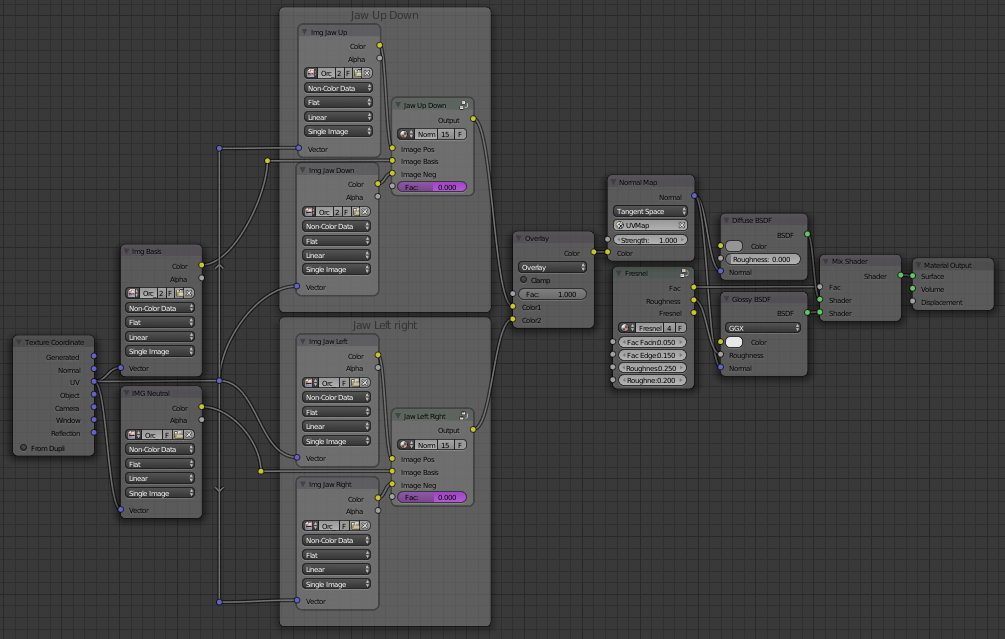
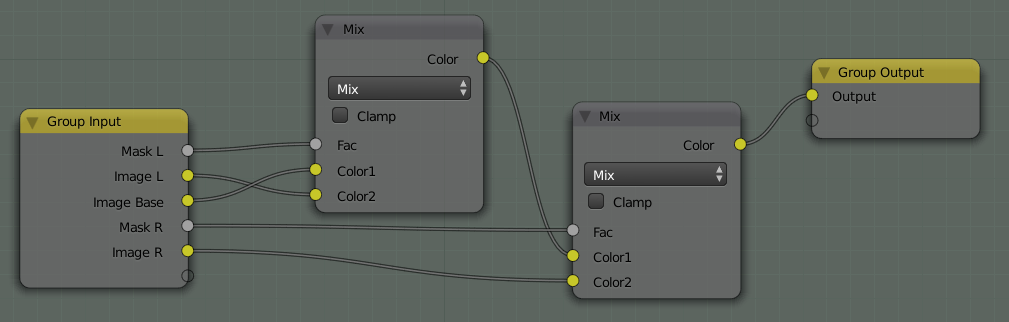
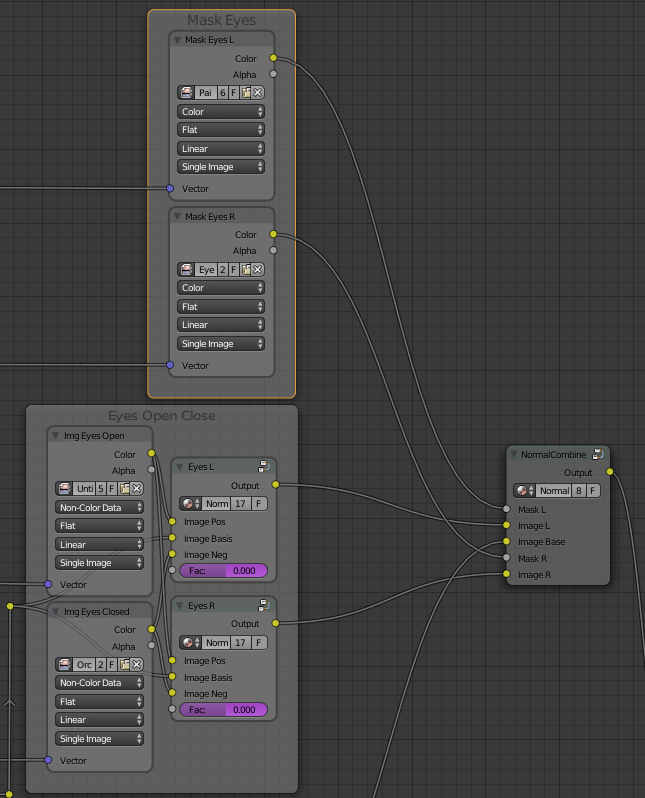
The next step was combining them into a mesh that I would deform. I settled on a multires level of 1 (14, 662 polygons) for the deform mesh. Once I had the Shape-Keys being driven by a bone, I needed to blend the normal maps I created from the three different sculpt objects. So, Much like a shape-key driver, I needed a positive, a base and a negative image. Here is the shader group I came up with.

It’s pretty simple. The eyebrow up normal map goes in Image Pos, the Main or Base normal map goes into image base and the eyebrow down normal map goes into image neg. The value slider on the bottom goes from -1 to 1 and blends between the 3 images. Here is a closer look at the inner workings of the group:
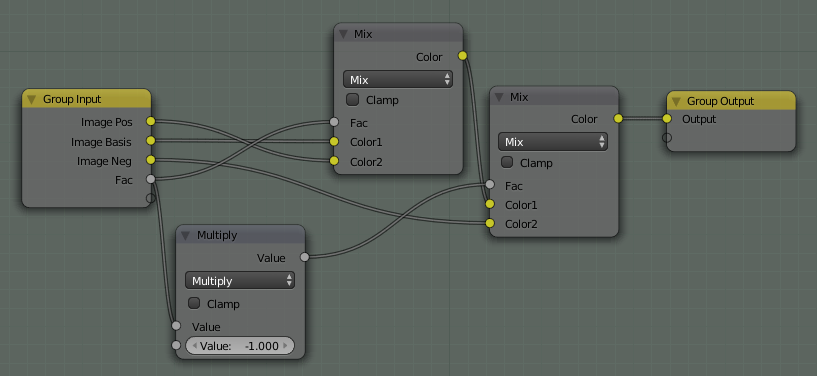
I don’t know if this needs to be explained but I will anyways because I love getting technical… It’s a condition. Image pos goes into Color 2 (value 1), image basis goes into Color 1 (value 0). The color output of the first mix node is then plugged into Color 1 of the second mix node and image neg goes into color 2. Basically what this means is that image pos and image neg will never blend between anything other than the basis. The value slider is then plugged into the factor of the mix nodes, and is multiplied by -1 before being plugged into the second mix node so that when the slider reaches -1 the mix node will be at 1. Again sorry if this seemed like it didn’t need explaining, don’t judge me.
Pretty much the only other step is to apply the same driver on the value slider of the group node that was driving the shape-keys. By the way, in the driver editor any driver that was added to a node will only show up if that node is selected.
Now, the fruit of my labor:
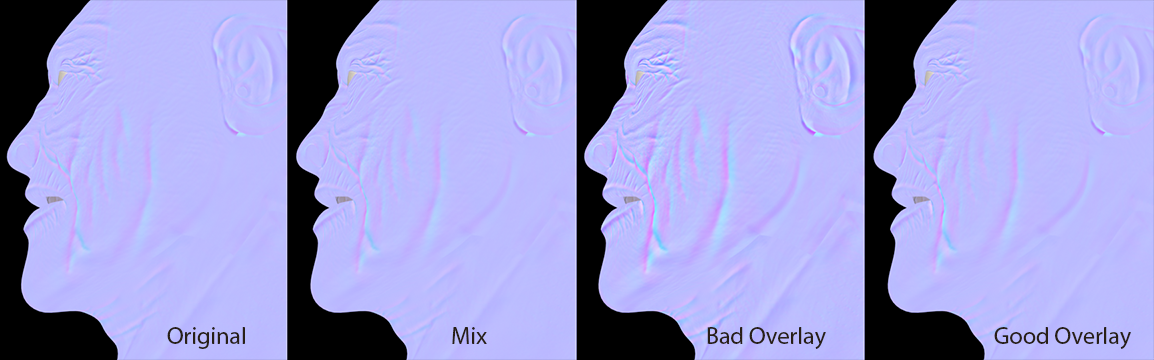
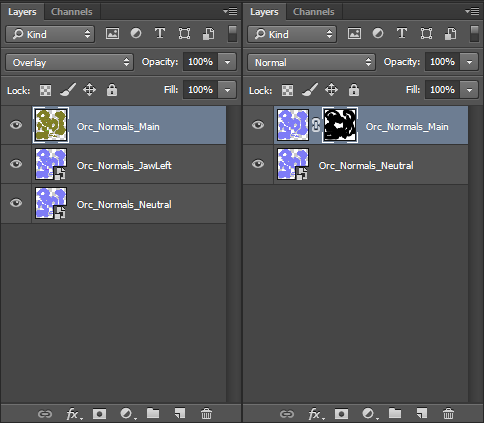
This isn’t the end of this project by the way. There’s plenty more fun to be had with blending normal maps and I’ve been losing tons of much needed sleep trying to figure out the simplest way of setting up these nodes… Here is a preview of it’s blending glory.
(only 3 images per post so here is another link…)

Anyways, hopefully my need to get super technical and over explain didn’t rustle too many jimmies. I’m really only going in depth so that others can take what I’ve done here and make it better. If anybody notices something that I could do better in the future please feel free to let me know.
-Soupertrooper
