You can enable the addon “add curve: extra objects”
Add a spiral then. There are options, bottom of T panel. Alternatively f6 all these parameters on a floating window.
Under object data panel of properties, Fill: = full. On geometry section bellow, Bevel: depth and resolution of circle.
Yes, but How??. I created a Bezier Curve, then added depth under “Object Data” then added a Screw Modifier but my results are not good see original post at top of page. Please explain how to do it?
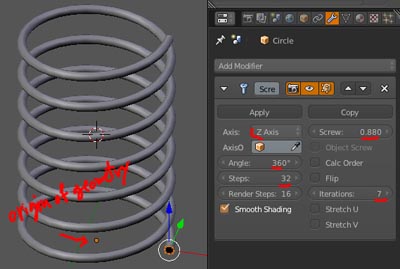
Screw modifier revolves a profile around an axis. By default it’s Z axis and the center of revolution is object’s origin. This can be changed in the modifier’s settings though.
Modifiers modify object data (vertices, control points, etc.), not objects themselves. So you need to orient and position the circle properly in edit mode. Otherwise you’ll need to use a helper object (Axis Object in the modifier’s settings) to define center of revolution and axis.
Add a circle, let’s say 8 sides and downsize it a lot.
rotate x =90º, apply rotation
Add screw modifier.
(by default at z axis), Angle=360, screw as needed, Iterations= let’s say 7, steps= as needed. flip= as needed.
Edit mode, select all vertices, move at x axis away, as needed.
It is interactive anyway.
Why to involve curves, when you will convert to mesh after?
Because curves are more interactive and animation friendly, probably.
However, the add curve addon is useful for many other cases.