hi all m new to this community and blender software i just started like few weeks before honestly currently i am learning from you tube tutorials i am trying to animate this human mesh but suddenly i saw whenever i try to move its left leg
its also pull little part of its right feet tried to figure out it with blender weight paint but in vain somehow subtract not working on it it doesn’t effect that glitch or m doing something wrong can some one please help me to sort this glitch or can show me some good tutorial for weight paint which could teach me how to use it properly. Thnx in advance :spin:
I’m on my phone, and can’t see your file, but the first thing that comes to my mind is a mirror modifier. With the mirror modifier you often have to switch to the opposite side to clean up weights. In your case that would mean select the right leg and subtract from the left foot.
Like I said, I can’t see what you’re working on, it’s just a thought.
Since you’re new around here, let me fill you in on a few things…
First, you tried to add a .blend file, hat’s off to you! A .blend file is almost always needed when looking at a problem. So good thinking on your part, however, that 4shared hosting is the worst hosting site there is. It used to be good and even I used it until it changed. I quit using it when it required users to register to download files. Now that is still a requirement, I have to be a member to download your file, and it’s filled with ads and pop-ups and pop-unders, etc, etc… But hey, it said I could download the file if I sign in thru my social media account, which I don’t have… really an ugly mess that site has become…
Two thing you can do. First, new members are restricted until their post count hits a magic number (~10ish or so), once that happens, you can upload files and maybe gain a few more freedoms. A good way to up your post count would be to look at the ‘finished artwork’ or ‘works in progress’ sections of this forum and post thoughtful feedback. Another way to up your post count is to venture down into the ‘off-topic’ section of this fourm. In that section there are some online forum games that you can post to.
The 2nd thing you can do to share your file with us is to use pasteall.org. It’s a file sharing site run by some people in the blender community and it’s purpose is for sharing .blend files, image files, and programming code. Easy to use, no sign up or anything else, just upload your file and copy the url from your browser and paste into your post here…
As to your problem, I can’t comment until I see your file.
@ @revolt_randy another thing i just saw ur vimeo video channel and those animation are damn Incredible you must have spent hella lot hard work and lots of time on those i think its truely awasome
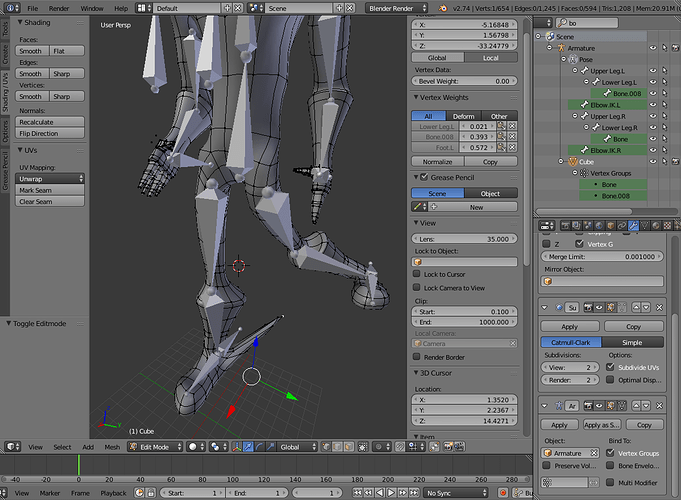
There is a (tiny) defom bone called Bone.008 and an associated vertex group that causes the problem. Deleting the bone and/or the vertex group fixes it.
omg thnx bro problem fixed u made mine day god bless you huge thnx coz of u guyz m able to animate that model he can walk now
Thnx all guyz for your huge help God Bless u all
On the armature modifier for the mesh (bottom right hand side) enable all the buttons at the top of the modifier. Now the armature modifier will work while the mesh is in edit mode. Go into edit mode for the mesh and select 1 vert that is giving you problems. In the transforms panel (left side of the 3d view) there is a vertex weights panel that lists all the vertex groups the vert is assigned to and it’s weight, notice the vert I select is weighted 3 bones, Bone.008 being one of them.
I started selecting bones, expecting them to not be named, and to my surprise, the bones I selected where named, (new users often don’t names bones). So I was wondering where Bone.008 was. Went to the outliner, top left corner of my screenshot and started typing in the name “bo” for bone. Blender highlights everything that has the letters ‘bo’, and now I can click to select Bone.008 in the outliner. In the 3d view, the 3d manipulator snaps to the bone.
Hope this helps…
Thanks for the compliment! To be honest, there is room for improvement, and yes, it takes time…
wow thnx for this all explanation you explained it realy well…its realy helpful another model fixed which was generating same problem coz of your this tutorial bro
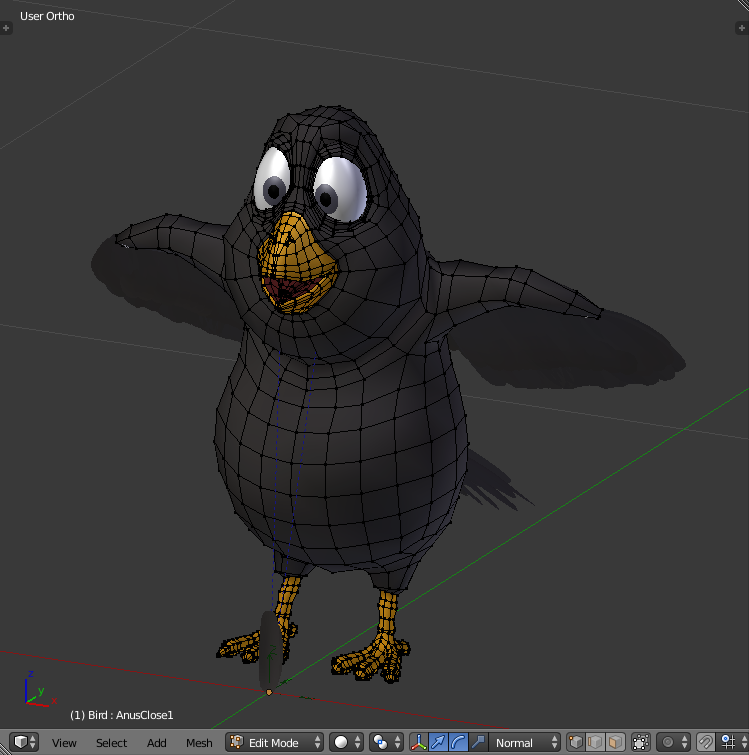
just a little one more question can’t we paint a particular area with weight paint i mean in this screenshort m trying to paint upper arm but no matter how long i use “ligten mode” in weight paint Upper Arm.L it do nothing as long as i don’t touch Lower Arm.L or rest body of this bird or tail paint doesn’t work i wanna completely paint upper Arm.L so it could bend smoothly any idea wat m doing wrong any help would be appreciated thnx in advance that blue large patch above upper arm trying hard to paint it but it doesn’t work or i think m doing something wrong i think its the reason its arm is not bending smoothly
no thats not mine problem bro… i was using empty weight since automatic weight don’t work properly every time i use it…so was thinking this time i will paint it manually(since most tutorials on net just show u they are painting but are not explaining much that wat thing do wat how to paint a specefic spot i mean selectable not just whole mesh they just use auto weight thn substract to manage it i tried that but doono wats wrong but its not working like i want most of time its just adding other parts with arm or leg or removing weight from whr it need or making mesh looks like a mess while posing i know i have less xp but i want to know whr m wrong so i could fix it ) for newbeis like me so i could describe weight and stuff on it by myself was thinking it will help me understand weight paint better and faster but i got some problem…i notice that this mesh’s arms are not getting bend properly so i started editing arms from left side coz right side coping it self from left side coz of mirror modification whn i was painting it i notice that m not able to paint upper arm properly paint just able work on some corner of bone sides aslong as m not touching mesh’s under arm m not able to add paint on upper arm no matter how long i use "add,Mix or lighten mode " it doesn’t work only on some particular area it work but in other hand when i use auto weight i notice that its dividing paint in whole arm bit lighter on joints but darker on rest bones i wonder how can i make it manually so i could animate this rig smoothly and here’s attached blend file bro i hope it will help u understand mine problem thnx in advance and thnx for looking into matter
ok u was 100000% correct abt those stretchy faces bro i can bend arms now after dividing thm in half as soon as arms started getting bend i notice some more problems (sry for asking so much)
1st) while folding arms m noticing that mesh’s under arm falling apart whn i move arm down ways i think weight paint is culprit behind it but m not sure should i increase or lower weight (it also get fixed if i change angle position but for some reason whn i reset arms position to default with Alt+r and Alt+G angle also getting reset i think i have to fix that patch manually every time i bend arms in some direction .
2nd) every time i bend meshs arm i have to set its angle manually again in Inverse kinematic properties or it bend in some other way
3rd after adding skin modifier (subdivision surface) m noticing some white patches which m not able to colour for some reason they are not selectable any idea how to paint thm
Ok, the whole problem is your model, not weight painting. You have the subsurf modifier set to 5 for the 3d view and it makes it look nice, but it just won’t work. Remove the subsurf modifier and look at what you have…
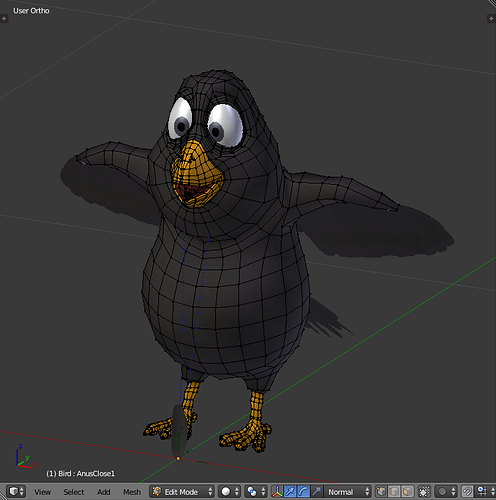
You have basically a bunch of geometric shapes. A bunch of flat faces. Faces are always flat, they don’t bend, the only place a mesh bends is along the edges between faces. For the model to deform nicely, it has to be modelled to look more like it does with the subsurf modifier. It needs to look more organic and less geometric. Here’s a bird that’s organic:
Notice how organic the mesh looks, this character deforms smoothly because of the mesh & face layout. You need to break up all those big flat faces into smaller faces if you want it to deform.
 that blue large patch above upper arm trying hard to paint it but it doesn’t work or i think m doing something wrong i think its the reason its arm is not bending smoothly