EDIT: Turns out I had extra vertices I hadn’t noticed. So nothing of this post holds true anymore but the praise.
original post:
Great Tutorial so far! I was just looking for something like this. Actually I had thought of doing it myself(model a simple character and play around with it, before bothering to learn more complex modelling/animation techniques), but even a “simple” character has proven a bit more complex than I thought so.
Anyway, on with the question:
I’m currently on section “modelling the inside of the mouth”, and when I try to do a Loop Cut around it, it only recognizes to edges, and sends an error message. So, what am I doing wrong?
I’ll try to get around it with a knife cut, but I’m still puzzled why the loop cut isn’t working.
Sorry for the direct email, silly me overlooked this thread in the first part of your tutorial.
Just wanted to say again want a great tutorial it is. If I had this to go by several years ago, I 'd be much further along then I am now. You’ve covered all the bases, mesh modeling, rigging, lighting, materials, animation, they are all there.
@timeless: I just checked out your 10-second club animation. I’m impressed that you created another character and animated it so quickly already! Glad the tutorial helped.
By the way, I only recently added this thread and the link on the first page of the tutorial – so that’s why you didn’t see it before.
I have already walk through this one and believe me this is not only the best one of BSoD but may be on of best Blender tutorials ever. Begginers can learn tons of very usefeul things.
It would be great if you wanted to work on a Spanish translation. You are the first to mention translation of any kind. Be warned though, it’s a big job! The wiki code is well over 100 pages, and while the tutorial text takes up only part of that, it still works out to 50+ pages of text you’ll have to type.
I don’t know Spanish, but I will help you out any way I can. PM me when you’re ready to work on it.
I have been so far successfully working through your tutorial, but have encountered a small problem with my armature. When I grab the leg handles and move the legs about, if I move the mouse cursor too far the foot bones and handle detach from the lower leg bone. Should this be happening? I’ve gone over the whole rigging part numerous times to see if there’s something I’m missing, but if it’s in there, I don’t see it.
That’s a limitation of the rig and I noticed it too and can tell you how to fix it fairly easily. Here are the steps briefly, if you have questions ask.
Mike
1)I made the toes, foot and lower_leg bones all connected, and changed the IK target for the lower leg from the “foot” bones, to the “leg.l/r” bones (I also renamed those to IKF.l / IKF.r).
Change toe.l/r parent from leg.r/l to foot.r/l (IKF.l/r), click the Con(nnect) button on
Change foot.l/r parent from leg.r to lower_leg.r/l, click the Con(nnect) button on
Add a copy rotation constraint to the foot.l/r bones targeting the respective “leg.l/r” (IKF.l/r) bones
(In EDIT mode), align the IKF.l/r (leg.l/r) bones with the foot bones, and make sure the roll angles were zero in edit mode. This is so that when you are in Pose mode and press alt-g, alt-r, the feet will return to a neutral rotation. (Press N for the transform properties, check/change the Roll: to 0)
After doing that, when the spine1 bone is translated down, the feet stay in place and don’t rotate (as they did with the original rig), and the foot bones also "come along for the ride) if the spine1 bone is translated upwards enough to straighten the legs and beyond.
I also moved the ‘master’ bone down in front of the character, and rotated the ‘spine1’ bone so that it sticks out behind him, making it easier to grab.
(disconnect spine2 from spine1 so that spine1’s tip can point out backwards.
also connect upper_arm.l/r to shoulder.l/r, then you can select and grab/move them or rotate them, and they’ll just still just rotate.
You can also make the arms IK quite easily, add two more bones near each hand, call them something like IKHand.R/L make the MASTER bone the parent (unConnected).
Then goto pose mode, select one of the new IKHand bones then SHIFT-RMB select lower_arm.l/r and press CTR-I to create an IK constraint. Change the chainlen to 2. Repeat for the other arm.
You can optionally add a copy rotation constraint to the hand.l/r bones targeting the IKHand.L/R bones, that way the hands will rotate to match the IK targets. Or you can choose to manually rotate the hands without the constraint.
I’ve followed your instructions up to the point where you mention aligning the leg bones with the foot bones. Should this be done in edit mode or pose mode? At the moment, both feet are pointing downwards in pose mode. However, in edit mode they point outwards. I’ve checked the roll value, and it is at 0. How do I get my feet pointing outwards as the default position in pose mode? Also, the IK handles still come loose if I move my mouse far enough, although now there is no stretching effect on the mesh. Exactly how do I overcome this?
The “leg” (IK target) bones should be aligned in EDIT mode. The idea is to get them exactly in the same orientatoin as the foot bones so that when you press alt-g, alt-r the feet and IK will orient to a default neutral pose. If you didn’t want the feet to be “neutral”, you’d put the IK target bones in whatever position you wanted.
As far as the IK handles "coming loose: that’s the way I’ve seen IK handles work on every other rig I’ve used including Ludwig, Mancandy and every rig that I’ve seen in Maya
legfly:
yep, it’s a known limitation. I sacrificed a little usability for simplicity in description, but mstram’s modifications work great.
mstram:
Do you want to write an add-on tutorial showing how to start with the final .blend and make the modifications you suggest? If you write it on your user page on the wiki, I can move it over to the BSoD easily once you’re done.
I’ve been blending for about 3 months, so I’m still trying to get my head around the basics. I’ve worked my way through quite a few tutorials already, and have to say this is probably the best I’ve seen so far. It’s definitely given me the confidence to start building and animating my own characters.
Thanks again, and thanks in advance (I’d say there’s a high possibility I’ll be nagging you for more help on this one in the near future!)
I’m glad you were able to check out my 10secondclub piece. I couldn’t have done it without your help. I still feel that I am having some trouble with the NLA part of things, I hope you can help clear it up for me. I am really close.
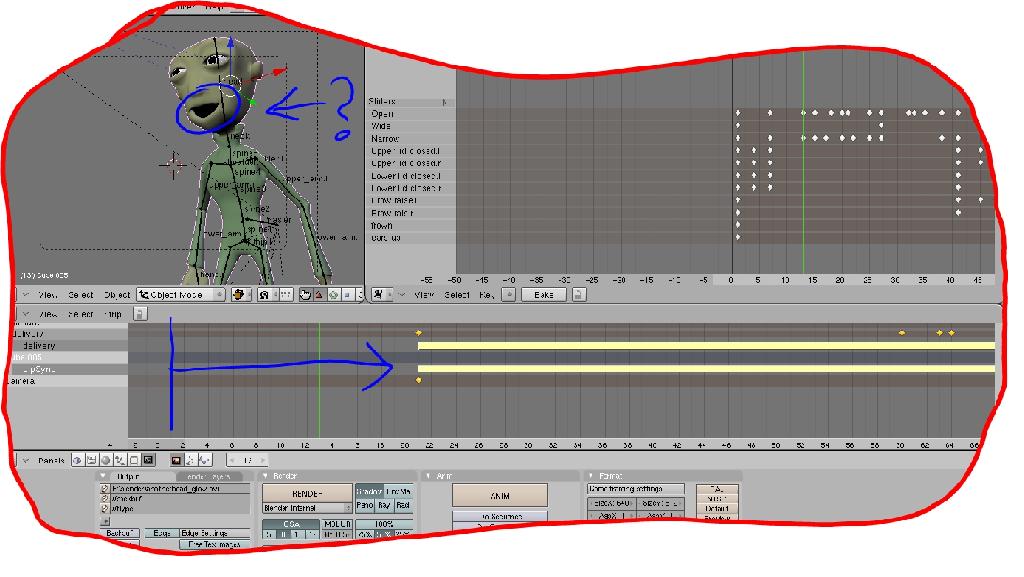
Here is a screen shot. As you can see, I have a lip-sync action, and an action for the armature for his gestures and whatever. I’m just trying to move both actions (everything that is happening) forward like 20 frames, so I can do a new action at the beginning of him walking into the shot. The problem is, after moving everything up to frame 20, the actions still start at frame 1. You can see here his mouth is open (on frame 13) as he is already speaking even though I’ve moved the lip-sync up to frame 20. I thought one of the uses of actions was that you can move them around in the NLA editor, but it doesn’t seem to be working out that way.
Thanks for any tips to help me wrap my head around this. Let me know if you would like to see my .blend
You cropped the screenshot a little close - it’s tough to see the state of the NLA/Action button-that-is-not-a-button on the left side of the NLA.
You’re right, the benefit of using the NLA Editor is moving strips around. But a shape key action for a mesh (as opposed to a pose action for an armature) takes couple of extra steps to get it to show up on the NLA properly.
Anyway, if those instructions don’t work, post a .blend and I’ll take a look.
I just noticed they aren’t strips in that blend, that is why I am not getting the button. However, even after toggling the button in the IPO editor, i still get mouth movement. It looks like the ‘wide’ shape is still animating (like his lips are glued shut).
I have noticed that usually the meshes in wireframe mode aren’t displayed completely, in my installation. I hasn’t been a problem only now I can’t align the bones to the proper vertices(“rigging the upper body”), because when I turn off subsurf and set wireframe view in object mode or in the armature’s edit mode, I get a simplfied mesh with, for instance, the elbow vertices missing.
help.
about the translation: I’m waiting till I’m done with the tut.