Based off the conversations in this thread, I have written a script (a preliminary version can be found in that thread).
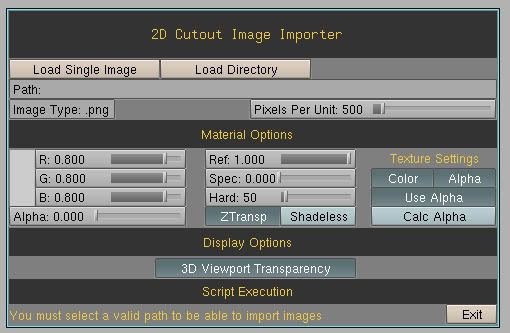
Updated UI->
The basic functionality of the script is fairly simple. Select a single image or directory of images and the import each image to a new plane, uv mapped with the image. The Pixels Per Unit slider sets how many pixels will be in one blender unit, meaning that whole directories of images will be proportional to the image size (see other thread for why this was done). Materials just give editing options for the materials (default lambert shader and cooktorr specularity).
I have only tried this script on windows, so I’d be interested in knowing if it works on other Operating systems (with the file import and what not).
June 16, 2008: I got a new update for this. It has a new UI and much, much more including materials templates and apply as a sequence of images as well as a few other miscellaneous features and improvements. Take a look:
Thanks for the script. I’ve tried it on linux and it works as long as i remember that linux is case sensitive so it wouldn’t load .JPG’s when i had .jpg in the image type box. I assume that having to click on each image before the next image appears is by design, giving you the chance to position the previous plane before the next one appears preventing a stack occuring.
I’m not quite sure what you meant by your last sentence about stacking. All planes are imported and positioned at the origin by default. If you select a directory it imports all of them (there should be a stack of planes at the origin after importing all of them). Could you describe the behavior further so I can know if its intended, a quirk with the blender redraw() function (I doubt this one, but maybe), or a bug in the script I might need to fix?
genius mate, ive needed this for ages, but now you’ve done it and i need it more than ever the next fortnight, genius , marvelous amazin, catn believe it, wicked!
@krupa: When you go into UV select mode, in the edit buttons (F9) there is a panel called ‘Texture Face’ and a button called ‘Alpha.’ If you enable the alpha button it will apply the alpha channel of the image in the 3d viewport.
Quick note - I just tried importing a folder of images exported from Photoshop on a mac, and I think, because of the .dot files (info stuff i think) the import fails after the first one - Im getting by by importing one by one, but a shame… Is there a way to stop the script from looking at these files?
I don’t have a mac on me, but I’ll look into it and try to simulate your results.
Could you tell me the specific error (in the blender console) you are getting. I created a .dot file on windows, filled it with garbage and had no problems importing a directory.
With mac im not sure how to get the console open, also it seems to (sometimes) import multiple copies of a single image (using single image import) - they end up on different objects with truncated names… ill try and research mac console thing though
Is blender highlighting any specific lines when it throws the error?
Also when you say its importing multiple copies with truncated names, do you mean that if you try to import an image like “myimage.png” its making multiple planes with the same image but names like “myim” or “myimag” or something like that instead of “myimage”(if the name on the file is too long, blender may be truncating it as well. I’m not sure what the internal length for name clipping is).
OMG… I wish I had found this script two days ago when I was working on a model of a house and was UV mapping every wall with wallpaper textures - 40 walls and a few hours…LMAO! I could have cut my work by at least a 1/3. This is great. Keep up the good work.
One quick question. Would it be possible to expand beyond just planes with a script? Spheres and cylinders. Just a thought.
@cipher_X: Yes its entirely possible to extend this with spheres and cylinders. That was outside the scope of the original purpose of the script though (since it was meant for 2D animation), so I’ve just never considered doing it.
Hopefully I’ll get around to updating this script soon. I had some good ideas back a couple months ago when I originally posted it for ways to extend/improve it, but lost track of time.
On a similar note, the URL for this script will likely be changing soon due to some webhost things. Not sure what it will be yet, but it will be changing. When it does I’ll post an update.
 sweeeet