@atom: I think I can do the trick with a vertex group; because each plank consists of 4 vertices not shared with other planks, I could assign the same random vertex weight to those 4 vertices. I am not entirely sure if the attribute node allows access to vertex group but if not using vertex colors in stead of vertex group weights would be an alternative (and I am pretty sure vertex colors can be read with the attribute node).
in case you make a very large floor is it possible not to make it 3D only 2D
in any case i need only the top part of the floor not what is under it which is normaly invisible!
also how do you add material to this
is it just add an image texture in cycles
i assume here that the image has to be seamless!
how do you make certain it does not repeat the pattern?
if you need a floor that is not rectangular
do you have to use the knife objet cutter to get the needed shape
i need a big floor that looks like a parabola shape!
nice work and very usefull for floor boards
thanks
I made a few improvements to your Script (improvements from my point of view as one who creates architectureal visualizations).
Now you can have a random offset per row value.
And I made now the regular offset value per row and not as an initial offset.
Random Length and Width is now a Max Value, for example if you set 0.2 for random length then it adds a value between 0 and 0.2 to the regular length to it.
Sure this could be improved by setting a min and max value.
I hope it’s useful for anybody and I hope I did not destroy any other functions in the Script 
planks.zip (2.76 KB)
@Ricky
The Script creates random UV Coordinates for each plank. This means there will not be any repeating of the Texture as long as it is bigger than the plank itself
Kind regards
Alain
Hi,
I added random vertex colors to each plank to ease creating materials with a per plank random component. I documented it in this article.
@alain: your changes sound very useful indeed. I’ll have a look at them and try to merge them with my code. Thanks for your contribution!
@rickyblender: if you need just the 2d object you can simply remove the solidify and bevel modifiers from the modifier stack. If you want a non rectangular section I probably wouldn’t use the knife operator but add a boolean modifier.
Thanks varkenvarken.
Can you give us a little hint how to setup a random HUE-Value for a Image in a Material, using Vertex Color ? 
The Random Material Node in Cycles is per Object, this means it’s not clear to me how I can control random values with Vertex Colors within an Object…
Kind regards
Alain
i can see one UV unwrap
for all planks!
so what is best thing here
try to fit uv map over one image
or scale UV map bigger to repeat pattern
but this might create repeating pattern in this case?
and one more thing if you make very big floor with 100 of planks
you have to get a very big picture like 4K X 4K maybe
so that you can zoom in
or is it possible to use a small image ?
this is not using the infonode for making randomness in texture for each plank
i still think you should add a checkbox option to make it 2D or 3D
depending on user need it would be more flexible that way
thanks
@alain: given that you have some seamless image (a placeholder in the image below) you might drive your hue node as follows (toned down by the math node to keep the variation subtle):
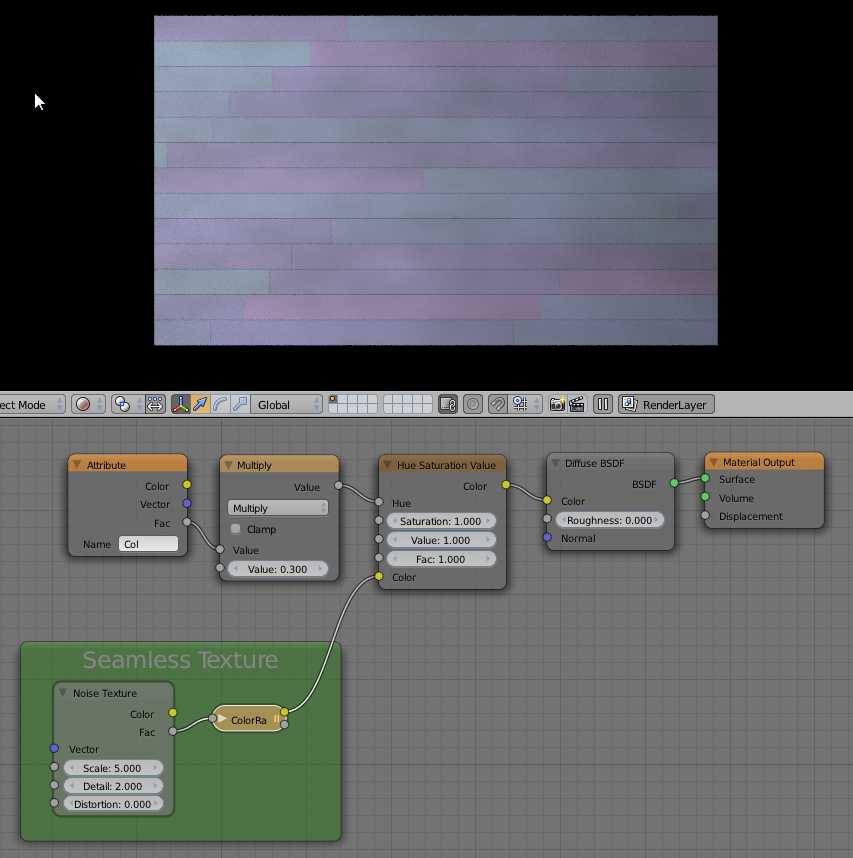
cheers
– Michel.
@RickyBlender: There is indeed 1 uv map for all planks, with each plank at a separate random position. This will make each plank look distinct. If you have a seamless texture you should scale the map in such a way that the size of individual individual features (like knots or veins if its wood) look good to you. It not necessary per se that the scaled texture covers al planks (its seamless after all). Which resolution you need is dependent on how close up you will view the floor: if the closest visible part covers only a few hundred pixels there’s probably no need a 4K texture, but let your artistic eye be the judge of that
@varkenvarken
Your vertex group map is really helpful and tipically in archviz this kind of variations are for the brightness so I can suggest this shader setup:
Attribute node->RGBtoBW-----
|||||||||||||||||||||||||||||||||||||------- mixRGB ------- color input of the shader
texture map node ---------------/
Using mixRGB as multiply mode and setting the mix value you can have good results… in addition you can mixing again the vertex color map with a hue/saturation node with a very low saturation value…
@marcatore: indeed you can drive different qualities with the node. it is however not always necessary to convert the color output with a rgb-to-bw node: if you plug it in a float input socket (a grey dot) this conversion is done automatically.
A general point of interest might be that the rgb values that the script assigns to the vertices of the individual planks are independent. That means that if you separate them with a separate-rgb node you can use each channel to drive a different property, say red for hue, green for glossiness and then these variations in properties will be uncorrelated.
@varkenvarken
This is interesting.
I made a Group Node to controll the initial and the maximum of variantion Value (it’s based on Sanne’s Random Clamp Node Group per Object):
See here, Material:
And this is the Group Node:

I hope it’s useful for someone ![]()
Kind regards
Alain
@alain: I am not sure I understand you completely … Your final assumption however is not true: rgb channels are NOT in the range [0 - 255] but in the range [0 - 1] (color may be stored as values between 0 and 255 in an image file but that’s another story)
So if you have already some material that is slightly random for different objects, all you need to do to get that behavior for different planks is to replace (inside that group node you show in your 2nd picture) the Object Info node by an Attribute node, but maybe I am missing something here?
I just edited my last post, I found the solution, you are right values are between 0 and 1 and not 0 and 255 
It works now 
Kind regards
Alain
@RickyBlender
I just merged varkenvarken’s and my additional Code.
This is the newest Version 0.0.5:
planks_version_0_0_5.zip (2.83 KB)
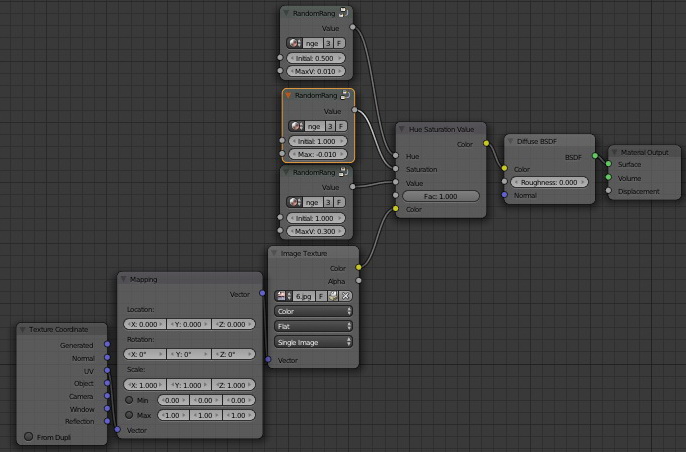
Here is a Blendfile to test around with Material Node Setup for random HUE, SAT und VAL.
You just can plugin the “RandomRange” Nodegroup into any Value.
floorgnerator_Test_03_140813.zip (346 KB)
I hope it helps.
Kind regards
Alain
Looking at this, I could see some incredible uses if the script was to go in the direction of being a generic tile/board/brick generator, think of all the time that can be saved for detailed scenes.
What would also be cool is to additionally fit/truncate these patterns to fit certain shapes that don’t even have to be planar (with slope handling modes such as blocky or smooth with the option for edging tiles). For a recent project of mine, I spent perhaps a cumulative total of about an hour placing stones by hand (and that is even with duplication of various sections to speed things up), having this done all automatically would be terrific.
@ace dragon: I will definitely try to get some more functionality in the script (and maybe Alain would like to help out some more, Alain? ).
Some regular tilings (like square and half brick) are simply presets and currently I am looking into a solution to distribute presets along with the scripts (that is not as simple as it sounds, you can’t include presets in the zip-file because the presets live in a directory paralel to the addons directory).
Fitting a pattern to follows a surface (and one that is arbitrarily truncated) is a bit more involved (unless these are planes perpendicular to the major axes).
But before I try my hand at it I would like to sure about what you mean by slope handling modes. Could you expand on that a bit more? (What I would like to have myself was a way to tile a semi-circular with small tiles, like you sometimes see in bath rooms. One way to let the user specify this is by selecting a bunch of faces in a mesh, generate the planks (or tiles in this case) and orient each tile perpendicular to the face normal of the face closest to the tiles midpoint. ) I don’t know what you mean exactly by blocky vs. smooth though, or do you mean curved tiles maybe? I definitely would like to have an option to randomize the orientationof the planks a bit and maybe even warp them as well (for old planks, but wouldn’t make much sense for stone tiles)
– Michel.
PS> Isn’t some of the functionality (tiling a wall) covered by the masonry addon (now part of add_mesh_building_objects) ?
made some additions and merged Alain’s contribution (and credited him in de bl_info bit of course
@RickyBlender: the solidify and bevel modifiers are now optional (but on by default). Unchecking the ‘modifiers’ checkbox will give you a flat (2D) geometry.
I would love to help you, because Blender needs more mature Scripts ![]()
My scripting knowledge is not good. I scare a bit of complicated algorithms because I fear that my brain can not handel it. But my main focus is always on usability and ease of use. So maybe I can help you with that and with my experiance in the architecture visualization industry.
Kind regards
Alain
@alain: having serious feed-back is very valuable to me, especially from someone with experience in the field. I am just a guy who likes to code, so your input on usability would be very welcome
meanwhile I added options to randomly rotate individual planks (for an old looking floor) and grouped the options for better readability.
– Michel.