nice trick!
I never new you could wrap one object around another like gift wrap! Nice method, It’ll be great for mapping an eye ball.
Great trick!

I think that this type of pre-unwrapped Icosphere needs to be hard coded into the blender Add => Mesh menu.
as others have said, brilliant.
On that tutorial he states:
- create a material for the sphere and add the ground texture for your planet
I’m lost on that. What does he mean? I thought we were using an image.
Also on this tutorial on this page, what is the step to get the image on the grid?
Thanks.
This is a really great trick to know.
THANK YOU all for your nice comments, i’ve been away for a while and i’m happy to see that many people enjoy this little trick 
thanks alot
I can’t get this to work right.
There are some steps missing.
1- add a grid
2- unwrap it.
3- put the cursor under the grid (i did 1 blender unit, so it would make a default uvsphere)
4- from the side view wrap (shift+w) 180
5- from the front view wrap (shift+w) 360.
6- all done!!!(select all vertices and remove doubles)
Here is what I added to the suggested work flow. (newbies need to know the extra steps)
add a grid
put the grid in edit mode
unwrap it using smart projection.
put the cursor under the grid (i did 1 blender unit, so it would make a default uvsphere)
from the right view wrap (shift+w) 180
from the front view wrap (shift+w) 360.
all done!!!
At this point you are far from done. The object still needs a material. So I apply a new material, then I pick my earth map (which I already imported). I change the MapInput from Orco to UV.
This just produces a stretched out earth.
Attachments

Atom:
Apply your grid to the top ortho view.
Add material now with an image texture. (Map input UV and flat.)
Do a plain unwrap with a UV Editor window open and make the grid fit your image in the UV editor.
Go to side view, move the cursor down and warp 180
Go to front view and warp 360
Remove doubles.
That should do it.
Hiya Atom!
I’d never heard of this trick until today. Very timely as it will help with some projects I’d like to start.
I had troubles with stretching, too. It might be because my default setup has messed up which way is “side” view and “top” view. Or maybe not.
In any case, I got it to work by going to the UV image window and rotating the image, then scaling the UVs appropriately in the Y and the X. My first try ended up with the X being backwards. grin
After that, it worked very well.
While this is a neat method, it is no better than direct mapping of a UV sphere.
Create sphere
Orient so that North is up in the front ortho view.
Add material with image texture: UV and flat.
Unwrap using “Sphere from View” with UV editor open.
In UV editor scale and move grid to fit the image. (Note at the top, and bottom, there will be areas of the grid that are off of the image but are actually over the tiled copy.)
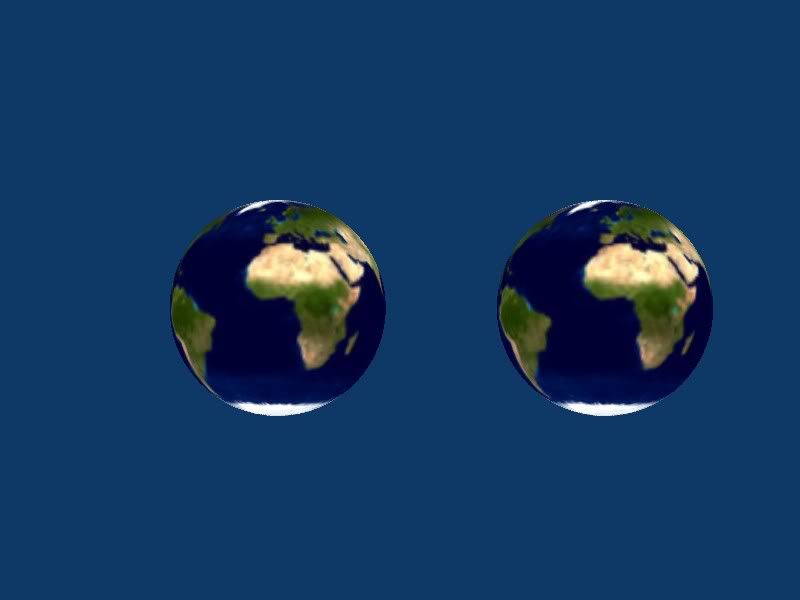
The earth on the left was textured using the technique in this thread. The one on the right using the approach above.
i dont know how to unwrap things but in 2.49 i find makeing a plane makeing uv tex then subdevideing it is a good way to do it
wow thanx, very useful 
atom I had this first as well, it all comes down to from which view you do the first and second wrap.
-
side
-
front
then the map will flow the way how the earth is and not 90 degrees rotated.
I finally figured it out and got working shape key morph from plane to sphere or back.
I have put together a few different scenes in common video aspect ratios.
You can find them here:
http://blenderartists.org/forum/showthread.php/180470-How-To-Animate-A-Sphere-Morphing-To-A-Plane?highlight=
awesome dude
I didn’t know the warp function before…
Thanks
The thing is, in blender is there is so many hidden function…
And take so much time to get in them
If anyone was wondering, you can check out this video: https://youtu.be/TLWlWEY5JPw?t=57s
BlenderVisionPro does an excellent job at demonstrating (step-by-step ![]() ) the UV unwrapping method described above. His tutorial is oriented towards beginners. Hope this helps!
) the UV unwrapping method described above. His tutorial is oriented towards beginners. Hope this helps! ![]()
If anyone is a beginner to Blender, the following video has an excellent demonstration of paulo_gomes’ UV unwrapping method.
Hope this helps! Enjoy!