Cosimo_0:
I’ve seen what you’re describing before, but I’m not sure how to replicate it. It’s a shot in the dark but try this:
*Select the mesh
*In the Draw panel under the Object buttons, press the Wire button
That will force Blender to draw the mesh in wireframe, even when you’re in shaded mode.
If that doesn’t work, no worries. The bone position doesn’t have to be exact, and you can always tweak the bone positions in the armature’s Edit mode even after the character has been rigged.
I don’t think there’s a right or wrong :). “Right” is just a matter of what looks good and what’s easy to work with for a particular project. Again, you can always move the bones around in the armature’s Edit mode later if they don’t deform the mesh properly, but I’d say laying out the bones along the mesh as you modeled it was the “right” move . . .
Now, in the Action Editor, click the X (delete) next to AC:Hit and the
datablock menu will disappear. (If you Add New instead of deleting then it
will copy selected bones to the new action and you don’t always want that).
i think that is where i was getting confused. for instance, when you go to make the ‘blink’ action, you will need to hit the ‘x’ first. normally, i would think this would delete the selected action all together but apparently this isn’t the case. hit ‘x’ before making a new action, unless you want duplicate the current action.
uh… I’m having some problems with the walkcycle… starting with the 3rd pose, both legs are always bent almost the same, so it is impossible for me to keep just one of them straight by moving the spine1 bone upwards. I dunno if there’s a problem with my initial stance or what, and there’s no “before” picture in the tutorial(those might come in handy at that point)… and if I move the right foot down I’ll move it “beyond the floor” so I guess that isn’t the idea either.
also, I had to create a second “walkcycle” action because at some point while trying to figure out how to fix the original one, something happened and when I cleared rotation of the bones the mesh deformed completely. Someone knows:
a)why did this happen?
b)how to delete the extra walkcycle action?(It wouldn’t hurt to know also how to delete materials that aren’t being used and so on and so on)
PS: the problem is not so much on frame 6, but when I turn to the 4th pose, in frame 8/18… well, that’s just impossible…
did you try moving the spine up and a bit forward (to the left, in the side view)? this is the ‘passing’ pose, so the spine would naturally shift a bit forward.
no clue
i don’t know about actions, but i believe unused materials are cleared out when you save and reopen the file.
:s I’m starting to feel embarrased bout all this questions… BUT.
The sound editor isn’t working “as promised” for me.
1.- I cannot “enlarge” the sound further than its 22-23 frames of duration.
2.- It doesn’t sound when I move the timeline, with sync and scrub on.
my walkcycle problems I resolved with some tweaking of the bones, but it looks like the character is tumbling forward at the “high point”. I’m currently animating a drunk guy.
maybe your system isn’t showing the filetype extensions? So you would actually just naming the file “hello_world.wav.BLEND”, that is a blend file with a “.wav” on its name.
Dunno if that’s the case but its the only thing that comes to my mind.
To fix that you should go, in an explorer window, to “Tools>Folder Options” hit on the “view” tab and look for something like “hide extension of known files” and make sure it isn’t checked.
(The names of the menu items are translated back from spanish, so I don’t know if those are the actual names, but they should be similar)
Cosimo_0:Posting a .blend might help with your walkcycle issues, it’s a little difficult to picture exactly what you’re talking about. As for your sound issue: I don’t know if it’s possible to “enlarge” the sound file. If it’s 23 frames long, that’s how long it is. You should be able to move it forward and back along the timeline, though, in the Sequence Editor. Finally, as far as sound not working, sometimes you have to hit Alt-A in the 3D Window for Blender to “register” that you have a sound file loaded before scrubbing will work.
legfly: For renaming the .wav file, I think where Cosimo_0 was going with the windows comment was this:
*Open up My Computer
*Go to Tools>>Folder Options
*In the View tab, uncheck “Hide extensions for known file types”
*Now try renaming the file
[EDIT] ah, Cosimo_0 beat me to it![/EDIT]
LukasT: Nice find. I just fixed it on the wiki.
everyone: This weekend I’m going to be doing some updates based on some suggestions in this thread and others I’ve received via email and PM’s. There won’t be any major changes, but lots of clarifications and refinements (like using the “X” button in the Action Editor and how to delete actions).
well, in the pictures the sound file looks 150 frames long, at least that’s how I remember it.
some comments on the tutorial:
it is really basic, but at some point you switch the buttons window to a non-linear editor and then, I think for the facial expressions, you start using buttons again but never actually say “switch back to a buttons window”.
second, maybe more important, I don’t recall you explaining that with the MMB you can move the window headers when they aren’t displayed completely. That’s specially important when you have to copy and paste the poses of the armature, because those buttons are hidden by the “actions” window.
I had noticed some other stuff but I forgot. Nothing that kept me from figuring it out, though.
Or use the good old dos/cmd prompt (what the heck is that ??? :eek: :eek: ) where an “unfiltered” view of the file system is available
From the start menu :
run… enter “cmd”, press ok.
type help<enter> or help | more
The ren(ame) (either ‘ren’ or ‘rename’ is accepted) will rename a file
The dir command will list files in the current directory, or whatever directory / file path you supply … including wild cards e.g. dir *.blend will list all your blend files in the current directory.
The cd command will change the current directory.
Behold … a whole new world of the command prompt
In WinXp there is even “path/file name auto completion” now … Hallejuleh !!! Use the TAB key. E.g. type cd \prog{Press TAB} and you should see 'cd “\Program Files” magically appear. Press ENTER to change to that directory.
<b>cd</b> \blender\sounds  (or wherever you downloaded the "blend"/sound file
<b>dir</b> hell*   or  dir hel{Press TAB} ... "hello_world.blend" should appear

<b>ren</b>(ame) hel{TAB} (hello_world.blend appears) he{TAB} (hello_world.blend appears again.  Backspace over the 'blend' and type in 'wav' .. ENTER
If you have all your .blend files in one directory / sub directories you can do :
"cd {my blender data directory} e.g. cd c:\blender\data dir *.blend /s> c:\blender_files.txt
Now you have a list of all your blender files in “c:\blender_files.txt” that you can open with notepad or other text editor.
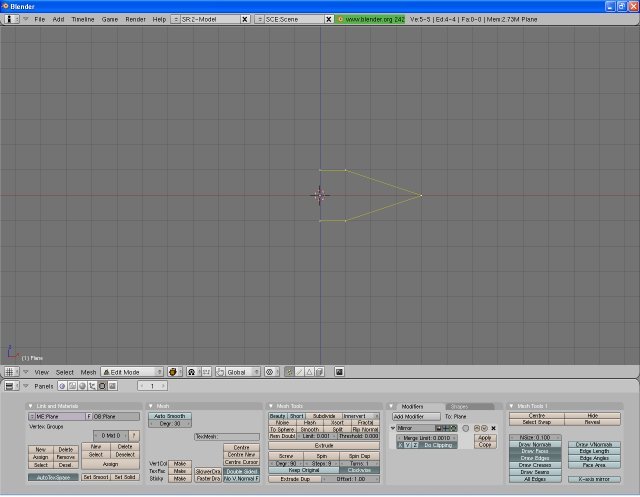
I’m having trouble getting the mouth to come out right. I’m using Blender 2.42a and for some reason nothing is coming as it should. Here is the initial mouth grabbed.
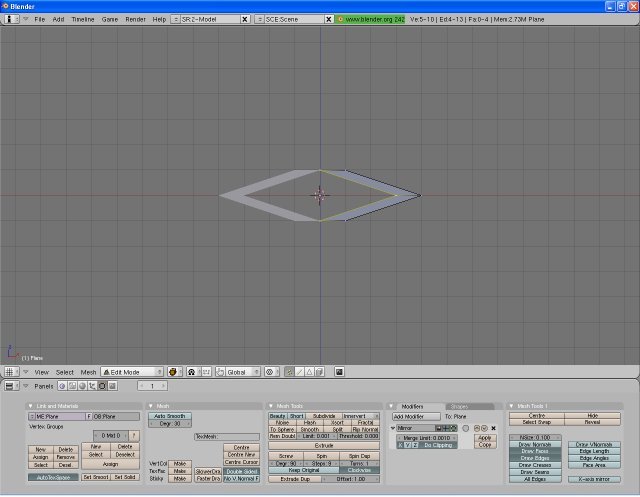
Extruded
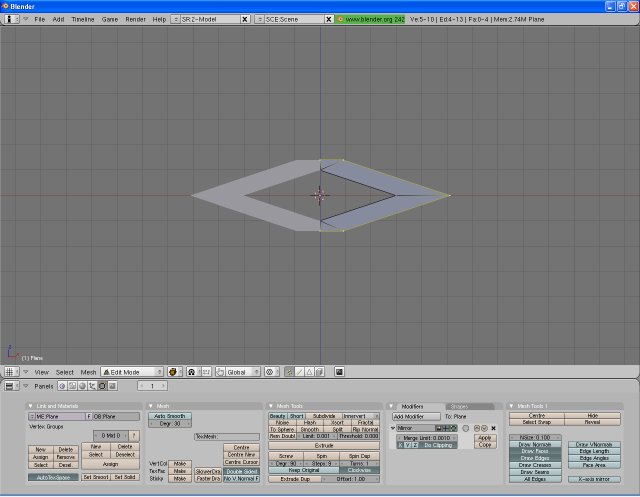
And Scaled
For some reason I think when I set up my plane, vertices aren’t getting created or something. Could someone please advise on what I may be doing wrong? If anyone needs the original images, I can send them to you zipped to see what’s going on.
I was able to replicate your screenshots by hitting E to extrude the vertices of the plane, moving the mouse to the left, hitting LMB to confirm the move (instead of RMB to cancel), then scaling the vertices down.
Remember, hitting E to extrude automatically puts you in Grab mode. What you want to do is hit RMB to cancel any moves you made. Then scale as needed, but remember it matters which direction your mouse moves while scaling . . . in this case, you want to increase the size of the new vertices.
If that doesn’t help, post a .blend and I’ll be glad to take a look.

