Mineblend - Blender importer add-on for Minecraft worlds

Thanks for the updates. Being able to select the layers is a huge memory and time saver. I’m currently tweaking a scene for a nice render (hopefully will be able to get some nice cycles renders over the weekend.) This particular one is a large interior, so lighting is a bit more of an issue.

Here are some screenshots straight from MC of what I am doing. http://imgur.com/a/0tJIU#9

I have another scene that is not loading for some reason. (I think the same problem as Atom posted) it goes through the load process, but then the scene is empty except for the material blocks. It’s not the zoom, because I can see the face/vertex count in blender is small. I’m still trying to figure out what is wrong with that though.

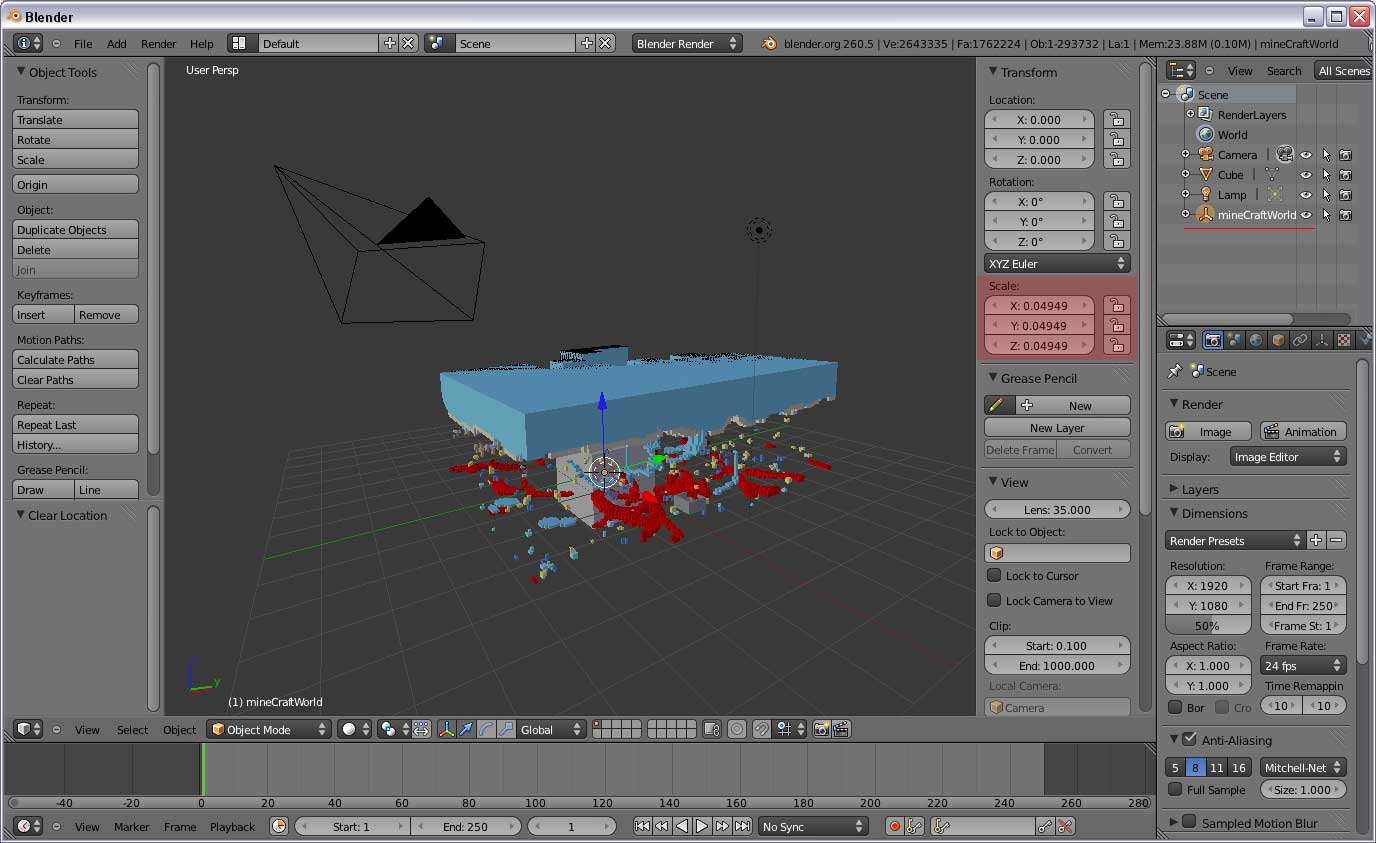
@acro: Thanks for the tip. you were right. The world was generated just outside the viewport clipping range.

I made a modification to the init.py to parent all generated objects under a single Empty called “mineCraftWorld”. This way you can scale and position the whole world from a single object.

init.py


# io_import_minecraft

# ##### BEGIN GPL LICENSE BLOCK #####
#
#  This program is free software; you can redistribute it and/or
#  modify it under the terms of the GNU General Public License
#  as published by the Free Software Foundation; either version 2
#  of the License, or (at your option) any later version.
#
#  This program is distributed in the hope that it will be useful,
#  but WITHOUT ANY WARRANTY; without even the implied warranty of
#  MERCHANTABILITY or FITNESS FOR A PARTICULAR PURPOSE.  See the
#  GNU General Public License for more details.
#
#  You should have received a copy of the GNU General Public License
#  along with this program; if not, write to the Free Software Foundation,
#  Inc., 51 Franklin Street, Fifth Floor, Boston, MA 02110-1301, USA.
#
# ##### END GPL LICENSE BLOCK #####

# <pep8 compliant>

bl_info = {
    "name": "Import: Minecraft 1.7+",
    "description": "Importer for viewing Minecraft world/region data",
    "author": "Adam Crossan (acro)",
    "version": (1,1),
    "blender": (2, 6, 0),
    "api": 41226,
    "location": "File > Import > Minecraft",
    "warning": '', # used for warning icon and text in addons panel
    "category": "Import-Export"}

# To support reload properly, try to access a package var, if it's there, reload everything
if "bpy" in locals():
    import imp
    if "mineregion" in locals():
        imp.reload(mineregion)

import bpy
from bpy.props import StringProperty, FloatProperty, IntProperty, BoolProperty, EnumProperty
from . import mineregion

# Begin Atom code 12-02-2011
def fetchIfObject (passedName= ""):
    try:
        result = bpy.data.objects[passedName]
    except:
        result = None
    return result

def returnAllObjectNames ():
    # NOTE: This returns all object names in Blender, not scene specific.
    result = []
    for ob in bpy.data.objects:
        result.append(ob.name)
    return result 

def returnObjectNamesLike(passedName):
    # Return objects named like our passedName.
    result = []
    isLike = passedName
    l = len(isLike)
    all_obs = returnAllObjectNames()
    for name in all_obs:
        candidate = name[0:l]
        if isLike == candidate:
            result.append(name)
    return result
# End Atom code 12-02-2011

#Menu 'button' for the import menu (which calls the world selector)...
class MinecraftWorldSelector(bpy.types.Operator):
    """An operator defining a dialogue for choosing one on-disk Minecraft world to load.
This supplants the need to call the file selector, since Minecraft worlds require
a given folder structure and multiple files and cannot be selected singly."""

    bl_idname = "mcraft.selectworld"
    bl_label = "Select Minecraft World"
    
    #bl_space_type = "PROPERTIES"
    #Possible placements for these:
    bl_region_type = "WINDOW"

    mcLoadAtCursor = bpy.props.BoolProperty(name='Load at 3D Cursor', description='Loads chunks around relative position of cursor in 3D View from (0,0,0), instead of loading saved player position.', default=False)

    #TODO: Make this much more intuitive for the user!
    mcLowLimit = bpy.props.IntProperty(name='Load Floor', description='The lowest depth layer to load. (High=128, Sea=64, Low=0)', min=0, max=128, step=1, default=0, subtype='UNSIGNED')
    mcHighLimit = bpy.props.IntProperty(name='Load Ceiling', description='The highest layer to load. (High=128, Sea=64, Low=0)', min=0, max=128, step=1, default=128, subtype='UNSIGNED')

    mcLoadRadius = bpy.props.IntProperty(name='Load Radius', description="""The half-width of the load range around load-pos.
e.g, 4 will load 9x9 chunks around the load centre
WARNING! Above 10, this gets slow and eats LOTS of memory!""", min=1, max=50, step=1, default=5, subtype='UNSIGNED')    #soft_min, soft_max?
    #optimiser algorithms..
    mcOmitStone = bpy.props.BoolProperty(name='Omit Stone', description='Check this to not load stone blocks (block id 1). Speeds up loading and viewport massively', default=True)
    mcShowSlimeSpawns = bpy.props.BoolProperty(name='Slime Spawns', description='Display green markers showing slime-spawn locations', default=False)
    mcLoadNether = bpy.props.BoolProperty(name='Load Nether', description='Load Nether instead of overworld.', default=False)

    from . import mineregion
    wlist = mineregion.getWorldSelectList()
    if wlist is not None:
        mcWorldSelectList = bpy.props.EnumProperty(items=wlist[::-1], name="World", description="Which Minecraft save should be loaded?")   #default='0', 
    else:
        mcWorldSelectList = bpy.props.EnumProperty(items=[], name="World", description="Which Minecraft save should be loaded?")

    #my_worldlist = bpy.props.EnumProperty(items=[('0', "A", "The A'th item"), ('1', 'B', "Bth item"), ('2', 'C', "Cth item"), ('3', 'D', "dth item"), ('4', 'E', 'Eth item')][::-1], default='2', name="World", description="Which Minecraft save should be loaded?")
        
    def execute(self, context): 
        print("I got value: " + str(self.mcWorldSelectList))

        self.report({"INFO"}, "I got value: " + str(self.mcWorldSelectList))        #from . import mineregion
        #toggleOptions = { 'loadSlime': mcShowSlimeSpawns }
        opts = {"omitstone": self.mcOmitStone, "showslimes": self.mcShowSlimeSpawns, "atcursor": self.mcLoadAtCursor,
            "highlimit": self.mcHighLimit, "lowlimit": self.mcLowLimit, "loadnether": self.mcLoadNether}
        mineregion.readMinecraftWorld(str(self.mcWorldSelectList), self.mcLoadRadius, opts)
        self.report({"INFO"},"Minecraft world read.")
        for s in bpy.context.area.spaces: # iterate all space in the active area
            if s.type == "VIEW_3D": # check if space is a 3d-view
                space = s
                space.clip_end = 10000.0
        #run minecraftLoadChunks
        
        # Begin Atom code 12-02-2011
        self.report({"INFO"},"Attempting to parent minecraft objects...")
        # Create an empty to be the parent of this minecraft level.
        ob_parent = bpy.data.objects.new("mineCraftWorld", None)
        context.scene.objects.link(ob_parent)
        # Now parent all "mc" prefixed objects to a SINGLE PARENT.
        ob_list = returnObjectNamesLike("mc")
        for ob_name in ob_list:
            self.report({"INFO"},"Reviewing [" + ob_name + "] for parenting.")
            ob = fetchIfObject(ob_name)
            if ob !=None:
                if ob.parent == None:
                    # Only change parenting if no other parenting is present.
                    ob.parent = ob_parent
                else:
                    self.report({"INFO"},"[" + ob_name + "] already has a parent.")
            else:
                self.report({"INFO"},"Could not fetch [" + ob_name + "] for parenting.")
        return {'FINISHED'}
        # End Atom code 12-02-2011

    def invoke(self, context, event):
        self.mcLoadAtCursor = True    #Atom code 12-02-2011
        context.window_manager.invoke_props_dialog(self, width=350,height=250)
        return {'RUNNING_MODAL'}


    def draw(self, context):
        layout = self.layout
        col = layout.column()
        col.label(text="Choose import options")

        row = col.row()
        row.prop(self, "mcLoadAtCursor")
        row.prop(self, "mcOmitStone")
        
        row = col.row()
        
        row.prop(self, "mcShowSlimeSpawns")
        
        #label: "loading limits"
        row = layout.row()
        row.prop(self, "mcLowLimit")
        row = layout.row()
        row.prop(self, "mcHighLimit")
        row = layout.row()
        row.prop(self, "mcLoadRadius")

        row = layout.row()
        row.prop(self, "mcWorldSelectList")
        col = layout.column()


class MineMenuItemOperator(bpy.types.Operator):
    bl_idname = "mcraft.launchselector"
    bl_label = "Needs label but label not used"

    def execute(self, context):
        bpy.ops.mcraft.selectworld('INVOKE_DEFAULT')
        return {'FINISHED'}

bpy.utils.register_class(MinecraftWorldSelector)
bpy.utils.register_class(MineMenuItemOperator)

def mcraft_filemenu_func(self, context):
    self.layout.operator("mcraft.launchselector", text="Minecraft (.region)", icon='MESH_CUBE')


def register():
    bpy.utils.register_module(__name__)
    bpy.types.INFO_MT_file_import.append(mcraft_filemenu_func)  # adds the operator action func to the filemenu

def unregister():
    bpy.utils.unregister_module(__name__)
    bpy.types.INFO_MT_file_import.remove(mcraft_filemenu_func)  # removes the operator action func from the filemenu

if __name__ == "__main__":
    register()

Attachments


Nice and smooth,
but could you also make some infos to how to install the scenes?

If you have minecraft, the add-on uses the save location already. I’m assuming you don’t have it though, so you need to place the save file at the following location (this is for windows 7)
Users/YourUserName/Appdata/Roaming/.minecraft/saves/

@tungee: You also have to do what Liero mentions (above). Put the minecraft.rar into the bin folder which resides at the same level as the saves folder. Create the bin folder (if it does not exist) and place minecraft.rar into it. It looks like the script fetches the texture.png file from this RAR package. So a failure could occur there if that RAR is not found.

As far as a working level, this Spleefing Arena does load although I wonder it if is correct?
If you load this Big House level into the AddOn does create geometry but it does not look like the posted final scene. There is no easy way to tell if a level is v1.8 or compliant.

MATERIAL MODIFICATION:
I have made some modifications to how the textures are generated. Basically I don’t like shadeless or use Face Textures. Instead I like to use the alpha of the PNG to make transparency.

Slight modification to createMCBlock inside blockBuild.py (near line #264)


    #Need a material. create it new if it doesn't exist.
    matname = mcname + 'Mat'
    blockMat = None
    if matname in bpy.data.materials:
        blockMat = bpy.data.materials[matname]
    else:
        blockMat = bpy.data.materials.new(matname)
    # Get rid of these flags.
    #blockMat.use_shadeless = True
    #blockMat.use_face_texture = True
    #blockMat.use_face_texture_alpha = True
    
    # Atom material adjustments 12-02-2011
    blockMat.use_transparent_shadows = True
    blockMat.use_transparency = True
    blockMat.alpha = 0.0
    blockMat.specular_alpha = 0.0

What this slight material change brought out is what looks like a slight off-by-one pixel mapping error when the UVs are generated. Consider this image rendered with the above mentioned material flag changes. You can see that both the grass and the dandelions have colored lines along one edge of the block. This may be due to improper UV mapping.

Attachments


Extra Guy -
cool, so that’s YOUR image! My brother (minecraft fanatic) saw it on Reddit yesterday and linked it to me, and I was left thinking ‘how on earth is my feeble script ever going to match that?’
Well, hopefully: by aiming to put in the long-planned custom block shapes feature, setting up useful Blender Internal and Cycles materials out of the box, and by getting more efficient.
I absolutely love the lighting you got on that lava flow, especially where it mingles with the water, and the water itself with the shallow bed works beautifully too.

To address your points-- the dupliverts setup seems to be what’s preventing you from getting at the materials. In your outliner, first select one of the landscape vertex objects (that is, one of the objects named like mcDirt, mcWater, etc). Expand it down, and you’ll see it has a child object parented to it. The block attached there is located at 0,0 - but you can only practically select it from the outliner because it is co-located with every other type of block instance in that world.
You can, in theory, replace any of those cubes with anything you want, eg high poly grass, and it’ll then replicate everywhere that the block appears in the world.

Note that there will soon be custom meshes for stairs, fences, torches, and so on, and these will have to be several landscape meshes - one for every variation: eg mcTorchNORTH, mcTorchEAST, mcTorchWEST, mcTorchSOUTH, mcTorchUPRIGHT - and the same again for directional Stairs, Ladders, fences, and so on.

I know, and it bugs the hell out of me. Ever since I got textures loading during development of this script, it’s been an eyesore, and sorting it out is very, very high on my list. For now, I’ll go about setting it as a combined material that uses that leaf texture as an alpha mask, with no biome variations in colour :frowning: . I’ve done some experiments for this in Cycles, too. It’s a shame: I assumed the grass/leaf/water colour variations would be easy to fetch - but it turns out they’re hidden in the Minecraft runtime, not actually saved to the level, so it does a lookup based on World Seed that basically isn’t openly available like the actual level format is. They just have to be set manually at the moment, whatever’s nicest aesthetically.

That’s reasonable, and something I hadn’t thought of so far. I’ll add it to the list. I think it may have to just be a text box you type (or paste) the custom file path into, as I already bypassed the file selector in a somewhat horrible way in order to present the import options the script currently gives you via checking and pre-scanning the saved games.

Optimisations:
I have several ideas and aims for this already, and I value your input - it’s good to know what’s wanted and what’s needed. I’ll maybe write up my optimisation ideas and plans on the google page (and then try to stick to them). I should get some more time to work on them in the christmas holidays, if not before. Basically, one idea is to hollow out heavy duty blocktypes - like 3D flood fill, but removing all interior points from a volume (eg of stone. or water, dirt, etc). It seems like it may be very processor intensive during the loading, but viewport performance should get a healthy increase. Secondly, there’s ‘rectangular volume filling’ - which would reduce, say, an 888 solid group of instances down to a single cuboid (512 verts -> 4 verts) with recalculated tiling UVs on all sides. This might work to make single-surface-like meshes and reduce the amount of geometry in the scene, or it may lead to lighting problems and not be particularly optimal overall; I need to try it and see.

Incidentally, Nether loading will be brought in as soon as the hollow-volume idea gives enough performance (all the netherrack…!)

Ideally, with a few clever optimisations I’d love to be able to load in an entire surface map, if possible.

Other tips: on supported hardware, VBOs should give a decent performance increase. See this: http://blog.mikepan.com/notes-on-blender-performance/

The problem with a joined mesh, I think, is that creating its UVs gets complicated… actually, hang on a second… I need some time to work on some tests. I have an idea!
How long do you mind Blender locking up for when you hit ‘load’? :smiley:

All the optimisation issues you mention, I am going to work around or improve eventually. I have some good ideas for various methods of dropping unneeded verts.

Replacing the grass X-planes will be automatic soon, but for now you can delete a couple of faces from the placeholder cube and arrange it how you want.

I hope I’ve addressed your questions.
All the best!

Hi everyone! Some pretty nice looking renders showing up here! Here is the best picture I have done with its help.


Rendered with cycles.

I have messed around with the add-on for a while now and it has been working perfectly. I do have some stuff to suggest though. First, I have to say that I really like the method you have it working by right now. The dupliverts method is really customize-able and good. Yes, it results in a heavy scene (though the really helpful layer selection helps alleviate that), but I wouldn’t change it personally. Now on to suggestions (if you want). First is that the default BI material could be better. I know you would probably like to get good default Cycles materials in, but I think that having decent BI materials would still be useful. Here is what I would do to the default material.

  1. Disable ‘shadeless’.
  2. Reduce specular to 0 ‘Intensity’
  3. Switch the terrain texture Image Sampling ‘Filter:’ to ‘Box’. I found that this is why the texture is blurry in BI, the EWA filter does not work.
  4. Disable ‘Face Textures’ and ‘Face Textures Alpha’
  5. Enable ‘Transparency’ and set the sliders ‘Alpha’ and ‘Specular’ to 0.
  6. Enable ‘Receive Transparent’ for the materials.
  7. Enable ‘Cast Transparent’ for the objects with alpha.

Here is were things get specific.
For the leaf block, I would UV map it to the leaf block texture that has the “Fancy Graphics” transparency.
For all the blocks that are totally biome specifically colored, i.e. leafs, tall grass, vines, ferns, etc., I would duplicate the terrain texture to slot two. The slot one texture should control just alpha, the slot 2 texture should control diffuse color with blend mode ‘Overlay’. After that it is just a matter of adjusting the materials diffuse color to look right. Setting it up like this would at least get rid of the gray color that seems to throw some people.
The grass block might be the hardest to fix but here is what I would do. Assign the grass block a second material with the same settings as the normal grass material. Give the block’s top face this material. For the second material turn off transparency and set its texture to control just diffuse color with blend mode ‘Overlay’. After that it is just a matter of adjusting the grass top material diffuse to look right. The last thing I would do is set the WaterStatBlock terrain texture to control alpha by only 0.2. This gives the water a transparent look.

Well I think that about does it. Hope my suggestions will be useful. Just as an example here is a render with the exact settings I described above. I did add a very simple light setup also.


I think that for someone to import, render, and get that would be be better than for them to get this with the default settings.


Now for your direct questions.

rassum frassum could’ve sworn I disabled interpolation option!

You did I noticed. If you read through the above writing you while see that number 3. further addresses this issue.

Next question (related to the possibility of auto-loading Mobs from the saved games) how did you create Steve in Blender with the correct proportions? I think a .blend ‘model pack’ could accompany this script, and load in spiders, creepers, pigs, cows, what have you. Maybe. I haven’t given this feature much time or effort yet, because the idea of python-generating the models seemed extreme, and I dunno how accurate hand-made models would end up being.

Making Minecraft characters perfectly to scale is actually extremely easy. For instance. If you are using 1 BU= 1 Minecraft meter then all you have to do is set the view grid to have 16 subdivisions per BU. This gives you a grid that corresponds 1/1 to pixels in the default 16x16 texture pack. Once that is finished you can model your character with cubes, snapping verts to the grid. I think it takes me like 5 minutes to model one of the characters. I think having a model pack accompany this add-on is very possible. I would even be willing to make all the characters if you were willing to credit me. Generating the character models is definitely unnecessary, hand made ones are probably way easier and can be perfectly accurate.

Well, I had better wrap up this post. Thanks for the current work on this script! I really like it.

Addressing Windows 7 queries and issues:

Windows 7 64bit users – I’ve now checked this on 3 different 64 bit windows machines with Blender 2.60a, and with build 42342 which was 4 hours old when I used it. bluecd, I’m afraid I couldn’t find a graphicall build of the revision you mentioned - did you build that one yourself?
I’ve tried locating the addon folder at:
C:\Users<USERNAME>\AppData\Roaming\Blender Foundation\Blender\2.60\scripts\addons\io_import_minecraft
and also alternatively here:
C:\Program Files\Blender Foundation\Blender\2.60\scripts\addons (which was my blender install folder).

In all cases, it’s worked straight out of the zipfile with no problems.

I’m very sorry, but I’m out of config solutions for these, and can only speculate wildly. Thus (please don’t blame me if these break your system, but they may be worth trying if you know what you’re doing):

  • if you have a custom Python path, try setting this to the default Blender value. This may affect other custom add-ons you may have, of course.
  • try it in official Blender 2.60a
  • have Python 3.2 installed? (latest is 3.2.2)

And just in case: any time the script doesn’t activate when you press the tickbox in User preferences, there will be some python error traces in the Blender System console. The console is the only way to know what went wrong (but not necessarily why).

I finally am getting some ‘play’ out of the script as well.

Here are two Cycles renders using GPU acceleration. With the torch object set to an emission shader.

Here is the full global illumination which took 5:16.


Here is the same scene lit with direct lighting which took 0:56.


Mmmm… I see that there were several posts this afternoon while I was gone and didn’t refresh the page.

@acro
Regarding your proposed optimizations. As I said above I really like having separate blocks. I don’t think I would be a fan of anything that just gives you a surface or “jpg” atifacts (big blocks :)) or whatever. A surface is completely uncostumizeable (relative to dupliverted blocks). The 3d flood fill sounds possible though. Removing complete interior blocks by deleting its duplivert would be fine IMO.

@A’n’W
I agree with everything you’ve said. The materials have always been placeholders. I’ve been trying to put in as many block definitions as possible, and to get their texture coordinates right, but haven’t been able to spend the time from an artistic point of view setting the BI stuff to work nicely. (I’m not happy right now about my ability to understand and use Blender materials - the results I tweak never seem to turn out how I think they should.) Therefore, your feedback is exactly what I’d hoped for and very valuable. Thank you so much for doing the legwork for me!
The only reason I had shadeless on at all was because I didn’t spend any time on light sources, so I just needed a quick way to see if the textures were appearing properly. I take it you’ve got AAO on or something for that BI render. I had thought about dupliverting lamps onto the Torches at one stage, but again, no time to play with that kind of thing.
The transparency and interpolation stuff was there because I started off trying to get it looking Minecraft-ish in the BGE, then just wanted it to look OK in textured viewport, and it was abandoned for a while from there. I also got somewhat confused as to which settings really controlled what, and then in 2.58 -> 2.59 the texture face script stuff changed.

I’ll read your post more fully then I’m logging off and getting productive ; )

Oh, and awesome clouds and sky and leaves and creepers in the first image! Maybe a Minecraft cloud generator would be useful… (random extrudes from a loopcut plane)!

I do need to really (really) actually truly switch off the texture oversampling. When I checked before, interpolation always appeared off in my texture materials panel, yet I still got the ugly edges and smudged pixels. I had looked at EWA and Box too, and hadn’t noticed any difference in the viewport – I’ll bet that only affects the BI rendered output. If so, I fixed it before but didn’t notice. Damn!

So then, Cycles: when I tried some leaf setup stuff in Cycles…


I would like to be enlightened here, too! All searching so far indicates that Cycles doesn’t read image alpha, and by default also does the inverse of what you expect (the leaf renderings here are smudged by sampling, and alpha’d out because the image colour fed into the alpha but with the opposite effect. It’s possible to reverse this with math/ramp nodes, but then the grey isn’t white so the leaves are translucent.
I’m very keen on automating as much as possible (getting everything automagically from the minecraft game file, etc).
I’m assuming you had to manually export the alpha channel as a B/W matte, then feed it into an Image Texture node with the same UV inputs?

Anyway, enough questions- to code!

Oh, and just rly rly quickly, Atom’s renders – cool stuff, again the materials settings go along with what I’ve said to A’n’W’s stuff, and I think the parented empty is very good and I wish I’d thought of it. The init file isn’t the best place for that, I’ll take your code into the next update in some fashion, probably adding the land meshes during the point of parenting the dupli-cubes.

@A’n’W again, I think removing unseen instance-verts, what i’m referring to as ‘hollow volumes’, is the easiest win optimisation at this stage. The other ideas are destructive, so here I also share your opinion.

ta, guys

A surface is completely uncostumizeable
The funny thing is I wished it was a continuous surface today. Because I wanted to run the Greeble plugin on the surface. But this script (or any other mesh manipulator) won’t work on a dupliverted surface.

I wonder if I could just export it as an OBJ…?

Actually, what I said is true. You can easily go from a dupliverted terrain to a surface only one (no exporting required!), it is impossible to go from surface to dupliverts.

Here is my simple way to convert the dupliverts into a surface.
-I do want to say that I have not done this to any massive terrains with complicated caves and such, but I do it very successfully on more simple stuff.-
(I would also do all this in the objects local view)

  1. Do ‘Make Duplicates Real’, do a space-bar search for it. It will convert every terrain block to a real object and select them all.
  2. Without deselecting anything, shift click on one of the blocks to make it active and ‘Ctrl+J’ to join them all.
  3. Go into edit mode, select all and do a ‘Merge Duplicates’, to get rid of all the extra verts.
  4. Deselect all and do a ‘Select Interior Faces’, do a space-bar search for it. It will select all the inside faces and some on the outside.
  5. Using the circle select or box select, deselect all the faces that are on the outside (in solid view and limit selection to visible on, but you probably knew that).

There you are, a surface only terrain mesh. Hope its useful.

I cant create a folder with starting with “.” (.minecraft) on osx ;(

@tungee: I had the same problem on Windows. I had to log in as admin of my machine then open up a CMD box and use a DOS command to create the .minecraft folder. The Windows explorer just would not allow it. I guess finder is the same.

Give this BLEND file a try. It is actually a ZIP file with the required folder structure for you. Rename it to .ZIP after downloading. Try unzipping it then move it to the correct location for your system user name.

@AnW: The duplivert convert does work, but it does take a while I would suggest to anyone going this route to convert each layer, one-at-a-time. Here is an image with the ice layer after discombobulator script.


And now that I have a true mesh, I can apply modifiers. Here is the ice field with a wave modifier applied to break up the exact flat nature. Then a displace modifier driven by a Clouds texture to twist the tops of the discombobulated elements.


Attachments

minecraft_rename_to_ZIP.blend (356 Bytes)

Glad it might be of service! Regarding the light setup. It is very simple in that picture. A single sun lamp with a light yellowish color and soft shadows, and then environment lighting with a light blueish color and raytrace AO set to multiply and distance 1.5.

Thanks. And yes, I think a cloud generator could be useful.

You did have interpolation off, but the filter also has to be set to Box. The confusing part is that, yes, these only affect the rendered output (and maybe the texture preview, I don’t remember).

Cycles is very basic right now. You are correct in that it does not read image alpha. First, Cycles gives you almost no control over the image you use as a texture. This means that currently it always samples the image, thus always making it blurry in the render. The only way around this that I know of is to scale up the image to reduce the affect. In this case I manually scaled up the terrain.png from 256x256 to 4096x4096 in GIMP (with no scaling interpolation). This gives it the resolution needed to keep the texture crisp in most renders. Kind of hackish, but the only way. Second, I actually didn’t manually export a B/W alpha matte. In this case a picture is best. I hope it makes sense, I didn’t annotate.


This is the node setup I made for the transparent stuff. This could probably be done ‘automagically’.

Glad it works for you. I did figure that it might be a bit slow, so yes, doing a terrain in smaller chunks is a good idea.

Those pictures are pretty interesting! I might have to try some stuff like that.

It doesn’t seem like this has been mentioned before, but this script doesn’t work with multiplayer worlds. I run a small server for me and my friends and would like to render a building we made, so I copied the folder from my server folder to my saves folder. It appears in the drop down along with all my other worlds, but when I hit ok nothing happens. I looked in the console and it said

Traceback (most recent call last):
    File "C:Blender\2.60\scripts\addons\io_import_minecraft\_inti_.py", line 116, in execute
    mineregion.readMinecraftWorld(str(self.mcWorldSelectList), self.mcLoadRadius, opts)
    File "C:Blender\2.60\scripts\addons\io_import_minecraft\mineregion.py", line 976, in readMinecraftWorld
    pPos = [posFloat.value for posFloat in worldData.value['Data'].value["Player'].value['Pos'].value ]   #convoluted, I grant you.
KeyError: 'Player'

location:<unknown location>:-1

location:<unknown location>:-1

. It looks like it’s erroring because it can’t find ‘Player’ since none of the people on the server were named ‘Player’, unlike when they are in singleplayer. I checked the “load at 3d center” hoping that it would bypass the player position coded, but it still errors. Thank you for this great script!

EDIT: I deleted line 976 and then it worked. I also added

    else:
        pPos = [posFloat.value for posFloat in worldData.value['Data'].value['Player'].value['Pos'].value ]   #convoluted, I grant you.

right after the code that checks whether the 3d center box is checked, that way if you have it checked it wont run this piece of code, and if it isn’t checked it will run as normal.

I have posted a camera tour video of the previously posted windmill scene here: