Oh, here’s the WIP thread you mentioned in your sketchbook. This is turning out really nice. I think you can push out the lips just a little bit, and soften the edge underneath the bottom one. His facial hair and eyebrows look patchy, and that really throws everything off. His head hair is great though!
I thought I linked it, but maybe i didn’t.
I know the mouth area has flaws. Not sure what, but I know it doesn’t quite look right.
As for the beard and eyebrows, I agree the eyebrows are patchy, but the beard really isn’t that much. I might can free the edit on the particles and increase it some, but I don’t want to increase it too much.

This is my base skin texture. I’ve UV unwrapped the mesh and will do some painting work on the skin texture, but this was to get hte base and the SSS working.
Speaking of UV unwrapping… Went through and created all the seams I needed for the UV unwrapping. Then I proceeded to spend the next 2 hours trying to figure out how to get UVs from multiple objects in to one map. (My arms, legs, and head are all part of separate objects in this instance). That’s when I slapped my forehead and went “Duh! Texture Atlas! There’s an add-on for that!” 

This stage has definitely been frustrating, but eventually it turned out okay. Still would like to add more detail, but the detail I was adding wasn’t quite looking right. Still, that could be added down the road. I think this will work for now.
One thing I realized is that I painted one of my textures upside down. I had to go back and redo them, but now they look better.
For now, though, there are other parts to work on, so I’ll leave this as is is, but I may come back and revisit it.

Almost done. Here, I have redone and textured both the eyes and the shoes. I’ve also fixed a problem with the glasses so they’re much more natural. The only big things I have left at this point is to rig the lattice on the eyes so they move with the head and doing the shoelaces.
I wanted to use hair dynamics to push the hair out of the way of the glasses, but wasn’t getting good results. So here, I did it “manually”, combing the hair on the top out of the way of the hair with a little bulging on either side where it comes out. (I wanted to to a shot of the glasses in the front of the face, but it kept jumping back to the top of the head when I would render… A problem I encountered once before, bot don’t remember the solve for.)
This has been a really fun week because this has been the week when he started to come to life with the texturing. Some of the texturing, as in other stages, could use some work, but will be fine for this attempt.
Just a couple more days and I’ll have a posed figure (though it might be a couple of days longer if I decide to set up a “scene”).
This isn’t the final image, but was a test shot playing around with the posing some. Lots of room for improvement, but I Like how this is going for my first character.
Thanks to those who have made comments throughout the process. Your input has made this result much better than it would have been without it.
Biggest thing I have left is getting the shoelaces in.
And for those who haven’t guessed yet or are still wondering… Yes, this is a self portrait.
Attachments


So… Which one looks better? the one just above this post or the one here?
This one is a more “cartoon” stylized version of the hair, similar to what I had around post 28 or 29. Someone at the time had mentioned how the hair didn’t look right, but I think I’ve pushed it a bit more toward toon and it may fit in better with the character I have, but I’m open to suggestions on which is better (or maybe something in between?).
Still learning how to pose a rig. And even now, I’m finding problems… Just noticed how long those forearms are, for example. And those fingers… (And that’s just the stuff you can see!  )
)
(and just noticed that the hand was a bit too “stiff”… opened the fingers too much.)
I like the face features as well as the a bit weird hand proportions. I think you should keep those non-realistic features, as they are expressive.
I may adjust a few things slightly, but drastically. At least, not in this iteration 
Getting close to finishing this. Just need to figure out the problem I mentioned in a post a minute ago. He has all but a face rig, which I may go back and redo anyway. For my first character, I like how he turned out, even with his 100,000 flaws (There’s one that appears to be a flaw, that you can’t quite see from this angle, but can make out from the front on view, that is intentional, and is a part of the character rather than a flaw.)

I do have one problem, though. On the shoe, the laces seem to be following the foot, but the curve that has the end parts of the laces seem to not be following. That part of the laces are an array along a curve with an endcap. The endcap and the curve don’t seem to be following the foot when posed. This is probably a minor issue. Here’s a couple of images to show what I mean:


Well, I could go through and tweak all kinds of things with this, but I think this will just about wrap up this character… For now. I know there are a ton of flaws all over the place on this, but overall, I think this turned out pretty good. Hope you enjoyed and thanks for those who provided input along the way!

For anyone who has been following this thread and is interested, this is the modeling sheet that I created and used to create my character. Thanks for all the comments and suggestions provided along the way!

Decided to give my self portrait character a new outfit more in line with the types of things I want to be doing more regularly. I went back to an earlier version before I did sculpt work on the shirt, but imported some of the materials and objects from later. Also used a different skin shader. The one here is from the Material and Textures Cookbook with the skin map I used in the version from last August. I made the shirt longer and changed the shorts into pants. Still need to change the shoes to boots, though.
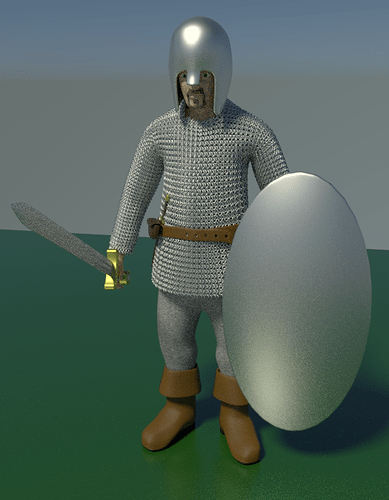
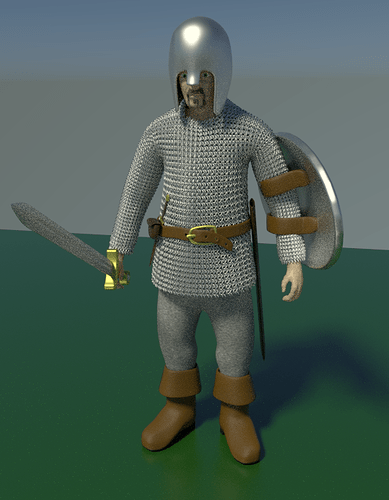
For the shield, I took a UV Sphere and rotated it on the X axis, deleted the back 3/4 of it, scaled it in on the Y axis and up on the Z axis, and solidified it.
Chain mail was from an old CG Cookie tutorial.
Will eventually add a sword for him as well.

Got the boots base done. Still needs a sculpting pass or two for “pieces” detailing and wear and tear, but looking good. Used leather from the MATC book I read last year scaled x10 on all axes in the mapping nodes.

I did a side view to show off the work on the sword and pouch so far. I’ve also added a belt. I still need to do the buckle and the detailing on everything. I think I want two more pieces, at least – a helmet and a knife. and a scabbard or two. But I like how it’s going so far.

Still have a lot of work to do on this one. I need to add straps on the shield (not seen from this angle, but you never know, right?), a scabbard for the sword, and a belt buckle as far as objects (at a minimum). I also need to do a sculpting pass on everything but the hands and head. And still have to tweak some of these base or temporary textures. With all of this in mind, comments welcome on what I have so far!
Looking good man! Hope you continue the great work! Keep it up man!