Harkyman, maybe of my bad english you always misunderstand me.
I’d really like to have the opinion of a real coder here.
Jean
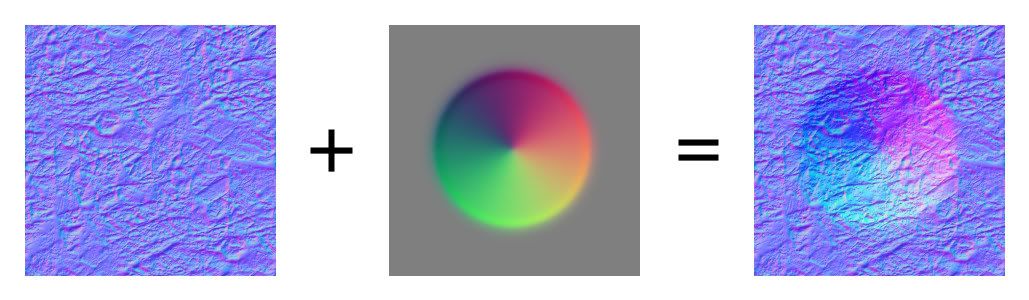
Its a nice idea but you cant just overlay a normal map onto another as the overlayed normal map will interfere with the height information of the normal map beneath it.
To fix this you must reduce the level of the blue channel in the overlayed map from 255 to 128.
Here are some screenies/images of what i mean (there are quite alot…sorry :S )
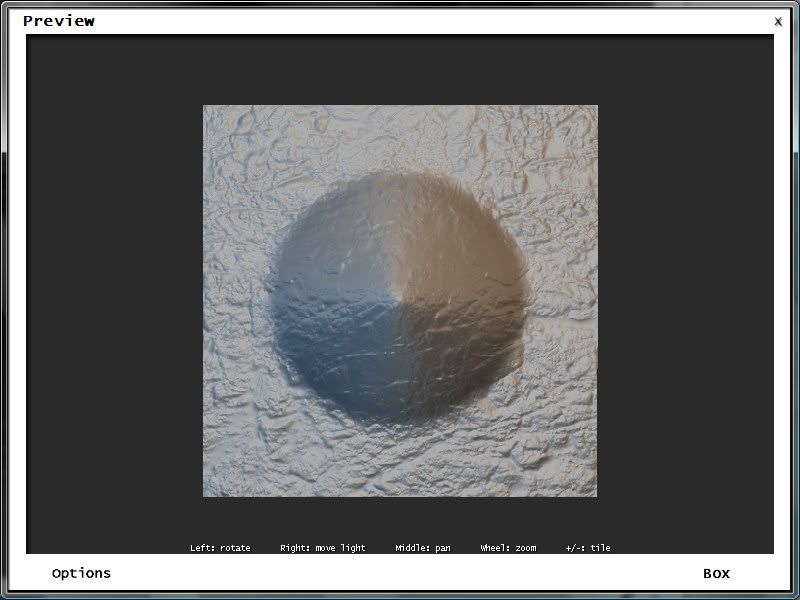
This is bad
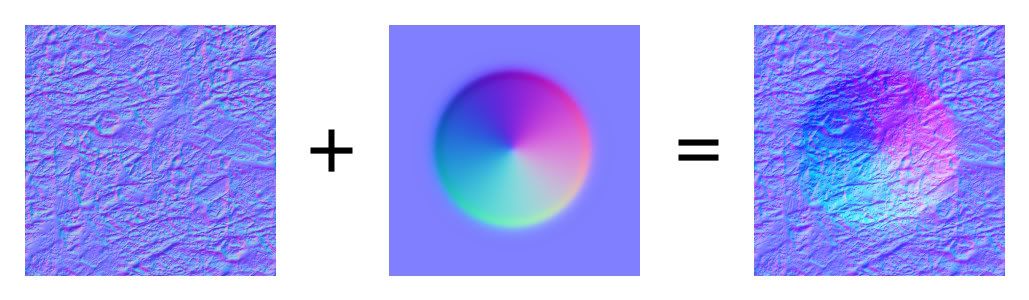
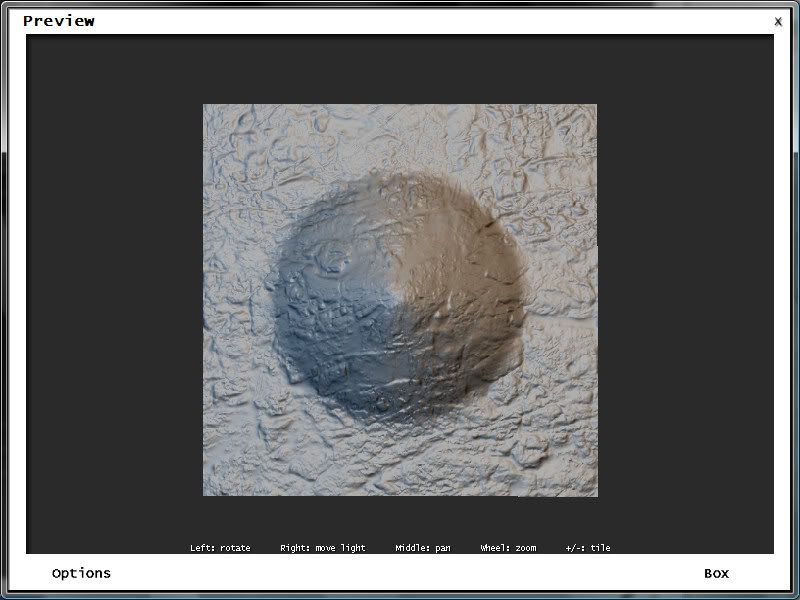
This is good
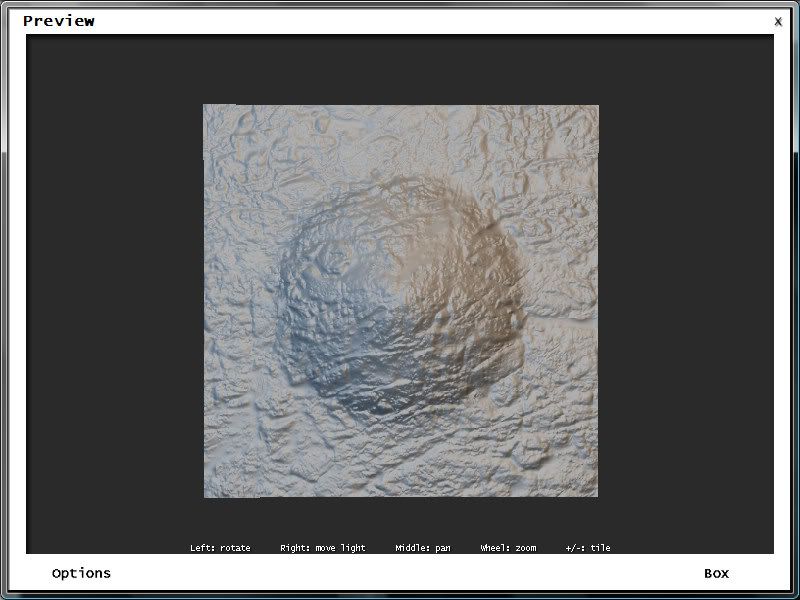
When compared, the output of the two methods may look similar but you can see the differences in the detail.
Incorrect method
Correct method
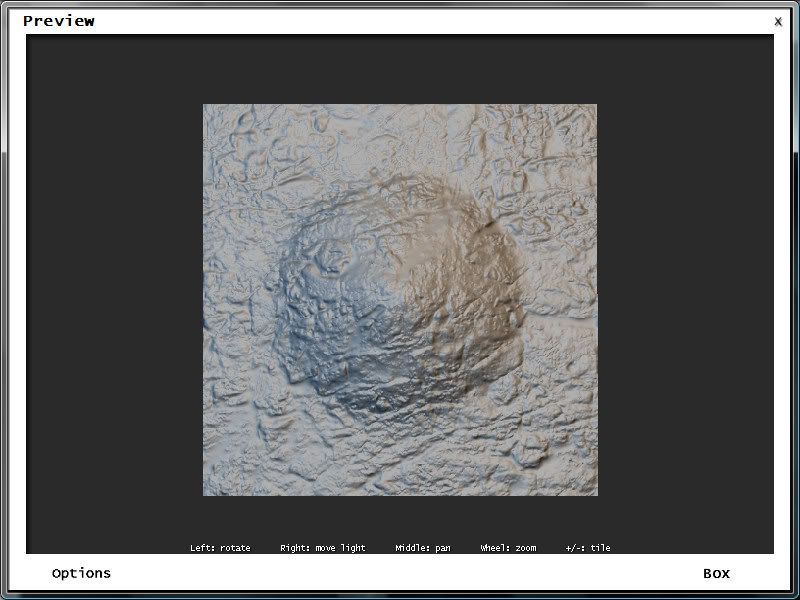
As you can see in the second image the underlying detail of the first non-overlayed map is preserved.
The results are even more apparent when you overlay more than one normal map.
In these examples i overlayed each map twice.
Incorrect method with 2 overlayed normal maps
Correct method with 2 overlayed normal maps
Also when overlaying normal maps, sometimes it is necessary re-normalise the image normals as to ensure they are all of uniform length…if this isn’t done it can sometimes cause problems with the specular map it may be used in conjunction with, such as shading errors and speckling.
See http://wiki.polycount.net/Normal_Map#head-fabe58e51f2e57e4b849b6bab15aec6a229fb353 for more information on this.
Hope that helps 
IamInnocent: I’ve coded new blend modes for the node compositor and texturing system. Does that count?
The other problem that doesn’t seem to be understood is that the original post described painting normal maps using the same kind of function as Texture Paint, i.e., painting directly to the RGB values of the image, using an “overlay” blend, as opposed to the indirect method of painting a grayscale value that is converted internally to the proper RGB values and applied for either rendering or (in the best of all worlds) real-time viewing.
Painting directly to the RGB of a normal map would require being able to control the painted data on a pixel-by-pixel level – not something that can be done efficiently with direct painting methods. Yes it is possible to paint directly to normal maps, but controlling the RGB values to the extent needed to make the normal map work properly would be so finicky and time-consuming that it would be simply impractical.
A sculpt tool that is used to “paint” features that are interpreted and rendered or displayed as normal-map data would be very useful, but that isn’t as simple as just painting to a normal map image as if it’s just another form of image texture (i.e., like Texture Paint).
EDIT____
@ metalliandy – thanks for the tip on compositing normal maps, looks like a much better method than overlaying the unmodified maps.
Yes. Sorry I didn’t notice that you were here.
How do you figure out that this idea can be implemented if it can because I truly can’t, not starting with Endi’s idea.
Are there any papers on the subject of painting normal maps on 3D object by any mean? I only found one and, since it is 40$ to buy, I don’t even know what it says.
@Metalliandy
Great explanation, thanks!
Just to graphic what I think chipmasque is trying to explain:

As the brush rotates with respect to the object the normals are rotated too and affect the object in a different way than expected.
.
+5 funny. But I am also easily amused tonight. ![]()
You can try my old blending mode patch (https://projects.blender.org/tracker/index.php?func=detail&aid=7619). It basically just adds all blending modes, overlay included, available at the mix compositing node for the painting system.
It seems to apply to current SVN even! Perhaps harkyman wants to finish it?
Eclectiel, since it’s realtime maybe a good way would be for left right
click or a hotbutton to rotate the normal map texture brush 90 or 180 degrees.
I predict 2.50-ish is going to be a sweet version of blender 
I’m not completely sure if I’m understanding well this. The thing is that, when painting the normal map, you want your brush to have the orientation you desire. In the example I showed the orientation has 180º of difference, and fully inverts the bump effect. But at any other degree (45º, 56º, 87º whatever it is) you will notice that effect, something in between of that example.
The problem is this:
When painting directly on an object you are rotating that object all the time, and painting strokes on that object from diferent angles.
If you, for instance, use a simple circular brush in one point of the surface of your object, when you paint it from one angle you will be “pushing”, and when you paint it from other angle (you rotated the object) you will be “pulling”. And you are using that same brush.
.
Yeah, you would have to get used to the constant inverting,
and then trying to compensate for that by rotating the brush around,
Which would probably be more trouble than it’s worth.
Plus flipping the rgb also… Like say you want the wrinkles to go in a certain direction,
but in that direction the lighting is all backwards.
Someone would need to invent an automatic brush rotation rgb flip script, or something,
with a set model start position type thing.
I think what you would need is a script that choose from 4 (or 6?) different flipped rgb normal maps
based upon the objects orientation.
I made a test and I think it could be a good thing although you can see the wrinkles
flip all over the place (I think…) without any special script.
For some people this would be an easy script to make.
Plus the default brush when mixed with the normal really eats into the model.


chipmasque actually has it right, I think. You don’t want to paint with rgb brushes into your normal map. That would be sort of do-able for this very simple blob example at the beginning of the thread, but for anything even slightly more complex would be prohibitive. What you want to be able to do is to, in addition to sculpting the mesh itself, have a “blank” normal map applied to the sculpted piece, and continue to the use the sculpting tools per normal. However, in “paint” mode, they don’t push the actual mesh – their effect is translated into the normal map, which then displays nicely in real time because you are using GLSL textured mode.
This gives you the ability to go beyond the sculpting resolution that you would normally be able to use with your system’s configuration. You can only sculpt 800k polys? Add a 2k x 2k blank normal map around the eyes and “paint” crows feet. The problem would come with the ability of the GLSL code to translate that into realtime feedback. I know very close to 0 about OpenGL, so I’m not sure if you’d have to re-load the full high res texture each time and recalc the pixel shaders. If so, that would be slow. Knowing the amazing things I’ve seen done with OpenGL, though, I’d be willing to bet there’s a trick that would work. 
Latest examples in this discussion highlight a difference in what “painting normal maps” is understood to mean by different folks – as picayune as it sounds, the last example to me would be better described as “painting with normal maps,” i.e., where the “color” loaded into the brush is actually a pre-produced normal map image texture being brushed onto the surface as shown. This would have the problems mentioned.
What I thought Endi was originally proposing is using a Texture Paint-type function to actually apply the various RGB values needed to manually build a normal map “from the ground up,” or Overlayed onto an existing pre-produced normal map image texture. In this case, the problem of orientation of the surface effect being highly dependent on exact placement of various RGB values would make the method too complex to be practical.
Last is the idea that some form of standard painting method, like applying grayscale marks to a model’s surface using Texture Paint, would be interpreted by some (theoretical) algorithm in order to produce an internal normal map representation of the painted marks that is then rendered or displayed. This actually seems the most feasible since all the elements to do so already exist and could (in theory) be integrated into an actual painting tool.
All of the above could be considered “painting normal maps,” so maybe it would be helpful if someone could define exactly what the heck everyone’s talking about :eek: 
Hm now you are right…
My idea is bad. ![]()
Sorry…
Yeah, I guess you can’t really just smear around all the separate channels all at once
and expect any good results. ![]()
I thought because it’s realtime maybe it might be doable,
but it would probably wind up looking like lumpy oatmeal.
That’s a good idea. I guess you would need a 3d object brush in order to properly blend the different rgb channels.
Not necessarily, it could be as simple (hah!) as converting a grayscale “heightmap” to a normal map, something a number of utility apps have been able to do for quite a while. The gray value would determine height above or below a mean surface, just as with bump mapping, but the results displayed using normal map technology, which is a more sophisticated method than bump mapping. But for best resolution, you’d need at least 16-bit grayscale, and probably some form of scaling factor that would be applied to a brush stroke to increase or decrease the surface effect.
Of course all of the above can now be done in discrete steps, but I think the direction of this discussion is how to integrate such methods into a realtime sculpting workspace.
Is it? I’ve always understood that bump maps and normal maps are essentially the same thing. Offline renderers like blender/mentalray/renderman etc internally convert a bump map into a modified normal to calculate the surface shading. Game engines try to save time by skipping that conversion, having it precalculated; ie, a normal map.
Render wise they (should) look the same, but a normal map is more friendly to realtime needs.
The basic difference afaik is that bump/height/displacement maps use a grayscale value to calculate the apparent (and hence rendered) height of a surface above or below the mean (average) unmodulated mesh surface. Black is (usually) as “deep” as it can go, and white as “high.” in Blender the Nor value acts as a scaling factor.
The normal for any point on the surface (basically which way the light will reflect from that point) is then calculated based on the height of that point.
Normal maps, however, contain the data for the normal direction in every pixel, based on the RGB balance of that particular pixel --a fully magenta pixel sends a ray off on some particular vector, and a fully cyan in another (talking about tangent space normal maps here but the principle’s the same for all types), various blends of RGB in various.There’s also probably some means of averaging the pixel/normal data over the surface so it’s not as resolution-dependent as a pixel-by-pixel relationship would be.
This results in not only faster normal calculation (hence its game-friendly nature), but also a fundamentally more robust surface description, that can be rendered more successfully across the entire surface, though it does not include any occlusion based on apparent surface features afaik. That requires displacement.
Of course a lot depends on implementation details in the various rendering engines, whether offline or realtime.
I feel personally that normal maps also work far better than bump maps when used on a blender material’s ‘nor’ setting, for some reason.
So far as I can tell, it looks like blender does it’s detail-obliterating texture filtering before converting the bump map into a normal map, so that depending on how close you are, etc, the actual normal info changes. Using greyscale bump maps gave me no end of trouble, as–whenever I changed the render size or camera angle, the strength and detail of the map changed. I just got into the habit of converting them to tangent-space maps, which keep the same scale and show up on oblique angles.