PT-109 Torpedo Patrol Boat

Glad you like it. It takes me forever to model something like this. I’m a slow modeler and models like this always turn out to be a bigger challenge than I expected.

Well, I wouldn’t mind creating an attack scene version. Even for my sunset scene, I’ll eventually have to figure out how to create the ocean and boat wake, so recreating that for a high speed torpedo run wouldn’t be that difficult. It’s always the first time that is hardest. Realigning the torpedo tubes into firing position isn’t that difficult and the Mark-VII torpedo would be easy to model.

Creating the torpedo leaving the tube with smoke from the gunpowder used to launch it would be relatively easy.

Spray and motion blur? I don’t know. I’m not into animation and I’d have to give some thought about how to create realistic spray.

I’ll give it some consideration, but I also have other projects that I want to start and I have some scenes on Blend Swap that I want to update to Cycles and improve the modeling and texturing.

The forward turret is pretty much complete except for texturing. There is a small error in the Limit Stop cage that I need to fix and the turret hatch has not yet been modeled.

The first image is of the bridge and the forward turret.

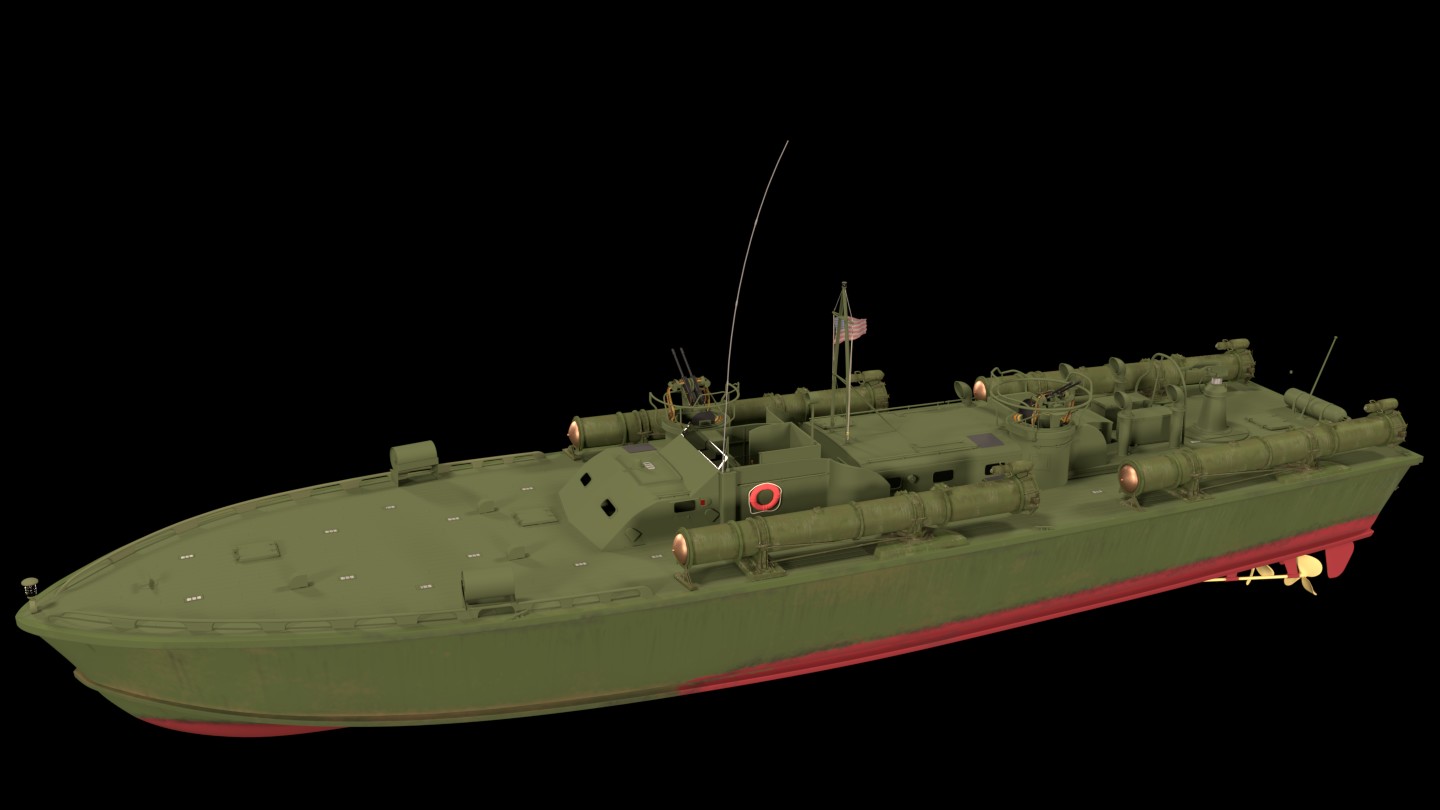
The second image is of both the forward and aft .50 cal turrets, though it is hard to see the details.

The third image is of the forward turret with most of the details I forgot to add in my last post here. There are still two details I need to fix, but it’s about 95-98% complete. Also, the aft turret is only half complete. I still need to add the Limit Stop cage. Also the aft turret had a canvass cover on the cage to protect the gunner from the spray of the boat at high speed. However, I’m not sure I’m motivated to create the canvass and the lashings to the cage. It’s not beyond my ability, but at some point I need to declare this model finished. I’m a very slow modeler and so there is a limit to my desire to include every tiny detail.

Although the modeling is progressing, I still have to model the life raft, life preservers, depth charges, the 20 mm cannon, and some small deck details such as the mushroom vents, gas caps, the drain for the bridge, and the push rod housings. I’ve toyed with the idea of modeling some of the crew members only because I’d like to update my B-17 model on Blend Swap and include the crew there as well. Practicing on modeling crew members here will make the B-17 update go much faster. However, I’ve never done characters or rigging before, and so this may be a bridge too far.

I’m not sure I have the motivation to model the .37 mm cannon that JFK had lashed to the forward deck on the last PT-109 mission. I don’t have any good drawings or blueprints and so although it would add some historical interest, almost no one knows the history of this boat and so I’m not sure my effort would enlighten that many people.

On Blend Swap some of my nature scenes have up to 5,000 downloads. But my historical scenes only have between 150 to 600. So so my assumption is that not many people are interested in history

And the .37 mm cannon on PT-109 was only on the boat for less than 24 hours. It was lashed to the forward part of the bow and that same evening, PT-109 was sunk when a Japanese destroyer running at about 40 knots accidentally collided with PT-109 at about 1 am in the morning, cutting the PT boat in half and sinking her. Two of the PT-109 were killed, one was badly burned because the PT boat used aviation fuel instead of diesel (the three 1,200 HP engines needed high octane gas to drive the PT boats up to 40 knots). The crew of the destroyer were unaware of the collision until later.

Anyway, if I can find some decent research on the .37 mm cannon, I might model the basic parts of it as it was lashed to the deck. But the truth is, my camera shots of the boat (even here) are going to be too far away for anyone to appreciate 80% of the detail I’ve put into this model.

For example, no one will ever notice the mushroom vents, the gas caps, the drain for the bridge, hinges on the hatches, the knobs on the bridge control panel, the accurate reconstruction of the limit stops on the turrets, or the dozens of other small details. But only matters that I know they are there.

But after all, I only do this historical modeling because I am a student of all kinds of histories.

I post all my models on Blend Swap as CC-0 for three reasons: I’m 70 years old and I don’t have time to become an expert to make a living or pocket change from my works; secondly, the meshes are probably so poor that no one could use them commercially; and finally, it’s just one of my many hobbies and so I feel like if someone can figure a way to make money off my work, more power to the–because I couldn’t.

There are experts out there who could do much better and in more detail than I have done so far (Chris Khun for one, Andrew Price for another, etc.) but for my skill level, I’m pretty satisfied with how accurate this model is. I spent weeks researching the PT-103 class boats (of which PT-109 was one), and so this model represents countless hours of research. Unfortunately, no one documented the different classes of PT boats, although there is more conjecture and speculation on PT-109 than on any other class of PT boats. In the end, I had to relay on photographs, forum discussions, recorded history, paintings, plastic models, etc. to come to a compromise of what PT-109 actually looked like. There is no unanimous agreement. Some modelers depict PT-109 as painted gray and some as painted green. Some say that the depth charges were removed after an accident and other say the damage was repaired and the depth charges were reinstalled.

All I can say is that after extensive research, I think this model is very close to what PT-109 looked like on its final mission.

I think that I may be just a couple / few weeks away from finishing this up as far as modeling goes.

But I have no freaking idea how I’m going to texture this beast because there are so many parts–some of which I have no idea how I would UV them. I’m hoping that I can get away with Smart UV Project. If not, I’m in big trouble.

In these images, only the hull and the torpedo tubes have been textured, but only as an experiment. The hull was simple to UV, but the torpedo tubes have lots of small parts and so I did a Smart UV Project. I think they turned out pretty good, although the texturing might be a bit over done. So I’m hoping that Smart UV Project will work for other parts of the boat. However, I will mark the seams for the major parts.

Criticisms and suggestions are always welcomed. Actually, I post my WIP here as a way to force me to make progress. Otherwise, I may procrastinate too much.

Sorry for the long post on not much progress, but I have to say that I’ve spent many hours on research and modeling and I’m pretty satisfied with the way this is turning out.


The first image is just a quarter front render of the boat to give me an idea of how it’s looking overall. The search light (just to the right of the mast) is a place holder and has not yet been modeled.

The forward and aft twin .50 Cal machinegun turrets and machineguns are complete. The machinegun mounts are fairly accurate, but the real mounts are much too complex to reproduce completely. The turrets and the Limit Stop cages around turrets are accurate. The two images below (i.e., the second and third) are of the aft port side machinegun turret. It differs from the forward turret only in the Limit Stop cage that surrounds the machineguns.

The purpose of the Limit Stop cages is to limit how far the machineguns can depress downward. This prevents the them from hitting the boat and crew as the turret rotates during battle.

BTW, you may notice that the machineguns in the second image are slightly different from the ones in the third image. This is because I added the “barrel” type flash suppressors after I rendered the third image. The second image accurately depicts how they looked on PT-109. Some PT boats didn’t have flash suppressors. PT boats that did have them used one of three types that were available to the Navy. PT-109 used the barrel flash suppressors.


It’s always a good idea to spend some time rendering a model in a high resolution as it tends to force you to notice details that might otherwise be missed. At least that’s how it works with me.

So, I’ve added the depth charges and depth charge rack to the bow. On the PT boat forums for PT-109, there is a controversy as to whether PT-109 had depth charges installed on the day of its last mission. Some time earlier, there was an accident in heavy seas when one of the forward torpedoes accidently launched when it wasn’t in firing position and it hit the depth charge in front of it. Some say that JFK removed the depth charges and didn’t have time to make the repairs. Others believe the repairs were made and PT-109 had the depth charges on the day of its last mission. I chose to show the depth charges because it adds some interest to the scene.

I also just noticed that I omitted some detail on the depth charge. In addition, I have not yet modeled the elastic straps that held the depth charge to the depth charge rack. The way these worked is that there is a latch on the back of the depth charge rack that one of the crew would control. When the captain gave the order, the crew member would release the latch and the depth charge would simply roll off the side. When the depth charge would explode was determined by the depth set on the charge. If it was set to 30 feet, then when the charge reached 30 feet it would explode. The depth was set by a handle on the side of the depth charge that the crew member rotated to the desired depth before releasing the latch on the depth charge rack.

As far as I have been able to research, no PT boat ever used the depth charges against a submarine. Instead, it appears they were mostly used to intimidate pursuing Japanese ships by releasing them at high speed. The depth charge would explode some distance behind the PT-boat and in front of the Japanese ship. In these cases, the smoke generator on the stern of the PT boat was also employed

If anyone has more specific research that gives a different story, I would be very interested in it.

In other news, I modeled the life preservers as well. While the texture is just a place holder, it seems to be a red that is too happy and bright. The life preservers were red on PT boats, but not that bright. I’ll fix it later with a darker color and whethering.

The first image is just a render of the entire boat so I can get a feel for what it looks like and where I need to make changes.

The second image is of the depth charges. How they were installed and where they were placed on the bow was different for just about every PT boat. The reason is that these were field modifications on the PT-103 class of boats and the crews put them wherever they wanted to.

The number of modifications that crews made to their boats in the early stages of WW II is mind boggling. Some crews removed the twin .50 cal machineguns and replaced them with a 20 mm cannon. Other crews added additional 20 mm cannons, and various machineguns to the bow.

Eventually, the most effective modifications made it into production PT boats as new classes were designed. Toward the end of the war, crews made very few medication to the new classes of boats as those boats bristled with formidable armament.

I just noticed that the right window on the Chart House looks crooked. That may be because of the angle or it may be that I unintentionally modified it while working on the Chart House.

At this point, I’m pretty intimidated about how I’m going to texture this complex model. The hull and torpedo tubes are UV unwrapped but nothing else is. Maybe Smart UV Project will come to the rescue.

Be sure to click on the image to get a higher resolution view.


Hi fmb501

I know nothing about boats at all, but the modelling and the attention to detail that you have here is simply wonderful. Will have a keen look at updates to your thread.

Shaun

First, ignore the textures. Except for the torpedo tubes and hull, everything else is just a place holder until I get around to texturing after the modeling is complete.

  1. Oerlikon 20 mm cannon (on the stern) is nearly complete. See images.

  2. Life raft on top of the Day Cabin is nearly complete. There were standard items in the life raft such as a wooden keg of water, a large bucket size can with food, first aid kit, oars, and usually the crew put a tarp in the raft for protection from the sun. Note: There were several different types of life rafts used on PT boats. Some were black or green rubber, some were made of balsa wood and tightly rapped in canvas. These were gray and green. The advantage of using balsa for flotation is that it couldn’t be punctured and deflated.

Also note that the bottom of virtually every life raft on a PT boat were a rope net so the survivors would be constantly wet. Not sure why that was a good idea, but it probably had something to do with historical experience. The rafts on PT boats were 10 man rafts, which was the standard crew of a PT boat. But most boats had more than 10 in the crew as they made field modifications and added extra guns, cannons, rockets, etc. So, after about the beginning of 1943, the rafts no longer would accommodate the entire crew. I’ve never seen a photo of a PT boat with more than one raft.

  1. The armor around the bridge is complete.

  2. The horn on the superstructure just forward of the bridge is done.

  3. Push rod housing is nearly complete (starboard side so you can’t see it).

  4. Life preservers are complete. There are several place holders in the lift raft. Research indicates that life rafts had a standard keg of water, two different cans that contained foods, a first aid kit, oars, etc. Crews also included non-standard items such as a tarp to protect survivors from the sun. In any event, space was very tight. The small raft was to accommodate 10 men and supplies. Space would have been very cramped.

So in a few days, the modelling should be complete. Then comes the texturing. I’m not sure how exactly I’m going to approach that task as there are at hundreds of individual objects to be textured.

I also need to create the scene: ocean, foaming wake, sky, lighting, etc. We’ll see how far I get on those. I’m not sure how best to create the wake of a high speed PT boat–dynamic Paint perhaps, but I’ve never used it.

Also, this is just lighting for modeling so I can see what I’m doing. If I include a full scene, it will be at sunset as PT-109 heads out on its last mission. If not, I’ll create studio lighting to present just the boat.

And finally, I have a personal dilemma. There are a number of small details that I have not yet modeled, but to be honest, unless you are an expert on the configuration of a PT-103 class boat, there is no way you would ever know what was missing. I’m tempted to include them even though almost no one will ever see them. But, history is what it is and when you leave things out, it’s no longer history.

I’ve learned a lot about the PT-103 class boats. They have an incredible history if you have the desire to research them.


Fred, as you know, I am mot an expert in the marine subjects, but the details in your boat look really good! I would suggest to avoid UV-mapping most of these details, using procedural textures instead. (You can easily recreate the dirt and other effect in this way). Unwrap only the large, flat areas, like the hull sides or the deck.

I have another question: the mounts of your twin 0.50 guns look quite similar to the mount of the twin 0.3 guns in the SBD-Dauntless. Do you have any original drawings of these mounts? It would help me in my model…

Well, one of my goals is to educate people about history. Therefore, everything you see in my model is historically correct to the extent that my research and modeling skills can achieve. Everything you see is based not only on blueprints, drawings, paintings, PT-109 Internet forums, plastic modelers (who are the most obsessive in terms of accuracy), and my best guess based on my personal research, and comparison of photos of similar PT boats at the same time frame and area of operation.

I spent two months researching everything I could find on PT-109 before I started to model it.

I do know that JFK had a 37 mm Army antitank cannon lashed to the bow on his last mission, but I don’t have good drawings or blueprints of it and so I may not include it. That will be a hard decision.

Thanks for you comment. I always appreciate comments, critiques, suggestions, and criticisms.

Witold,
I wish I did have detailed blueprints of the twin mounts, but my efforts are based on perspective drawings I found on a PT-109 forum. Although the drawings are fairly detailed, they are mostly done in perspective like in a quarter front view. In most cases, I had to make an educated guess at the size and shape based on other small parts that that were easier to size and based on the relative size of the parts compared to the entire drawing which in turn I estimated based on the turret and the Limit Stops which were modeled to scale based on Navy and Elco boat company drawings and some detailed drawings from the PT-109 forum.

I don’t have your engineering skills and I probably don’t have your patience to draw the PT-103 class boat to scale based on available drawings and rare photographs. It seems that PT boats were not photographed much during the war and the vast majority of them are of boats running at high speed from a distance, group pictures of the crews, and some limited close ups of different parts. I didn’t find the photographs to be very useful except in realizing how different every PT boat seemed to be as the crews made their own field modifications.

For example, in some cases the crews removed the twin .50 cal machine guns and replaced them with single Oerlikon 20mm cannons, which personally, I think was a good idea as it had much greater stopping power. However, the magazine only had 60 rounds and at 550 rounds per minute the 20mm could only fire for 9 seconds before you had to stop and reload a new magazine. The .50 cal machine guns on the other hand had the bins inside the turret that held a thousand rounds or so plus a second set of bins with another thousand rounds or so. It was a trade off that had to be made by the crews.

Anyway…

In my case, there are two parts to the twin .50 mounts. The .50 call machine guns on the early PT boats were the same as the ones used on the B-17 (and other bombers). And the cradles for the machine guns on the .50 twin mounts are very similar if not identical to the cradles used for the .50 cals on the B-17.

So I used the machine gun and cradle from my B-17 model as a starting point for PT-109. I then modeled the PT boat naval mount for the rest of it. There isn’t much detail to the ones in my model as the turret hides most of it, my model is already around 100 MB in size, and so, I captured the major pieces to give it a realistic look and feel, but not down to the screws and brackets.

Having said that, you are welcome to all the references I have for the PT boat twin mounts. They are less than 100 kbs per image so I can send you a couple of emails with them as attachments.

I’ve been following your work on the SDB. I’m always in awe of the level of research and the detail you include.

Look for a couple of emails with the PT twin mount images.

BTW, my skills in texturing are very basic and I find that the paint tools in Blender are not very intuitive and the shaders to create realistic results become a mass of noodles. I actually find Substance Painter 2 much more intuitive and the PBR textures now work nicely with the PBR shaders that have been developed for Blender. It’s just a matter of exporting an object to FBX, import into SP2, create complex PBR textures in a few minutes, save the metallic roughness textures as images, and in blender plug them into the PBR shader slots. PBR in Cycles without much effort. The down side is that SP2 will not import FBX files that are not UV unwrapped.

So, with a model this complex, I’m either stuck with Blender paint tools and a mess of texture nodes, or I UV unwrap the model and get better results with SP2.

As an example, the hull and the torpedo tubes were textured in SP2 in a few minutes. I will say, however, that the initial learning curve for SP2 is steep because there are so many options. But there are good tutorials on it that will speed that learning process along. Once I figured out how to use it, creating great textures is quite easy. And I especially like the PBR results in Blender Cycles.

Take care.

So the modeling is essentially complete. Although there are a number of small details I’d like to include, this model is a very accurate representation of the PT-109 boat that John F. Kennedy commanded in WW II.

It does not have the 37 mm cannon that JFK had his crew lash to the bow of the boat on the day/night that PT-109 was sunk when a Japanese destroyer accidently rammed PT-109 at night and cut it in half. Two of the crew were killed but the other eight survived.

Now comes the task of texturing the boat. I’m not very good at it and so this will be a challenge for me.

While I’m only a low-level modeler, I’m satisfied with the way this model has turned out. Historically, it is a very accurate model. It’s not a perfect historic replication, but I’d say it’s a 98 percent representation.

I spent two months researching this before I stared to model it.


I think should be possible to make one bay back and front.
That is good idea.

This is incredible; great research and perseverance on it. I Can’t wait for some renders, hope to see this boat up top!

I recently saw a documentary on Kennedy’s experience, and while I’m hesitant to overly glorify war stories, his was pretty darn incredible. You’re going need to model a coconut too!

Thanks for the comment. This project has been a learning experience in many unexpected ways.

This posts begins the texturing phase of PT-109.

This is a WIP and I seek inputs as to what people think of the textures so far. There is a fair amount of dirt and grime but the conditions in which the PT boats operated were primitive and harsh. I’ve included a photograph of a typical PT boat base in the Solomon Islands circa late 1942 or 1943. There are seven boats in the photo. From left to right boats 1, 5, and 6 are Elco 80 foot PT boats. Boats 3, 4, and 7 are Higgins 78 foot PT boats. Boat 2 is unknown as a canvass covers the bridge and chart house and the rest of the boat is too out of focus to make a determination.

So my texturing is a educated guess as to what PT-109 may have looked like after operating in a combat environment in the Pacific from December 1942 to August 1943.

The boat is not completely textured.

Textured Parts:

  1. Hull
  2. Main Deck
  3. Smoke Generator (the tank on the stern)
  4. 20 mm cannon mount and 20 mm cannon
  5. Engine housing platform (with the four large air vents)
  6. The starboard aft turret frame but not the twin .50 cal mount inside the frame.
  7. Life raft and its contents.
  8. Gas caps. The Elco PT boats had three gas tanks as depicted by the red objects in the overhead view) PT boats used highly flammable aviation fuel to power the three main engines.

Parts Not Textured (visible as a lighter hue of green)

  1. The Day Cabin (it’s the structure under the life raft.
  2. The port turret and gun mount
  3. The Bridge / Chart House (i.e., the forward part of the superstructure).
  4. The depth charges

Also, I have not modeled the .37 mm Army anti-tank cannon that the crew lashed to the bow of the boat as an unauthorized field modification. I haven’t decided if I’ll include it or not. I don’t have any detailed references, though the Japanese .37 mm cannon is very similar and I doubt anyone would know the difference. I also need to add the final scene (ocean, sky, lighting, etc.)

So, I’m looking for feedback. Should I dial back the texturing to reduce the amount of grime and weathering, or does it look like a PT boat that has been in combat for 8 months?


Here are three more detailed images of the texturing WIP.

For the side view, I’ve completely retextured the hull to be more realistic. I’m always concerned that I may over do the grunge and weathering, but I’m also well aware of the primitive conditions in which these boat were based and the harsh environment in which they operated.

Note: All PT boats had a black line painted between the red and green along the water line. I don’t know why, but it was universal. And, I’ve never seen a photo where the black like was perfectly straight. The black lines always seem to be more of a grunge effect where the parallel lines were broken up. I have no idea why. For my model, I’ve given it the grunge effect and I’ve faded it a bit because of the length of time it would have been exposed to water and weathering.

Note: the Depth Charges and the Day Cabin (immediately to the left of the aft .50 cal. turret) have not yet been textured. nor have the straps around the smoke generator.

There is a view of the aft .50 cal. turret and the life raft with it’s essential contents, though crews often added more survival things such as tarp, extra food cans, etc. I just noticed that the water keg looks too long and too shiny. I’ll have to go back and fix that.

And there is the close up view of the 20 mm cannon.

There are slight differences in paint schemes due to the fact that modifications were added after the boat had been painted, replacement parts such as torpedo tubes were from other boats or had been stored out in the weather, etc.

The green of the main boat and the red of the water line (called Copperoyd) on the hull are the official Navy paint colors for 1942 (as published by the Navy) in hexadecimal. I’ve weather and faded that black line a bit to what it may have looked like in August 1943 after nearly a year in operation.

Despite my best efforts, when I see the texturing skills of the professional modelers I’m almost embarrassed by my amateur skill level. I can’t seem to capture what I have in mind based on the rare color photos of PT boats in the Solomon Islands–but then, I’m not an artist; I’m a 70 year old who has had a wild ride in life and as I begin to transition into retirement, 3D modeling is only one of a dozen or so hobbies/interests I have.

The bottom line is that I only know that the operating environment was harsh and primitive and that paint, spare parts, and supplies were limited and so I’ve textured it to reflect those conditions.

Based on my extensive research, I think I’ve managed a balance between too much grunge and weather and not enough. But I don’t know for certain

I do think that the warheads of the torpedoes are too shinny, but I can’t seem to get the right look an feel from the one or two WW II color photograph of the torpedo warheads in the torpedo tubes. In those photos, they are shinny, but they seem to have a lot of grunge. Whatever the combination, I haven’t been able to replicate it yet.

I only have the Depth Charges and the Day Cabin to texture and then to add the only decals PT-109 had which were the “109” on the aft part of the 20 mm mount, the starboard .50 cal. turret, the port side of the bridge, and the front of the superstructure.

After that, I only need to try to place the boat into a scene with an ocean, the wake of a PT boat, and something close to sunset as PT boats rarely operated in daylight except to transit from point A to point B, and even then mostly at night.

Despite all of my laments, I’m very happy with the way this has turned out so far at my skill level. I am no where close to a Greg Zaal or a Chis Khun. But they inspire me to be better than I am today.


Note: All PT boats had a black line painted between the red and green along the water line. I don’t know why, but it was universal. And, I’ve never seen a photo where the black like was perfectly straight. The black lines always seem to be more of a grunge effect where the parallel lines were broken up. I have no idea why.
Don’t know for sure, not having seen any relevant photos myself, but if the “black line” looks uneven and grungy it could well be just the usual (dark green) algae/scum that accumulates around the waterline of most boats that aren’t scrubbed very often. In a black and white shot, or a slightly dodgey old colour shot, this could well appear to be almost black. Particularly if the water at the PT base also had engine oil scum on the surface.

And a minor point about “the .37 mm Army anti-tank cannon”: it would be 37 mm, not .37 mm. .37 mm is only 15 thousandths of an inch. 37 mm is just under an inch and a half. :wink:

As I’ve noted in previous posts, almost anything is possible with regard to how PT boats were configured and painted. Additionally, clear in focus photos of PT boats are rare and ones in color are even rarer.

So, my observations are based on literally a hundred or so poor quality photo and videos made from wartime film.

I’ve included three pictures of PT-109 that is ready to be transported aboard a Liberty ship to Panama before being further shipped to the Solomon Islands. The photos are of August 1942, so the boat is fairly new. The dark strip between the red water line and the gray (the boat had not yet been painted green) looks to me to be too consistent to be due to algae or oil stains. This appears to be the case in most photos. If it were algae or oil, I would think the line would be much more broken and grungy.

However, the edges of the line are obviously not perfectly straight, so it’s hard to tell. It appears to have been spray painted without tape.

With regard to the 37 mm, it was a typo. I served 21 years in the Marine Corps and I’m knowledgeable about all weapons. I believe in an earlier post, I inadvertently referred to it as 57 mm–another typo.

Attachments


For those who might be following this tread, it’s been a long while since I have been able to get back to the PT 109 model. I have been on business travel almost constantly and when I get home, I have a lot of back logged things to take care of.

However, I will be publishing the final renders in a few days.