Sweet! it’s starting to take shape…see you in the battlefield :eyebrowlift:
Nice, I can’t wait to see it with all the detail added in.
Yeah this one just screams for details 
Really a good base that you’ve made here, nice work. And thanks for the wires, thats always interesting to see.
Terrific stuff. Can you point me to anything that shows me how you went about the rendering? I’m a blender newbie and I like this look for showing the model
Sweet! it’s starting to take shape…see you in the battlefield :eyebrowlift:
I’ll be there ![]()
Nice, I can’t wait to see it with all the detail added in.
I’m excited for all the panel work too!
Yeah this one just screams for details
Really a good base that you’ve made here, nice work. And thanks for the wires, thats always interesting to see.
And so details I shall give it ![]()
Thank you!
Terrific stuff. Can you point me to anything that shows me how you went about the rendering? I’m a blender newbie and I like this look for showing the model
Thanks! If you want a more professional tutorial, then look up something like “3-point lighting setup blender” or “studio setup in blender” But here’s my take on things.
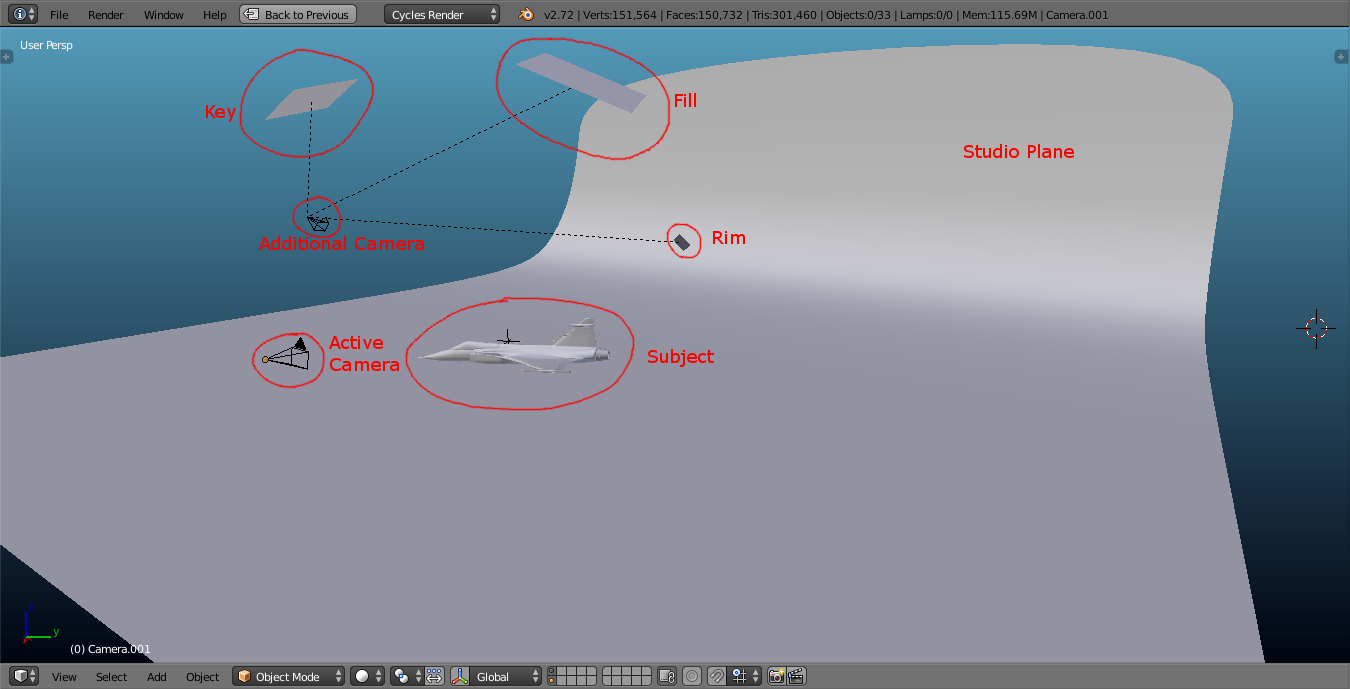
So the first thing is the Studio plane. Basically just a giant plane with a gentle curve as the background of the image. This creates the illusion of a never ending background. In the middle of the flat part of the plane is the subject, with three lights around it, created from planes with emission shaders on them. The key light is the main light, with medium brightness and size. The fill light balances out the light, and is bigger and less powerful. The third is the rim or back light, which is very small but also brighter than the other two, and illuminates the subject from the back. Those lines coming from the camera to the lights means that they are parented to the camera. That means that wherever I move the camera, the lights will stay in the same place relative to the camera, which is usually when re positioning the camera. The rim light is always behind the subject, and the key and fill are to the left and right of the camera respectively, facing the subject
I liked the light blue color because it gives contrast to the subject, but isn’t too harsh, although other colors can work too. The material for the studio plane is just a diffuse with the selected color, and a subtle glossiness. Lastly, two cameras for different angles of the subject.
Hopefully this helps a bit, and if not there are lots of tutorials on studio lighting out there
As I mentioned in my recently revived GT40 thread, I’m taking some time off this to focus on a contest, but I did manage to complete the tail/canard art that I’m going to use for this livery. The tail art is from the Czech 211 Tactical Squadron, originally designed by Karin Zeller. Here it is 


Maaan THAT’S AWESOME!!! well done…now all you need it to add some wear and tear :eyebrowlift:
Interesting artwork!
Quite unusual for a fighter, but it looks good, instead all these tiger stripes or shark mounths…
Is it cubism, in style?
Don’t make fun of the tiger stripes… http://france-air-otan.blogspot.ca/2010/11/50-ans-de-nato-tiger-meet.html

Curtis p-40 Warhawk/Kittyhawk/tomahawk… I always wonder why they went with a shark mouth instead of a hawk beak or talons instead because of the name…
Thanks tommy!
Interesting artwork!
Quite unusual for a fighter, but it looks good, instead all these tiger stripes or shark mounths…
Is it cubism, in style?
It may take some inspiration from cubism and that whole picasso idea, here is the artist’s website in case you are interested.
http://www.redbubble.com/people/karincharlotte
Don’t make fun of the tiger stripes… http://france-air-otan.blogspot.ca/2…iger-meet.html
Good ol’ RCAF Starfighter there!
Try to check for following causes:
- variation of normals directions (check the normals on these faces - are all of them pointing outward?);
- smooth shading artifacts: try to use the Auto Smooth option from Normals panel (Object Data context)? Or Edge Split modifier?
- improper material assignment: some small mesh faces in this area are assigned to different material (they can be so small that you did not noticed them in the textured preview);
- “forgotten” UV faces: some mesh faces were omitted by mistake in UV-unwrapping. In such a case they are covered wit the color of a single pixel (located at 0,0) of the texture image. Use the “test Grid” (“chessboard”) image to check if in this area texture mapping is OK;
For example - I remember that I had such a spot on my La-5 model. Ultimately I discovered that it was a forgotten vertex: an end of an edge which was not connected to any face.