I’m going through the book Introducing Character Animation with Blender by Tony Mullen.
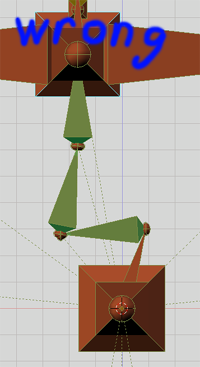
I am having trouble getting the bones in the spine of my rig to stretch properly. First, when I offset the “chest” from the “hips” the IK chain goes all wacky. The first pic shows my current rig.
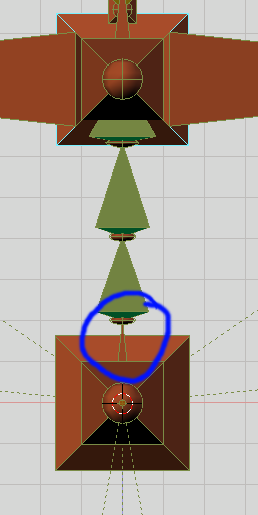
it does not do this in Tony’s rig, as illustrated by the last pic. So, it would seem to me that I am missing something, I have gone over the bones part of the book quite a few times and cannot find what I need to do to correct these issues.
Any help you could provide would be greatly appreciated! I’ve been kinda tearing my hair out over this…
That’s a good thought, and I should have noted it my first comment.
The chain length must be set to 4, otherwise the base of the spine will be completely stationary. More to the point, the chain length is set to 4 in the rig that is working properly. Because I’m not really sure what affects what I’m dealing with, I’m not sure what I should be posting in terms of settings.
Thank you for the idea.
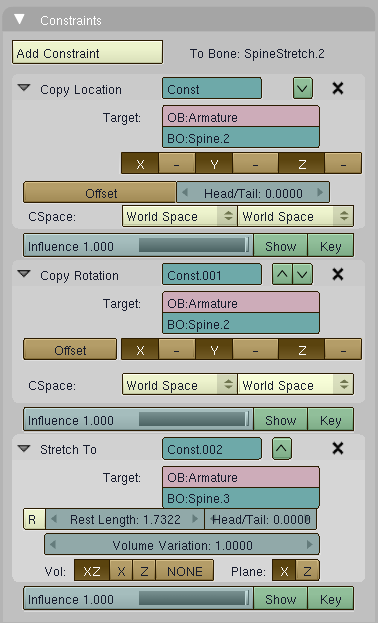
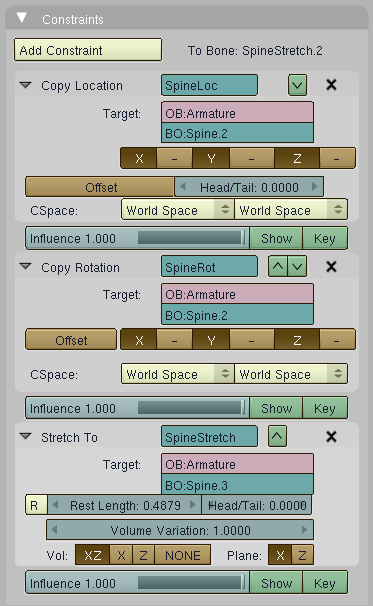
Could you show your constraint stack with the settings for the ik chain and the setting for the base bone of the spine. Do you have a stretch to constraint in place?
After a lengthy ordeal I was able to ascertain the cause of my problem.
There were 2 things:
I needed to set the “stretch” field (under Armature Bones, in Pose Mode) of my base spine bone to 0. I had it set to 0.100. The book told me to set all the bones in the IK chain to 0.100, but this is not the case. The first bone (Spine.1) in the chain should be set to 0.
Even though the book told me to set the stretch of the other bones in the spine to 0.100, the armature provided on the DVD is set to 0.300. This is why my rig was not bending the same as the provided rig.
While this was a pretty frustrating experience, I now have a better concept of how the “stretchiness” of the bones affect how the rig deforms when posed in different positions. I just wish some of this had been explained in the book… on to the next challenge!
Ok, new problem and a question(s):
First, the question(s): should all axis of the bones in a rig point the same way? Is that even possible? and is it possible to reorient the bone axis?
Second, the problem: as I am adding bones to the rig and setting things up something is happening that is creating a discrepancy in the position of the bones in Edit Mode vs. Posing Mode. Some bones end up rotated just a little off in Posing Mode and clearing rotation, etc. does not fix the problem. If I delete the bones and re-add them, the problem goes away, but sometimes it happens again to other bones. Note that I have not moved a thing in Posing Mode.
Also the Clearing Roll (CTRL-N) command seems to have different effects over the course of building the rig. As I add more bones, bones that have cleared fine in the past (resulting in the z axis being where it should be) will become skewed, often in opposition to each other (if they are mirrored they will roll opposite directions).
I have put quite a bit of time in trying to research answers online, and in experimenting and have come up with nothing so far on my own.
You should apply your roll angle and transformations to bones (Ctrl+A) this should get rid of the discrapancy. About the Clear rotate thing I can only guess but since bones are parented or mirrored they will copy the rotation of their parent so when you clear the parent the children will move relative to it.
applying does nothing to change the situation. I have tried applying through CTRL-A many times and it does nothing, except in one case it squashed the hell out of the whole rib cage.
When I Clear Roll (along Z axis) some of the bones go all wacky, even if I only try to clear an individual bone, not a parent bone.
There has got to be a way to get the pose to match the Edit Mode rest position!
Ok, made some break-throughs (maybe) at 5 in the morning! I finally had to go to sleep.
Found out that making adjustments in Edit Mode to unconnected bones that have constraints (or IKs) either on them, or targeting them, is BAD! This was causing my rig to change rotation or location in Pose Mode with no option to match the Edit Mode position. CTRL-A (the Apply Object menu in Object/Pose Mode) will not correct this problem. The only way I’ve found to correct the problem is to delete the unconnected bone and make a new one where it should be, or position it exactly as it should be.
The problem with the z axis of my bones seems to be due to the fact that I was not using CTRL-N (Clear Roll) every time I added or extruded a bone. I’m pretty much guessing here. I still cannot get a consistent test on this. Please let me know if this is not the case!
for 1, it seems like good policy to press w to clear user transform or to reset the constraint options (like resetting the stretch length or distant length or summat) or just removing the constraints beforehand and re-adding them afterwards.
2. I haven’t read the whole thread, and right now I have no intention to do so, rather lengthy, but you shouldn’t have to use ctrl N to recalculate the roll angle every time.
When pressing ctrl N you get to choose to options, If you want the z axis to point up, just use the first option, the second one just an average roll for each selected bone in relation to one another, I think… Because I think the roll angle is detemined by how it is attached to other bones. If you connect a bone, it could change it’s roll angle.
Point is, I don’t recalculate the roll angle if I don’t have to. If I get some weird angles/effects/whatever, I often recalculate just to see what it does, but I’d rather just manually set the roll angles for the bones that cause me trouble.
Sorry for the length of this thread. Let’s just say it’s been pretty frustrating to say the least.
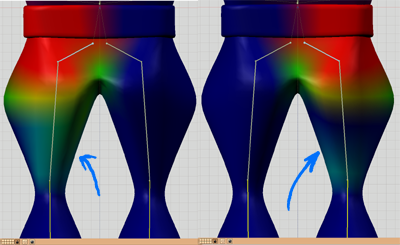
On weight painting: Is the x-mirror option in the paint menu consistent? I’ve had it on and I find every now and then my actions have not translated to the sister vertex group. The reason I’m asking is to know if this is something I simply have to deal with (which I can, if I have to) or something I’m doing wrong. Same with my questions on the bones. I have no idea what the behavior of these things is supposed to be, so I don’t know if what I’m seeing is normal, or if I need to do something different. I’ve attached a pic to illustrate what I mean about the weight paint.
the x mirror weight is not consistent if you manually set or fix some weights in editmode, I ussually weight one side then copy the weights to the other side when I’m done.
ah, that would be great! So… exactly how do you copy the weights?
I found a thread that said to delete one bone and duplicate the other, but it was in reference to separate mesh objects.
There is a script that does it. You can find your scripts either by opening the script window, or usually at the top of the “Mesh”, “Paint”, or “Object” menus…


 I finally had to go to sleep.