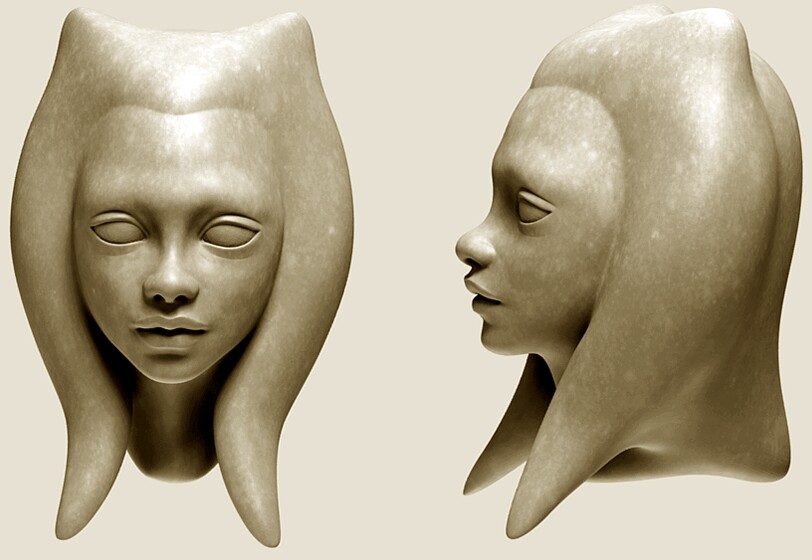
Here are a couple of Blender sculpting tests. Also, does anyone know if there’s a way to store and retrieve brush curves? Or atleast edit them on a per-brush basis rather than globally?


Beautiful work.
For the curves, I may have overlooked it completely but I haven’t seen any way of saving them either. It is so little data, how can it be that we can’t save them? I had to resort to a crazy workaround :
- make a new scene, empty
- back in the scene where the sculpted object is, use Ctrl-L on it to just link it to the new scene
Now you have two scene where you can sculpt the very same object and have different brush settings : size, strenght… everything even the curve is kept. You can even have there a whole new set of textures.
This is absolutely annoying since you have to re-enter the SculptMode every time you change scene. I truly hope that I am just a dumb ass for not finding out that there is an easier way. If I am right though, it is a valuable workaround that isn’t expensive in RAM.
Hope this helped.
Jean
This is prefect job. Are all these pictures form Blender?
I really like also your shader for models.
Four stars from me!
I like it very much.
3 questions:
Do you make the poly versions and then sculpt or the poly versions of the dog and the woman are retopo and you previously sculpted them?
Are you using GLSL when sculpting?
How many polys have the dog and the man?
Keep it up!
Thanks guys!
IamInnocent: Yes it is a bit cumbersome. I don’t change the falloff curve that much since the default works very well, but I was playing around with it alot when doing the wrinkles on the dog and although reseting and setting up different curves manually doesn’t take that long it’s certainly easier if they can be stored. Also I think it would be better if each draw mode (draw, smooth, pinch, inflate etc) had their own curve atleast. So for example that if I edit the curve in draw mode, the curve in smooth mode is unaffected. Anyway, beggars can’t be choosers, and I really like the sculpting in Blender. Thanks for the idea with the scene linking.
JiriH: Yes all shots are from within Blender, including the renders. I used one of UncleZiev’s excellent lightcuts builds, sadly I can’t render to save my life so stuff like lightcuts is pretty wasted on me. Here are my light and material settings for when sculpting: 

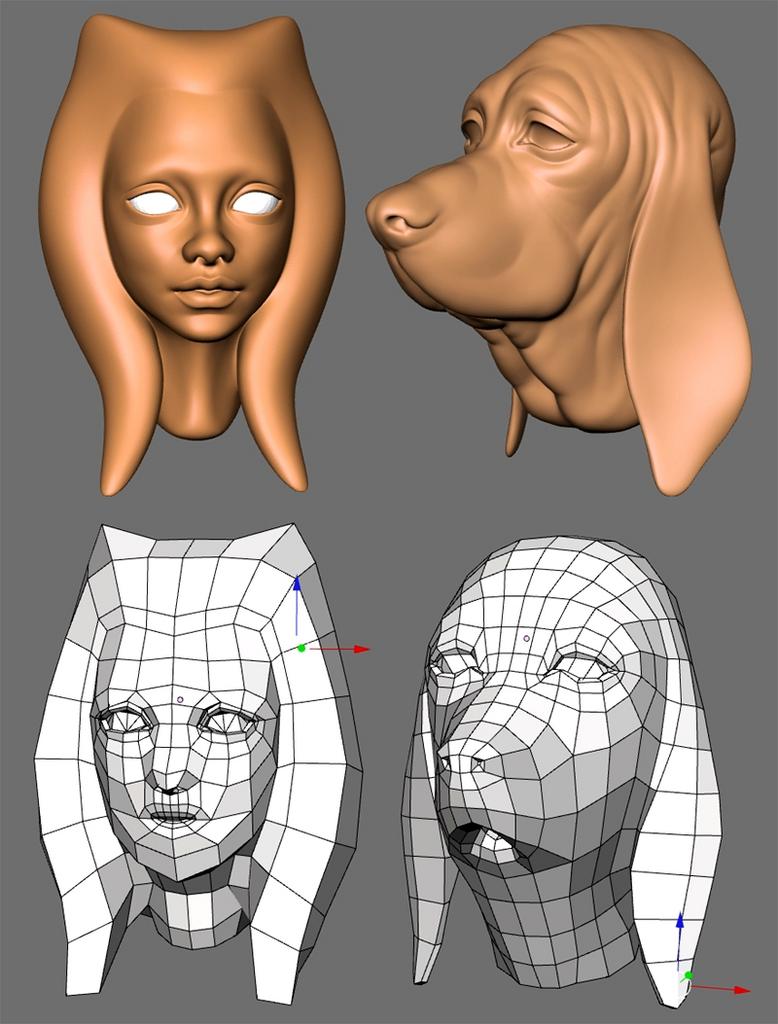
Eclectiel: The way I currently work is that I model the low polygon versions you see here first, and then I sculpt them by entering multires and the increasing levels like in the last screenshot. I’m really looking forward to Nicholas Bishop’s summer of code stuff where you can add/edit geometry mid-sculpting. Also, doing retopology and using the shrinkwrap modifier to project detail from one mesh to another is another option that could be useful (if I understand it correctly).
Nope, no GLSL.
The dog started at 490 polygons and ended up at 125440. I tried adding another level which brought it up to above 500000 polygons and it was workable but not enjoyable on my crappy machine.
For the man I reused a mesh from another test model which was light (538 polygons) and ended up at a mere 34368. Here is the original base mesh that I reused:


Thank you very much for all the information in matter. Really useful stuff for others.
That last one is beautiful! Great work on the shaders and lighting as well, as simple as they may be.
I like your style, seems like something in between realistic and cartoonish. Not sure if your goal is only realism, but I like that combination on your models.
In other site someone mentioned something like a place to organize brushes. I like the idea of saving brushes in a separate place, and then you could assign each mode a different brush.
The way I currently work is that I model the low polygon versions you see here first, and then I sculpt them by entering multires and the increasing levels like in the last screenshot.
That’s a nice base model for sculpting a human head, nicely distributed poly density.
I’m really looking forward to Nicholas Bishop’s summer of code stuff where you can add/edit geometry mid-sculpting. Also, doing retopology and using the shrinkwrap modifier to project detail from one mesh to another is another option that could be useful (if I understand it correctly).
That’s correct. What I like about retopo is that you can start sculpting with a subdivided cube without worrying about topology or pre-modelling with faces. You draft the shape sculpting and when the original topology of the subdivided cube gets too crappy, you do retopology with the needed density according to what the model had become, and following the lines of the actual shape, add some levels and shrinkwrap, and there you have a fresh model. You never worried about moving a vertex or creating a face in an “old fashion” face modelling way, just in a retopo way, which is significantly faster and I personally find it more fun.
Maybe you know there are already builds with Multires modifier and that Shrinkwrap is already in SVN Trunk. You could do the model using Multires modifier, and when you are done, export the high-res to a SVN Trunk build to do the retopo with Shrinkwrap and the actual Multires method for further use of the model. Kind of an exportation from the new Multires to the actual Multires. A little uncomfortable but a workaround to enjoy the new Multires.
The dog started at 490 polygons and ended up at 125440. I tried adding another level which brought it up to above 500000 polygons and it was workable but not enjoyable on my crappy machine.
Are you using “Partial redraw”? and also reducing screen resolution helps a lot.
Well, keep up the good work, and hope to see more of it here in the future.
.
prefect~~
Beautiful work.
JiriH:
You’re welcome!
Hobo Joe:
Thanks man! Just a color map and a lightcuts render, so anything good that came out of that render was purely due to lightcuts.
Eclectiel:
I often find myself drifting towards Cartoony/Stylistic/Caricature’ish when I’m modeling. The model in the progress shot was supposed to be a caricature of Hitler (didn’t really end up as I hoped) which came about as a result of me spending a whole afternoon on youtube watching all those crazy WWII cartoons (I was humming ‘Gremlins from the Kremlin’ for two days  )
)
Yes, some way to define and store a bunch of curve presets would be great, atleast on a session basis (though I’d prefer a way to store them permanently). But again my main gripe would be that the brush curve (falloff) changes affect all drawing modes rather than just the one I’m currently in while editing. The strength and size of the brush works on a per-draw-mode-setting, so I think it would be great if the falloff curve did the same.
As for the new Multires development, the most interesting part for me is being able to quickly add geometry mid-sculpting in areas where I notice that I could use more detail, thus not having to subdivide the whole model just because I need more polygons in a particular area. I haven’t actually tried the new Multires yet, given that it’s in heavy development. But I’ve marveled over the screencasts Nicholas sent up over at Vimeo, and unless I misunderstand them (which is not entriely unlikely) the new multires should offer this workflow enhancement. If I understand Shrinkwrap correctly I’ll be able to do the same by retopologizing and shrinkwrapping, but not on-the-fly which is something the new Multires seems to offer.
Oh and thanks for the Partial Redraw mention! I was sure that I had turned it on before I did a ctrl+u a while back but it was off. With Partial Redraw 5000000 polygons where smooth as silk and when I added another level which brought it up to 2 million it staggered when rotating and zooming but the strokes where still smooth. I have a couple of full body models I’m working on and I was thinking that I’d not be able to go very high in details when sculpting but with Partial Redraw that situation just improved greatly!
BillyJ:
Thanks!
I think I understand what you mean, and is a nice workflow, I will add it to mine… Thanks for sharing!
professional sculpt examples!
Hi,
Cool, i like the dog model!
Say, what tablet you use?
and do you sculpt anything or you are professional on characters more?
Awesomeness! Can I use these pics for the wiki http://wiki.blender.org/index.php/Manual/SculptMode please?
Beautiful sculpts and excellent characterizations as well. And many thanks for posting that screencap of your lighting setup for sculpting. I’ve been thinking about ways to improve what I can see while sculpting and your settings are a great tip.
Awesome stuff, as always. Your modeling always inspires the hell out of me – keep up the great work!
Your material and lighting setup for sculpting are a big help; simple things like the specularity and colors, things I hand’t thought of, actually make a big difference. Now I’ve just got to work on modeling mid-res basemeshes speficially for sculpting like you.
I recognized Little Adolf and immediately thought of ‘Plane Daffy’ and the WWII Looney Tunes caricatures!
EDIT:
I meant to mention that the GSoC Multires build at Graphicall is pretty complete and functional, but (devastatingly) deletes more than one step when using Undo. This can be worked around by setting Undo steps to 0 in the User Preferences window to be safe and probably allow playing around with relatively massive polycounts.
wow thats awesome
did u use bump / normal maps or what produced these soft shadows ?
Those “test” are great. Wish I had a better video card for sculpting.
woot! very nice work! makes me want to practice with the sculpting brush some more.
awwwwwwwwww. that puppies face looks so nice and amorphous.