I can’t seem to focus I really should be working on the Blender Foundations book, but I had an urge to model my dad’s old car! Here are some reference pictures:
I saw it being stolen (I was still a kid, watching through the window as the guy who “doesn’t look like dad or my brother…” drove away), and I’ve been hating the guy ever since. Although not well taken care of and therefore always kind of on the verge of breakdown, I would have loved to have the chance to drive it. I think it’s a really cool looking car
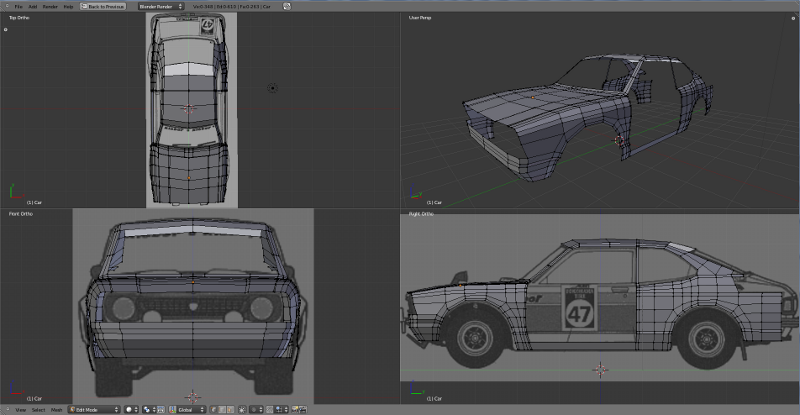
So I found some images of a similar model (*) that I could use as background for modeling, and I’m on it! Here’s where I am so far:
I am grossly unqualified for doing this, but I’m doing the best I can, trying to pay attention to topology especially. Blender Cookie’s Porsche modeling tutorial is giving me some lights, so cheers for that Jonathan
Let me know what you think of it so far! Any tips? I can already tell I’ll be learning a LOT doing this.
(*) Where do you guys find your blueprints for the cars? I googled extensively to find those images you can see in the Blender screenshot, but they’re not the best… probably harder to find blueprints for this model anyway.
Thank you Jonathan - your tutorial has been priceless, both teaching me how to approach this kind of project and how to solve the problems that come up. Kick-ass!
(Now I’m looking forward even more to the vehicle modeling series!)
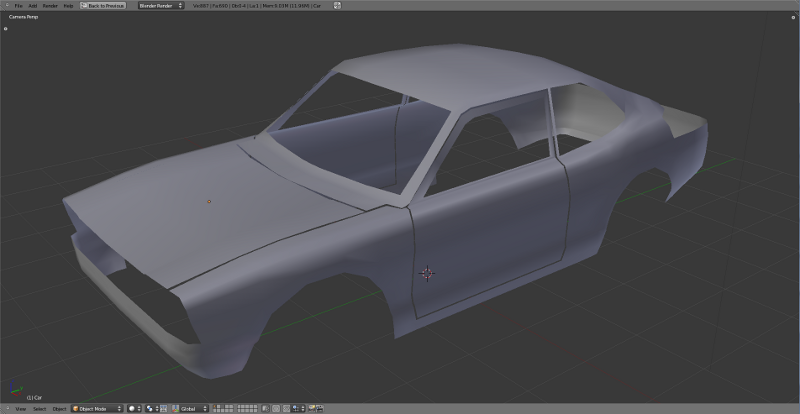
I’m calling it a night, here are wireframe and solid views in proper resolution:
(the discrepancies between the model and the “blueprints” in the bottom of the car and the wheel “holes” are on purpose, the images are from a modified rallye version)
So far the hardest part was definitely the back - I tried to follow the flow of the vehicle but I’m not too happy about how it turned out, looks pretty messy:
Wow, this was already buried in page 5! Lots of WIPs here, good sign
Thanks Ghostly! The bad news is that the images they had were the same as mine (the rallye version of the car). The good news is I registered at Scratch Made Cars and they had much better pictures for reference!
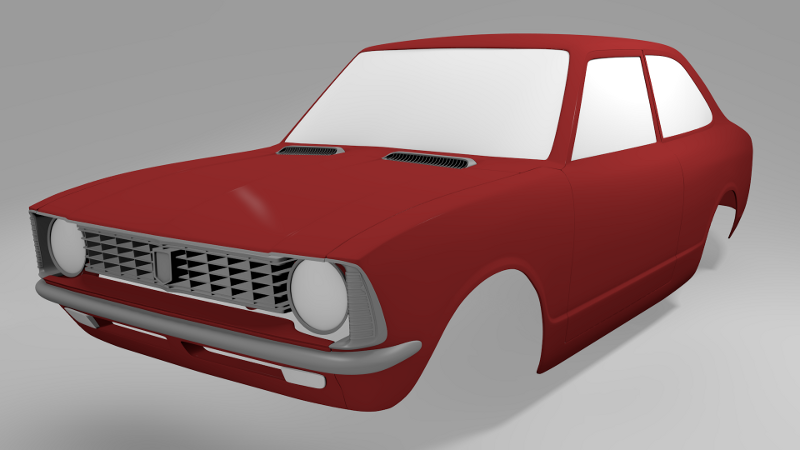
With those, and after a lot of reworking and then some more work, I’ve (kind of) finished the main body! Kind of because I’m sure there will be lots of tweaking here and there while I’m working on the details. But I’m very happy with the result so far One way I realize I’m very new to this 3D scene is I get the chills (really, literally) once something I do starts to resemble something real. When I finished the back and then rendered it I had a very creepy feeling - obviously I have childhood memories of this car and the resemblance with the model really struck :eek:
Here are wires:
And preliminary renders for my own motivation
Edit: Next up will be starting to detail, but I’m underqualified. Hopefully not for long - today I downloaded my pre-ordered copy of BlenderCookie’s Vehicle Modeling Series, so if I can’t detail this car after I’m done with that awesome gyrocopter, just slap me
stop saying that you are doing a good job, I spot a few bumps here and there but all you need to do is slap on a mat with a high spec and tweak the surface so that it is smooth rotate your model in the 3dview and look at it from as many angles as you can and iron out the bumps and you should be sorted.
So just take care of those bumps because when you add a car paint material the are going to mess up your reflections. But so far you are doing a good job.
Thanks guys Don’t get me wrong, I do think I’ve done a good job so far - back when I started I knew much less but after watching and reading some education and then actually applying it I feel confident (although still inefficient, but that will come with experience). But now I have to do the same for the detailing phase, my modeling skills (essentially the tools I know and how best to apply them) are still very basic - I’m not sure how to (as efficiently as possible) model these and this, for example (those photos will be SO useful by the way!). But I will get there, doing it!
I’m back on this! Thanks for the tip Benny_Flex (and sorry for the delay getting back to you!), I’m using that for sure.
I have a question though: when you add loops to sharpen the subsurfed edges, how do you avoid getting small creases (very noticeable on the reflection highlights) on those auxiliary edges?
What I’m doing to solve this is I’m keeping the important vertices in place and edge-sliding the rest to even out the mesh, but I’m wondering if that’s the best way.
Let me know if my question wasn’t clear, I’ll post an update with pictures between today and tomorrow and I can show an example of what I mean.
You guys didn’t answer but that’s ok, I figured out I knew the answer already
So! More progress on this. I’m finally happy with the base topology and I’m calling it done, although I’m 100% sure there will be some tweaking at the wheel wells, but since those will have to be detailed (the car has some creasing on them) I’ll worry about that later.
You’re on the right path. Everyone else seems to crit well enough, so I’ll just say that this was one of my first cars. When you’d start it and put it in DRIVE, it wouldn’t go anywhere for 5 minutes before it finally kicked in. I remember taking a girl home one day from school, and pretending to look in my backseat for something until I felt the transmission kick in so the car would move.
Bahaha, too funny Lots of stories with ours too. It started fine, it was what it would do half-way that was always a surprise. My brother opened and started and drove the car with a screwdriver when my dad took the key. I guess it’s no surprise that the crook managed to steal it anyway. In fact the guy may very well have saved our lives, my dad once came home from the mountains with some sort of plastic bottle tied to the radiator with a shoestring because of some leak. He’s not McGuyver, but close.
Alright, enabled subsurf, smoothed some areas, added depth to the surfaces and detailed the main body (ie the creases along the sides, which is pretty much all there is).
Still working on some of the details, but getting really happy with how it’s turning out! I bumped the project to the top of my list so expect more frequent updates.
I’m anxious to start working on the wheels, it must have a big psychological effect
 I really should be working on the Blender Foundations book, but I had an urge to model my dad’s old car! Here are some reference pictures:


