Hi Blenderheads,
it seems there are some gaps when it comes to specific methods in implementing logic.
FSM
Today I want to show how to implement an FSM with logic bricks and states. Please check wikipedia for details on finite state machine. Do not be affraid if you think it looks to complicated - you will see it is not.
An FSM comes quite handy for character animation and behavior description. The nice thing is you do not need to write a single line of Python to implement an FSM.
This tutorial will show you how to do that.
For simplification the example uses entry actions only (Moore-machines). This is a good idea in general to keep it simple.
Elements of an FSM
State - describes the current state of the system
Transition - describes the transition from exactly one (from-) state to one (to-)state
Action - creating output (animation, calculation, sound etc.)
Events - trigger a transition
Graphical notation
An FSM can be described as a graph. The nodes are the states, the edges the transitions. The events are written to the edges. The actions are written to the state if included.
Example:

A graph is quite handy for quick sketches and overview. I really recommend to draw your own. But it is hard to use a graph within a program. The truth is the BGE can’t work with graphs.
Table notation
The BGE can work with the table notification of the FSM.
It usually consists of
- a table of transitions
- a table of entry actions
Each row belongs to one state. The state in the BGE is implicit given by the state number of a controller (right of the controller’s name).
Entries in the state table contain:
- one or more sensors sensing for the transition events
- one or more controllers performing the decision of the transaction is enabled or not
- one State Actuator switching the state when the transition takes place
Entries in the entry action table contain:
- an sensor triggering at state entry (Always - no pulses - LEVEL)
- one or more controllers
- one or more Actuators of any type (except State Actuators)
Please keep in mind, the BGE deactivates actuators when leaving a state
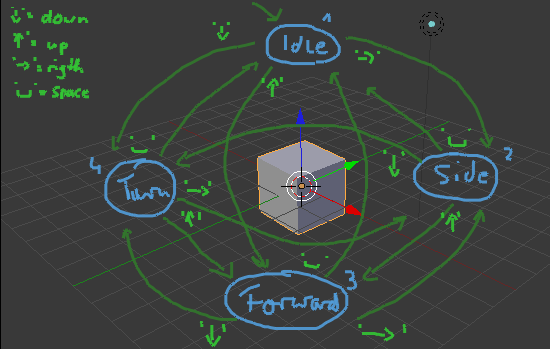
Example
This example defines 4 states:
Idle, Side, Forward, Turn
When entering a state the cube does what the name of the state implies (= Entry Action).
| State | Entry Action |
|---|---|
| Idle | stop all motion |
| Side | Move to the side |
| Forward | Move forward |
| Turn | Turn yourself |
You can switch from one state to another on key press. Here only two keys are accepted <- left and -> right arrows.
You can cycle through the states with this two keys.
The transitions are:
| State | Event | Next State |
|---|---|---|
| Idle | <- | Side |
| Idle | -> | Turn |
| Side | <- | Forward |
| Side | -> | Idle |
| Forward | <- | Turn |
| Forward | -> | Side |
| Turn | <- | Idle |
| Turn | -> | Forward |
Game Logic
First enable the state map by selecting the little (+) left of the controller’s column header.
In the lower map enable the first state to make it the initial state.
Now define 4 states by setting up 1 controller for each state. Each controller needs a different state number:
1 = Idle
2 = Side
3 = Forward
4 = Turn
I recommend to name the controller according to their meaning. It will help you later to keep the overview. In 2.49 this name was shown as hover in the state map. I really do not know why this useful information was removed with 2.5.
Now you need 4 State Actuators to be able to switch to these states. You can’t give them the same name as the controllers, but you can use a variation:
e.g. controller = Idle -> idle, aIdle, toIdle
I recommend to disable the state button above the sensor and actuator columns. otherwise the logic block would only be visible in the state with a connection. You can enable it when you are done.
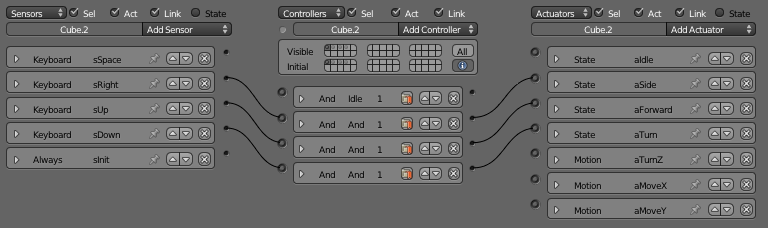
The logic bricks of the first state (“Idle”) look like this:
In Idle state the cube should not do anything. So the transition table is the only setup here.
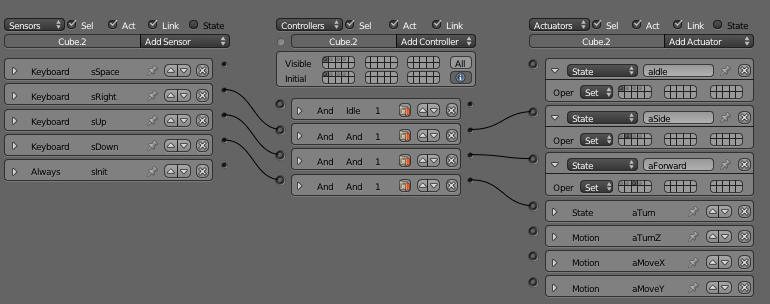
Lets have a look at the second state (“Side”):
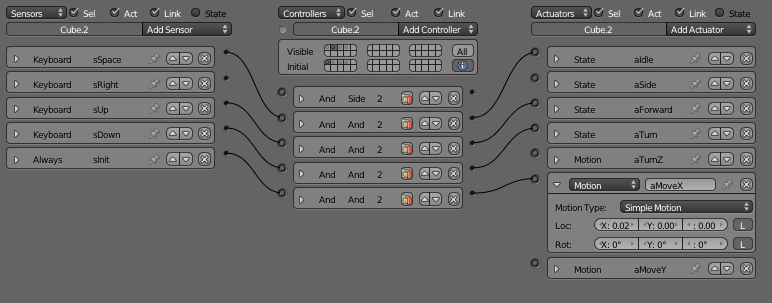
Additional there is one entry action triggered by an always sensor. It will move the cube along X as long as the cube is in state “Side”.
The other states are similar to this one but with different entry actions and different transitions. You can find the complete setup in the demo file in the next post.
I hope this introduction to FSM is useful.
Monster