So this is something I’ve been tinkering around with for my WoW guild, setting up characters in WoW ModelView, importing them into blender and rendering them with cycles. I figured I’d write up a short tutorial about it.
You will need WoW Model Viewer installed, it’s a program that opens the World of Warcraft assets and has exporting capability. You can get it from http://www.wowmodelviewer.org/. You will also need some sort of image editor, be it Photoshop or Gimp.

Open up Modelviewer and set up your character however you wish. I just went with the randomized human male it gave me when I opened it, and picked a set of equipment from the list.
In the file menu are the export options. One thing to note is the “Export initial pose only” toggle. If this is set to on, the mesh exported is a basic “Standing straight, arms and legs straight at the sides” pose which is easy to rig with armatures. If the option is unchecked whichever pose or animation frame you choose in Modelviewer is the exported mesh. Use this if you don’t want to do rigging in Blender and just want a stock game pose.
The best option to use is exporting to Wavefront Obj. This is a format Blender can import easily.
Over in Blender we go to File -> Import -> Wavefront, and find the location of our exported mesh. Modelview is a smart tool, it automatically exports the UV maps for the mesh as well as the necessary texture files for any equipment you put on the character.
I exported mine to C:, so all paths I describe will refer to this. If you exported somewhere different your directories will be in the directory you chose instead.
If I exported to C:\ and named the file “TutorialHuman” I would have the following files and directories created in the export process:
- c:\TutorialHuman.obj - The mesh exported
- c:\TutorialHuman.mtl - Not needed
- c:\TutorialHuman_Body.tga - The skin texture for the base model.
- c:\Character\Human\ - The texture for the characters hair mesh would be here. Note that if your character has a helmet or hat and you toggle “Show Hair” in Modelviewer to off, you have no hair texture since the hair mesh is replaced by the headgear mesh.
- c:\Items\Head\ - The texture for any helmet would be found here.
- c:\Items\Shoulder\ - The texture for any shoulder armor would be found here.

Once we have our mesh imported into Blender we need to clean it up. For some reason the exported WoW models have lots of duplicate faces. Select each seperate component of the model, tab to edit mode, select all vertices and choose “Remove doubles” from the left side menu. You need to do this for each piece of the character.
WoW uses seperate components of the character model to swap out to give various gear (Gloves, boots, cloaks) their shape. These all get exported from Modelview.
The easiest way to clean up the model is select all the seperate meshes that use the basic skin and join them together with the J key. The specific pieces to be joined can be summed up as “Everything except for shoulder armor, headgear, or hair if present”. Some of these are sneaky, there is a “cloak” mesh on the characters back that is very small. Other character races also have various other small pieces that need to be hunted down such as facial hair bits, sideburns, jaws, etc. Join all of these together.
Once you join all the seperate meshes except for the hair headgear or shoulders, you should select all vertices and choose “Remove doubles” once more. This will get rid of doubled vertices where the seperate meshes join together.
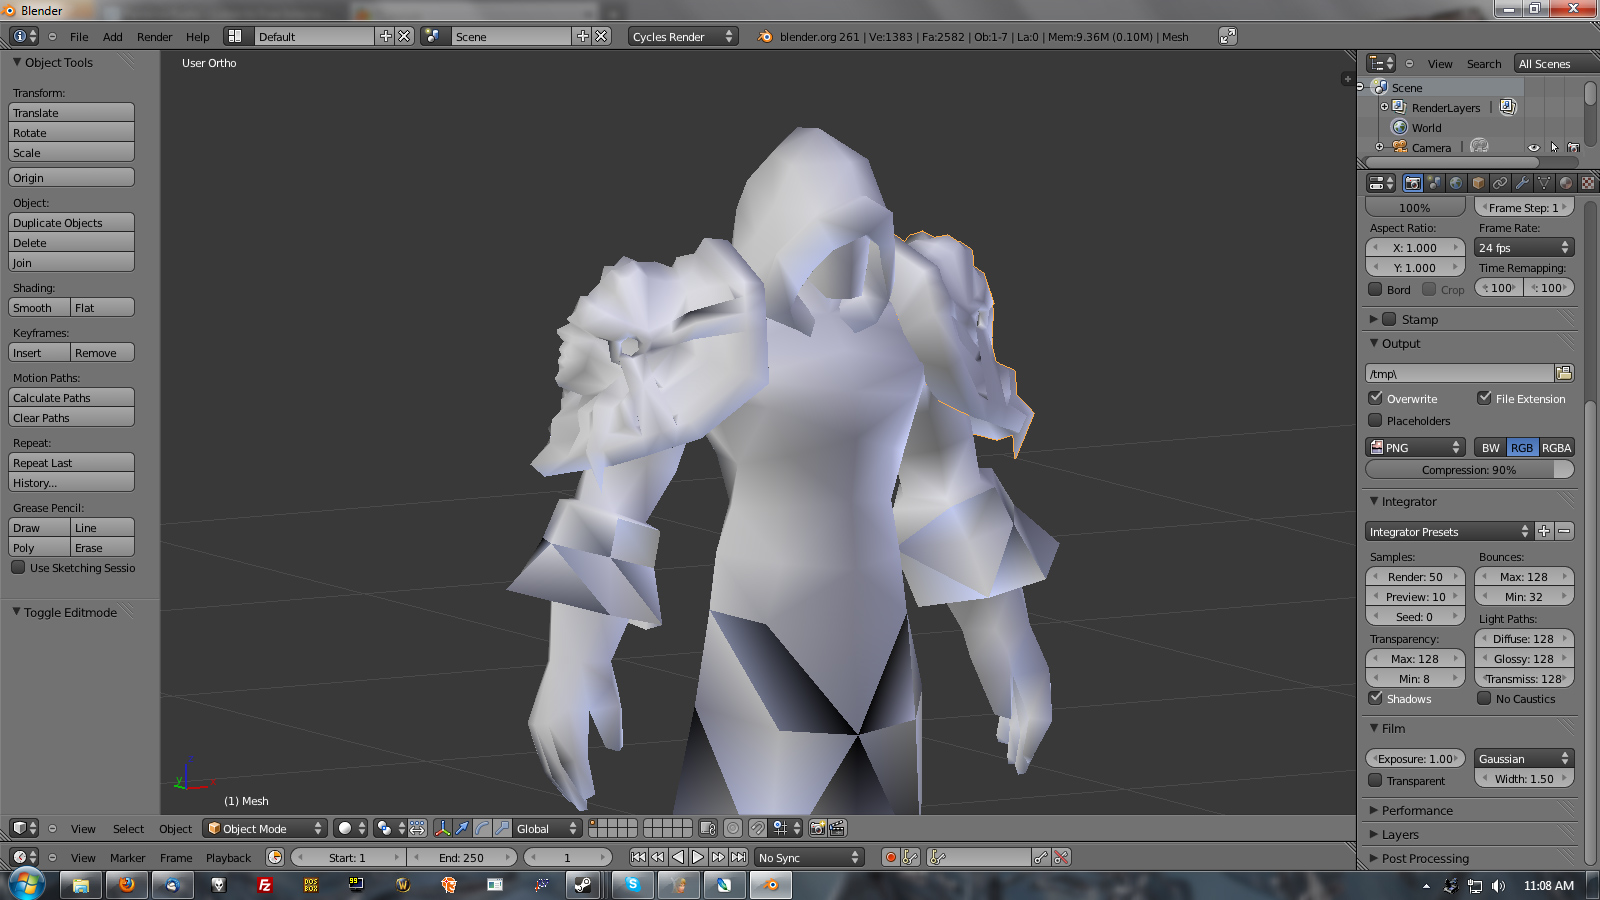
In solid view you can see that as you remove doubles from the various objects the mesh becomes smoothed. You will also probably notice some normal errors (The black faces on the mesh). Try going into edit mode, selecting all and choosing “Recalculate Normals” from the left toolbox. This will usually take care of any issues, but sometimes you will need to manually select problem faces and flip the normals (The shoulderpads in this example were particularly troubled)
Now you can start applying the texture to the model. On the Material tab click the Use Nodes button, you will get a basic Diffuse material by default. Click the Color button and choose image texture. Open the image to be used and find the basic skin texture Modelview exported. For me it was c:\TutorialHuman_Body.tga. Once you pick it, change your 3d view style to Textured view and you should see the texture applied to the character.
For my character I found an interesting bit that requires me to explain using transparent materials in Cycles. The helmet that I chose for this example has a face covering area. In game this is given a gradient style alpha transparency to fake a shadow on the character’s face from the hood. With Cycles this isn’t necessary, but I’ll show how to set it up anyway since faking alpha is used a lot in these WoW models.
I’ve changed my lower panel to the UV image editor to show this. When I select the face covering mesh you can see that the faces are mapped to that small bit in the top right of the texture.
The way I usually do these in Photoshop is open the texture I’m working with. When I view the alpha channel it shows the built-in alpha transparency that WoW uses, but Cycles cannot. So I select all in the alpha channel, copy it, then paste it over the regular image and save the file as “Whateverfilename_Trans”.
Here’s what I ended up with for this one. Notice I only bothered with the area that the face cover maps to.
Here’s the node setup I used. Notice the Mix Shader with the texture mapped Diffuse and a Transparent shader feeding into it. The upper Image Texture node running through an RGB to BW node connects to the Fac input on the Mix Shader. For that upper image texture I loaded up my saved transparency mask.
The upper panel in that shot is the view set to Rendered. Notice the face cover mesh has been turned mostly-transparent.
You’ll need to use this fake-alpha technique a lot for WoW assets. Things like character hair, chains, etc all will need this trick.
Once all your textures are in place, the basic setup is pretty much done. I added a subsurface modifier to all the meshes to render this final shot of this tutorial:
Where you could go from here would include rigging the character with an armature for posing or animation, exporting other assets from WoW to set up your own scenes, etc. I hope it’s been informative, and have fun 