Hi,
Did anybody suceeded to construct ionic capital using modifiers/spin or other procedure
- not purely ‘by hand’ ?
Id be grateful for any reponse !
Hi,
Did anybody suceeded to construct ionic capital using modifiers/spin or other procedure
Id be grateful for any reponse !
what do you want to know>?
select the qty segments you need and make it then spin dup
should work like a charm
a you pic of what you want and what preicsion you need!
salutations
That what i have in Sketchup and what i roughly want in Blender (a not very detailed)
http://www.pasteall.org/pic/28476
Afaik SPIN DUP would work w/constant distance from axis while ionic volute needs ca. spiral path for the profile to be projected along…?
http://www.pasteall.org/pic/28479
I would like also model slabs -see the image please: http://www.pasteall.org/pic/28477
engraved/embossed in stone but have no idea about extruding irregular/non-ortho shapes from within the slab…
and in Blender: http://www.pasteall.org/pic/28478
ok just remember what an ionic capital was !LOL
your right you need either a spiral to start it and manually do it
or lool at the screw tool to begin something
there might be a way also to do this with the array modifier but no that easy to do !
i’ll check my files later on but i think i used a spriral to start it then manually completed the ionic head!
if anybody did it with array and curve modifier it might be possible
but have not tried it !
for the slab you want to apply like a bump map to it
there is a plug in that might help you with this if not an ortho nomal picture
salutations
http://www.pasteall.org/pic/28484
So far i use to create such surf projecting a profile along the path (see image), in Blender >>SORRY<< i cant figure out dependecies&hierachy between origin/axes and pivot point. And of course how to manipulate them efficiently…
Logically one would need:
Anyway-you helped me a lot, I appreciate, thank you !
sorry to say but this is a very complicated model in 3D
and i think should be done by someone with intermediary or advance skills with blender
otherwise you gone loose a lot of time trying different things which might not work and give some good results!
so wish you good luck
happy 2.6
That seems also interesting: http://johnflower.org/article/tutorial-make-mountains-blender-25-height-maps
Is it possible to model w/above only part of the slab (only sculpture in tje middle) and glue to the mesh afterwards ??
you might be able to use height map but you need like a grey map to do it then add some noise with displacement modifier
but i think this is already done with the plugin for bas relief!
if you can cut the picture and take only the middle part then it should work
to make a height map or try to make a normal or bump map with external soft may be!
salutations
Hello again,
I am moving forward w/my model yet still experimenting w/best method for volute (spin/MOd/or ‘by hand’ sculpt.;
Anyway - I switched to ionic base for a while:
http://www.pasteall.org/pic/29169
The question appears: since columns quantity would exceed 50 most probably in my scene it becomes vital to the whole model the bases (made by profile projection) optimal method not to cause overkill to my comp.:
Alternatives:
2. Profile by Bezier curve and Spin
3. Profile by Bezier and Mod.Screw
4. ??
Any experience w/similar subject welcome !
depends if you need to take close shot with camera
otherwise verts cont will go very high and fast and blender becomes sluggish
you could make a normal/bump map baking of one column!
but not certain if it would work nicely!
let us know if yiou try it !
you can upload pics here too !
salutations
(…) for the canelures on columns’ surface I could prepare bump but the bases(their shadows on the floor) &profiles is the essence
so bumps cannot be taken under consideration …
I meant if theres better methode (as for ex. Bezier for the profile) to release the comp. from unnecessary computation.
try it with bezier profile but not certain if that would make a lot of differences for comp
i mean 50 is a lot of columns
make a copy of one section of your column then transform into curve then use it as profile !
but if you can use baking normals that might help a lot !
salutations
Explain it to as for a child, please…
http://www.pasteall.org/pic/29193
Think its gonna be as ususally: experimenting w/optimal solution in render.
BTW: is there (in Blender) an option to select/exchange group of linked objects ? (similar to block in CAD so I could place the columns and-if to hard to compute-exchange them with the others at once ?
PS. ‘Baking normals’ - sure I could use it but (wtf) it is ?!
There you need to decide if you go for an absolute precision in modelling, do all and every dent struggling with performance issues and crashes, or go for a less precise, faked somehow, game a like model, which could be nicely done using textures, imitating smaller details, e.g. mentioned slabs and column top parts.
If you stay with latter, then see some tutorials on textures and especially normalmap use. Also you nedd to be more or less proficient in 2d drawing, able to use Photoshop, Gimp to make these textures.
Happy Blending!
Sure the second option, think about animating the scene also, maybe motion tracking also(got some footage from the spot).
For the good of the stills some semi-detailed objects (bases and capitels of the colum(s), iconostas and some others could made as mesh.
Would you advice the tutorial yopu mentioned or some keyword to search them? (photoshop is not a problem).
There was one 2 part, covering making doors (panels) for to import in Unity. It was perfectly describing such panel normal baking and Unity stuff did take just some minutes in the very end. I would recommend that for a beginning. Blendercookie of course… I’ll see if i find it and post a link later.
for multiple columns you could duplivert for instance
so make one mesh line with only verts and may be edges then apply the duplivert
or you could Alt-D so that you have one master columns then you modify this column and all the others would be the same!
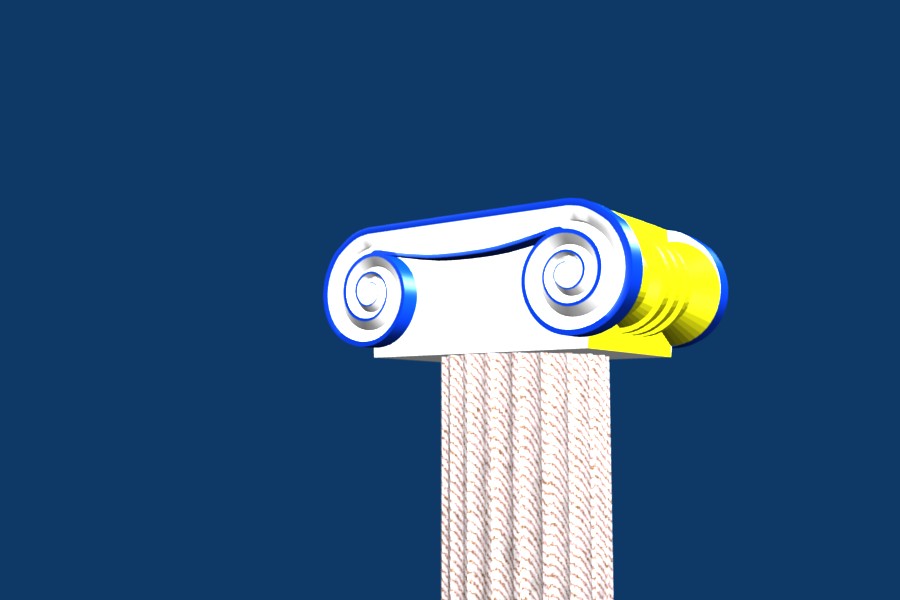
here an example of an ionic capital i did manually
and this is only medium res
now if you have 50 like that it’s gone make blender sluggish!
and render will take a long time !
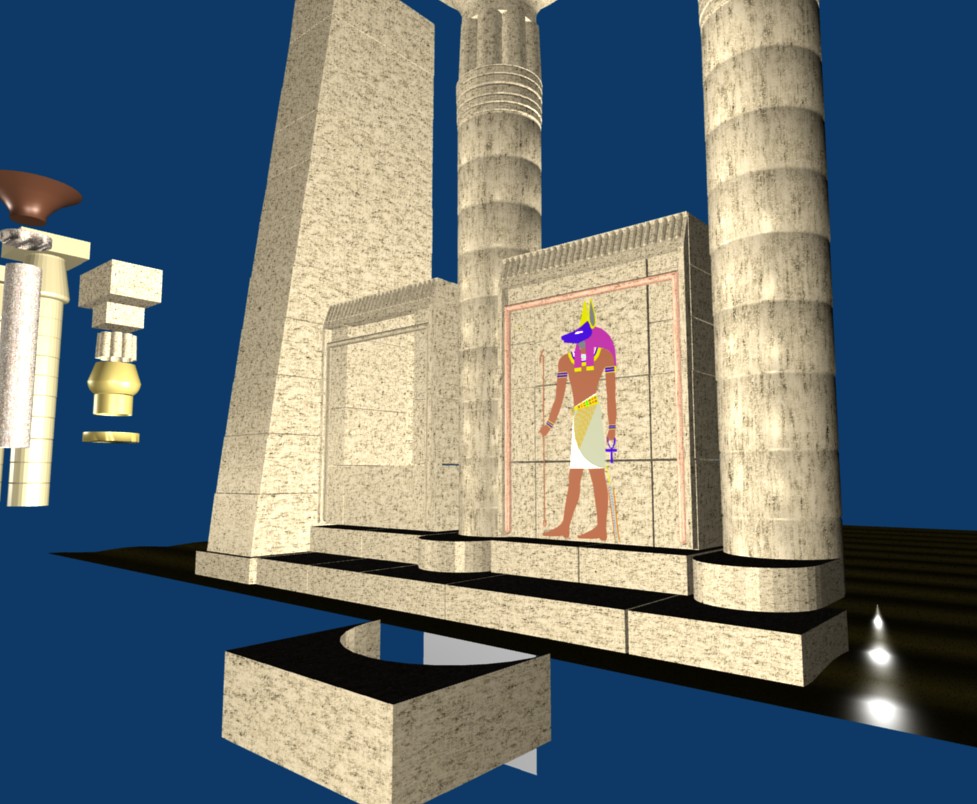
here is another one i did for old egypt temple
salutations
Congrats ! I can see we share similar passion !
Experimenting-only experimenting. Think id like to have it more detailed. (Phenom X4/gtx260/Win7 x64/8GB RAM)
darn i wish it would be nice to see the real thing!LOL
yes modifier works with simple objects not composite group or parented things!
salutations
Tell me when u need some real photos for texture base )) (not being there however u saved A LOT of money for bakshish !
My progress: http://www.pasteall.org/pic/29229
Now i am diving into Dupliverts world…(they say its useful)
BTW of magic: got a few Empties in the file and can not get rid of them…they are non-selectable…?