Comprehensive Character Animation Proposal

This has been sent to bf-committers mailing list and posted on blender.org, but I know some people hang out here and rarely there, so I’ll post it here, too.

With work about to begin on reconstructing Blender’s character animation, I have been working on an end-user character animation proposal. I’ve ploughed through a lot of the existing character animation code, and have a decent idea of what goes on under the hood. I believe the proposal is quite realistic, as it mostly makes use of what is already available in Blender at the structural level. This document can be found in .html format at: http://www.harkyman.com/animprop/caproposal.html

Comprehensive Blender Character Animation Proposal

I have been digging through character animation systems for different applications for a couple of weeks in order to help come up with some proposals and suggestions for the rework of Blender’s character animation system. One thing that impressed me was the foresight of the original coders. Blender’s philosophy is one of datablocks, with the GUI being a way of linking and visualizing those blocks. From my evaluations of other animation packages, it seems to me that the datablocks are almost all there. We just need some help with linking and visualization.

I’ve done a few drafts of this already going point by point on the problems of the current system and how others solve those problems, but it keeps coming out as a hodge-podge. What I’ll do instead is just describe what I think would be a superior character animation workflow to implement in Blender.

1. Rigging

Ideally, Blender should include a couple of pre-made biped rigs (and maybe some quadrupeds, if anyone has them) or varying complexity. So to begin animating, a user goes to Toolbox-]Add-]Armatures-]Rigs-]BiPed No Muscles (Ill. 1). Blender adds the armature at the cursor location. The user then enters Edit Mode to adjust the armature to fit their mesh (or better yet, adjusts it parametrically).
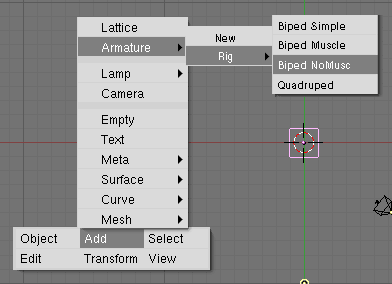
http://www.harkyman.com/animprop/toolbox.gif

2. Animation Workflow

The user can begin to place keyframes for their poses. No Pose Mode. The user also calls up the animation timeline, which is a simple timeline like the audio track trick people use, except that it shows markers on the frames that hold keys for the current object. A keyboard command in the 3D window lets users jump forward and backward through keyed frames for the easy adjustment of existing keys.

If no Action is targeted in the Actions window, a new action is created to hold these keyframes, and this action is added as a new strip to the NLA chain for the armature.

In the current workflow, NLA is an afterthought. From looking at other animation systems, I think that it should be the bedrock. In the current armature evaluation code do (do_all_actions, specifically), there are a lot of if-then traps for different states of NLA v. Action only animation. There should be no Action-only animation. Animation data is pulled strictly from the NLA. If the user doesn’t want to know about NLA, they don’t have to: the Action that is created when they begin animating is automatically appended to NLA. They never have to see it, and Blender never has to worry about evaluating non-NLA Actions. There are some other advantages, too, but I’ll explain those as they become relevant later.

Back to the fact that there is no Pose Mode: how do you move the whole armature object as a single piece? We would require a special bone. Call it the BaseBone or something. Moving that bone translates (or rotates) the armature as a whole. One of the other side effects of not having a specific Pose Mode is that any object can be keyframed into an Action (or, to put it another way, any set of IPOs can be saved as an Action). The only difference between bone IPOs/poses and IPOs for mundane objects are that keys for bones go into Actions by default, whereas keys for other objects do not.
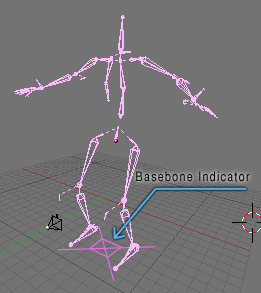
http://www.harkyman.com/animprop/basebone.gif

So to the basic user so far, nothing has really changed, except the elimination of two steps: creating your own rig from scratch, and entering/exiting pose mode. Much simple for the user’s standpoint.
But for the power animator, this is where things get good:

3. Using NLA for animation layers

The Character Animation Toolkit (awesome demos - check them out - easy reg. required and worth it - thanks Tom) uses layers for powerful animation which seem to be a lot like Blender’s NLA could be, with a few modifications.

So, I have my first Action created, just by keyframing the armature, and it’s been entered as the first strip in the NLA window. I, the advanced animator, pull up the NLA, and add a new strip. Adding this new strip (note, I’m not appending an already made Action), creates a new Action, which my subsequent keyframes will drop into. As I add my keyframes to this new strip, I see how they blend and interact with those of the first strip, because Blender is only evaluating character animation based on the full NLA, not just on the currently selected Action. Of course, if you want, you can still pull in Actions that were created elsewhere.

Here’s where we start to see some power from NLA. Currently, you can adjust BlendIn and BlenderOut only for each strip, which is evaluated within do_all_actions. But now, with the new CA system, each strip has its own blending IPO. Bringing up the properties palette for an NLA strip not only gives you the original parameters, but some new ones as well, explained here:

Name: You can name or change the name of the referenced action from right here.

Mode: Replace or Add, as per the current system.

Mute: Prevents NLA system from evaluating this strip. In the illustration, this control appears directly on the strip’s name panel, as a slashed circle. In the example, the LegMove strip is Muted, and so has no effect on the final animation solution.

Solo: Shows only this strip’s animation, ignoring others. Shown as the star on in the illustration. In the picture below, of the NLA-baking strip, you can see that the last strip has been set to solo, so only it will be evaluated.

Color: Lets you choose a color for the strip. Your armature appears in whatever is the color (or blended colors) of the current strip. (An all blue strip with an IPO value of 1 would show a blue armature, whereas the same strip with an IPO value of .5 over a red strip would look purple). It allow you to see at a glance which strips are affecting your animation.

MatchMove: A toggle button and a drop down menu, listing all available bones. When it is activated, Blender transforms all keys in this strip so that the initial position of the indicated bone matches the position in time of the indicated bone in the previous strip. This allows you to, for example, keyframe a moving backflip that lands many units away from the BaseBone, then follow it up with a keyframed Action of the character sitting, but MatchMoving them to the characters right foot, so that keyframes of the sitting action are transformed to begin in the ending position of the backflip. This is extremely useful for chaining together and building a library of Actions that do not have to all start and end in the same location relative to the BaseBone.

Additionally, it would be cool to allow each bone to have it’s own strip IPO, meaning that you could just use the influence of the Head’s IK solver from a certain strip, ignoring the rest, if you so chose. In that case, the Head’s IK solver only would appear in the color of that strip. In fact, that’s what is going on in the illustration above: IPOs for the lower body bones are set to 0, so they do not affect the lower body. You can see this at a glance by comparing the color of the armature bones to the colors of the strips.
This way of using the NLA system would be extremely powerful, and the additional of optional colorization would make the it much more accessible to users.

The final tool for inclusion in NLA is a Bake tool. If the user is happy with character animation being created in the NLA, he (or she) can Bake it into a new single strip Action, which is automatically set to IPO 1 across the board, and to Replace mode. Constraints could optionally be baked into straight IPO data, or be left live, at the user’s discretion. The user can also decide if he wants to retain the underlying strips (which won’t be evaluated anyway and therefore won’t cost any time, because of the presence of a top-level strip in replace mode with an IPO value of 1) or remove them from NLA. Once animation is finalized, this can be a big timesaver, eliminating a ton of on-the-fly calculations and replacing them with a single set of IPO transforms.

http://www.harkyman.com/animprop/baked.gif

4. Keyframing Tools

In the first section, I said that the user keyframes the character animation. Here are some additions and enhancements to the current keyframing tools.

First, Influence IPOs for all constraints should be set to Auto Key as a default.

Second, reducing the Influence of a bone’s IK solver constraint to 0 should release the bones from the IK solution and allow FK keyframing to take over. How exactly does this take place? I’m not sure. Alias MotionBuilder lets you set up two full solutions, one IK and one FK, then see them superimposed and blend between the two. Here’s a thought…

When a user wants to switch between IK and FK, they don’t really want to destroy the current IK solution. What they really want to do is rotate the IK chain from the selected bone’s base to the solver, on a local axis defined by the line between the selected bone’s base and that same solver. So here’s how you do it: you don’t need to generate true FK keyframes. You also don’t use the IK solver’s influence to do it. Each bone in an IK chain has a button next to it’s name in the Edit Buttons, called FK Move. If that button is clicked, rotations on that bone also move the IK target, as though it were the (non-IK) child of the bone. You can download this simple example .blend file showing three armatures here:http://www.harkyman.com/IKFKDemo.blend The first is freeform IK, the second is IK with the IK target as the child of the shoulder bone, the third is IK with the IK target as the child of the forearms bone. So, when doing an “FK Move” rotation on an IK chain, you’re generating rotation keys for the actual bone you have chosen, plus rotation and translation keys for the IK target bone.
So that’s how you simulate FK motion while maintaining your IK solution, which is what most people want to do anyway. The FK Move button is nothing more than a keyframing tool, and not a true mode.

Third, the introduction of Driven Keys. Since that name’s already taken, let’s call them Action Sliders. You create a small action, say, the keyframed opening of a hand. First frame is closed (state 1), the second is opened (state 2). Bring up the NLA screen, select this Action strip you just made (remember, all Actions initially get appended to NLA), preform the appropriate Make Slider key command, and the Action disappears from the NLA.

http://www.harkyman.com/animprop/makeslider.gif

Where’d it go? Take a look at the Action Sliders window. There is now a Slider there, going from 0.0 to 1.0, set to auto key, that controls the pose of the keyed part of the armature. Keys generated with this tool are applied as IPO keyframes within the current Action, not as live slider data, so there is no confusion in the NLA. If you want to change positioning that is already set, you can use the previously mentioned key commands to bebop to the frame with a key on it and reset it to the value you prefer.
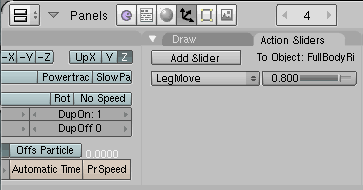
http://www.harkyman.com/animprop/sliders.gif

If you think about what I proposed earlier, you will notice that any object that can be keyframed can be added to the NLA, and not just object motions. Materials. Light settings. Anything with an IPO. That NLA strip can then be made into an Action Slider which can be used to dynamically set keys throughout an animation. You are also not limited to a two state toggle - you could have a full battery of linear character animation put into your Action Slider, which would proceed on your character over the 0.0 to 1.0 range. Obviously, RVKs could be used with this system as well.

Fourth, the RVK creation interface. There isn’t one, really. When you make them they show up as lines in an IPO window, then show up again to be named in the NLA screen. Honestly, anything would be better than this.

5. Visualization Tools

First, onion skinning. When the user turns on the Onion Skinning button in the object’s animation buttons, you get two new sliders, Proceed and Trail. They set the number of frames forward and backward in the timeline to show ghosts of the current object. This allows you to see your motion’s flow at a glance, without actually going forward or backward in time. An immense timesaver.
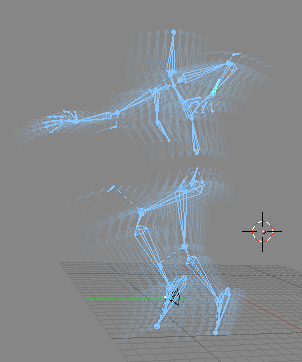
http://www.harkyman.com/animprop/onionskin.gif

Second, animation paths. Turning on Show Path for either an object or a specific bone draws the entire animation path within the 3D window. Other packages have this because it is an extremely useful for character (and normal) animation. There is no reason not to have it.
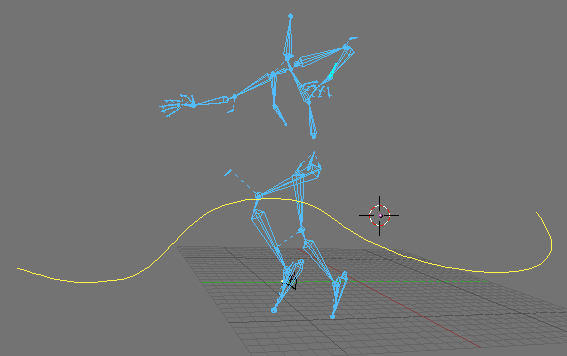
http://www.harkyman.com/animprop/animpath.gif

6. Wish List

Up to this point, Blender’s underlying animation structure is mostly in place to do all of this. The building blocks are there, and I’ve just proposed a new way of looking at, linking, and using some of them. Now, though, I have to address a couple of the drool-worthy things I saw in other packages.

First, footprints. CAT, which I mentioned before, uses these. Go to their website and watch the video. It’s about 5 minutes long, and amazing. I believe that CAT uses procedural motion for its walkcycles, as opposed to keyframed, allowing it to alter it’s walk on the fly. I’m not sure if this is even implementable in Blender’s current structure, as Blender doesn’t really know the difference between a foot, a hand, and a tailbone. For those of you not inclined to watch the video, here’s what happens: with a walkcycle defined, you link your skeleton to an animated empty (keyframed/path-following/etc.). CAT then moves the skeleton to the position of the empty and calculates and displays the locations of everywhere along it’s animated path that the character’s feet will fall. You can grab the footprint locations and move them. If you alter the path or keyframed animation of the empty object, you see the footprints rearrange in real time. In-freaking-credible, and a serious tool for animators.

Second, rotation constraints. From what I’ve read this is not easy to do, especially with IK solvers. The best implementations I’ve seen allow the user to apply graphical widgets to joints, specifying what kind of constraint it is: conical, ball, etc. The user then sets the limits graphically.

Third, rag doll physics. This would only come after the physics engine would somehow become directly applicable to the static side of Blender (please!). If you’re working on recoding bones and armatures, keep in mind that us greedy animators will want the physics to affect our skeletons as well someday. Create and bake a dynamically generated action from the physics and add it to your NLA timeline!

Conclusion

Those are my thoughts on the future of Blender’s character animation tools. As I said before, many of these suggestions are just new ways of visualizing and using the structures that are already present in Blender. The tools and workflow I have described would bring Blender on a par with many of the current commercially available animation packages. Hopefully, these analyses and suggestions will inspire the developers to do as good of a job on Blender’s character animation tools as they have done on the renderer, mesh modeller and game engine in recent months. Thanks for reading!

Roland Hess
harkyman

You can give me feedback on this by emailing me: me and harkyman dot com or by replying in this thread.

Yeah, looks great :slight_smile:

Stefano

nice…

I mentioned that of onion skinning (as I have it in xsi) viewing some days ago…I also emntioned that it’d be also probably cool if one could set if want or not seen the ghosting of following frames(or previous), how many frames to ghost , and even a color different of previous and following…

This could help a bit better for animation till not having cough certain joint feature…

I suppose you meant premade rigs as an addon, but the user would be able yet to create from scratch his/her own skeletons…I don’t like using other’s armatures…

Yep, in character Studio and Max bones you use a ball gizmo to rotate, and is quite good thing to have. There you have also the FK/IK at same time thing.

I think the use of Jox script’s mesh/box based envelopes to speed up rigging, in a quick rough way for starting the weighting proccess, would be a god send.

I like that of all melt in a mode.

The basebone thing you are refering is usually called root? , I think, in most packages I used…

probably Character Studio Bip Footsteps is similar to what you mention. But surely not so powerfully as in CAT( I have been told it is amazing) As you told it, it looks like as a very powerful feature…

So, you think floor constrain and joint pining wont be needed/missed with these features you mention ?

All this would be absolutely amazing, IMO.
I’ve just one point about the root bone: trying the slikdigit technique of Loc Constrains to freeze the feet sliding, I discovered that the feet seems to slide anyway if the character is doing a curve… this is of course because the foot stay in place but as the skeleton rotate on itself following the path curve the feet rotate too. So I think a solution should be found for this too (I solved the problem applying a Rot Constrain togheter to the Loc Constrain).

Env

extrudeface:

No coughing necessary. MatchMove is just pinBone renamed. I think you might be referring to on-the-fly pinning of joints in space. Some of the animation systems I looked at had it, and some didn’t. The one’s that didn’t did not seem to suffer from the lack. Though you have to go through a couple of steps, you can actually do this in Blender already by placing a keyed location Constraint on a bone and pointing it to a stationary empty.

A floor constraint would still be useful. CAT seems to do it by generating its footprints as described in my prop, then dropping them to follow an underlying mesh, almost like my Drop2Ground script. Hmmm… Instead of doing it dynamically with a constraint, which would require all kinds of calcs in realtime, you would generate footprint targets all at once, then drop them to follow the terrain.

“I think you might be referring to on-the-fly pinning of joints in space. Some of the animation systems I looked at had it, and some didn’t”

yes, I use it in XSI and when at job, in Character Studio 3.4, or 4.x.

Somewhat I am liking more it now in XSI4 Foundation: Perhaps as I have managed to set it a key, and toggle it, or not at any moment, generates a joint pinning object (similar to an empty, but not the same) is more flexible, in the way it makes you work, in that quite similar to CS. Just click a button or a key :wink: So I IK pose and fk pose all the time, and the siwtch between fk and ik, or setting a pin, does not distracts me.

Yes, I had already found my way for something similar in Blender with empties, ik solvers and certain rigs. Is not as quick, but I admit is a possible way to go. Each pakage has its manners, after all.

The proposal sounds good.

harkyman,

Wow and Yes! Great suggestions! I hope those ideas get into blender! It would make animation easier to grasp and would enhance the workflow as well as using the existing datablocks for the coders.

gaiamuse

nice but still messy. Need some for visual tools, like pre baked drop ins that have full customing stuff so you make make your own, but still better than starting from scratch

Nice list, but i don’t agree on the ‘No pause mode’
Blender is mode based and so using a mode for animation is intuitive. Object is for setting your scene, Pose for animation. You suggest lot of visual helpers that are really fine but would disturb the user when doing other things than animation. With no pose mode you should go to your display options to remove Oignon skinning, curves, etc… With a pose mode you would simply hit TAB.

But i agree on the rest.
What would be really usefull is a graphical display for joints axes and ranges.

Wow we Blenderheads think along the same lines. Harkyman you have some golden ideas here. I like your idea of allowing the user to use NLA without having to actually know that it is at work. The control of complex NLA system is there but the user wouldn’t have to think about the nuts and bolts just get it on at a purely creative impulse driven workflow.

That’s what I’m talking about in my thread on Arbitrary Animation, impulsive animation features. As 3d artist we like to work with our gut feelings and only turn on the “3d science” when we want to really tweak out the details. Other apps always put complex animation control up in your face. We need a system that is all about animating on the fly and sorting out the math later.

The “CAT” animation system has some good principals at work. But we need to keep our Blender animation system in symmetry with the modeling system. Maybe thinking even along the lines of even hooking up a rig as me model and model and tweak the rig for deformation at the same time.

Right now most 3d animation systems make you finalize the modeling/uv mapping parts in some areas before you move onto animation. An artist work is never really done. So with this in mind we have to think about how much tweakage we want to maintain as far as in connection modeling and rigging until we say enough is enough.

Oh yeah I think that dynamically generated action is a must for Blender for every form of animation conceivable.

wow, looks nice

i personally like posemode… it just helps me visualize the movement of the bones

~Delta

Hi Harkyman,

this sounds very cool. These things would be great steps ahead. Your work is much appreciated.

Al the best, fritzman

Your ideas are great Harkyman.

I do, however, think that world-space bone pinning or some other solution to foot sliding is needed.

<<<EDIT>>>
Sorry, I realize CAT footsteps were mentioned, but I think a solution to this should be higher up on the list of priorities.
<<<END EDIT>>>

I am quite new to character animation, but it seems this is quite limiting right now. For example, if you wanted to have a character run around a corner, unless you make a new action for that, and try to make it match your straight-line walk cycle, your going to get foot sliding.

So, what is the use of path animation if you have to stick to straight paths?

Unless there is another way that I am not aware of, which could very well be.

Anyways, I hope at least some if not all of your ideas get implemented.

What is this technique you speak of? I havn’t been able to find anything.

Thanks,

First thing: GREAT WORK! this program should be looked at from this perspective. User end is how Blender came about (an inhouse tool) and has been the largest area where comments have been made for each upgrade.

This sort of this would help me IMENSELY in my work, and make Blender the hands down winner in the spectrum of programs we are looking at in using to integrate into our workflow at Steam. I am building a library of cycles for a biped, which is a long-way-around way of doing what you are suggesting should be inbuilt. You have inspired me to share what I’ve got so far. For those interested, either WATCH THIS SPACE or PM me. I am currently working on a biped with a library of walk and run cycles. The biggest hurdle to jump is constructing a universally accepted biped that has a skeleton that includes all the bones you would be likely to use.

What would be cool is a way to “turn off” or “turn on” bones you don’t need. eg: not everyone needs a complete skeleton with five three-jointed fingers and an oposable thumbe; tongue and jaw bone; four controllers for eyebrows, etc… what would be cool is a direct correlation between bones and vertex groups, so if a bone is deleted, the vertex group is automatically deleted, and any vertices belonging to “deleted group” are simply added to the parent bone one step up in the chain.

@Fakeplastic

What you describe as a problem is what harkyman has solved with a feature called pinBone, that -imho- much more wisely renamed to …I think “Matchmove”.

It actually does not pin a bone to world coords (-sigh- :wink: ) , but would solve the problem you describe, if I understood ok.

It forces I think the foot (for example) bone in an action to match the position of the first frame of the next action.Or at least, that’s what I understood some time ago when he described it.

(btw, to report a bit of stuff…mirai has world pinning, too)

So, you would not notice the extra slide for the reason of the change of action.Still, you may have it fo rother reasons.

For those others, at blender.org forums, I think a thread recently being updated," improving the nla" or something, Slikdigit (if I remember ok) proposed a technique: making like a second skeleton serve as a target to avoid the sliding.

I tried it, but thought was too much long workflow, but that’s just my opinion. Look for it there. I just add an empty and make it IK solver (I’ve done too like in weird hat tuts, just I did seem to prefer this other one, less complex to execute) for the foot bone. The legs are each an independent chain in same armature (just exiting(tab) edit mode, to start the second leg in wherever I put the cursor for next branch). The I do other “branch” for spine, and if I remeber well (some time since I did my last animation in Blender, and I tend to remember workflows when I have to make them, only :wink: ) I extrude from it the arms (could also make independent branches: I work for rt 3d games, anyway) The, I think(also, I sometimes change the workflow) I use and empty to use as root. I then link legs and spnie branches as children fo empty root. When I move the root, the ik empties(cause they’re iksolver) stay in place (unless I also select one of them) so avoiding slide as I move forexample th emodel for a dodge. or pivoting over a feet, or in certain moments in runing, walking, etc.

(well, the way I do it is too simple: just I make no null bones, foot are same chain, non independent from leg, so that I only do with the foot bone, as the ik solver will act well in the heel,(when moving the root-empty) almost as a pinned joint…but…And well, when you move the foot empty it works like an ik solver.I have tried the other suggested workaorunds, and none -of course, neither mine- convince me as much as I have used it in other packages. )

Anyway, there are much more advanced rigs, and very good skeletons (though I’m more a person that needs to fk in all bones, like in Character Studio, makes my work much more accurate) some very good ones have been posted here; you may like to work so or may not.

The weirdhat tuts are a quite good way to understand how Blender works and does the trick for sliding.

But…in character studio or xsi, it wont let bhind the foot if I drag the root too much, for example, besides, for how is built the pin feature, I have experienced every day at job, how much quick it is that way.

But it comes to be something like point to point modelling vs box modelling. Hard to say who’s more certain. Some ppl stick with one way, some with the other (however, I have it so clear in my mind :wink: )

BTW, though I doubt it, in case you’re like me a game artist (here majority tend to be more focused on video, rendering) , I have checked that the rig of independent (but linked as children) bone chains, do act as a whole skeleton, with hierarchies as you wish them to be, once exported to game engines in directx *.x format. So, the way I don with empties, works for games. I have explained to others in indy gamemaking comunities, and seems people understood very quickly the workflow. Even people knowing little of Blender. Indeed, I use those posts to demonstrate Blender can already be used to do good character animation stuff for indy games. I prefer xsi, but imho Blender with these tricks already can do very good the stuff for those projects. (and as is free, is perfect for all of them)

Yes, it would prevent sliding during a change in actions, BUT not during a single action, such as if you have a walk cycle and a character following a path that curves.

The walk cycle might have been tweaked to not have any foot sliding during a straight forward movement, but as the character goes around a corner, the speed of his outside foot will increase and the inside foot decrease, thus they will not stay aligned with the floor.

It turns out that locking feet to the ground is a huge problem. Determining a proper approach to this in Blender has taken up more head-time for me than I’m comfortable with. Let me describe the difficulty (you may already know all or none of this; my intention is to neither insult anyone’s intelligence nor assume anyone’s expertise):

A) During a standard walk cycle, the character is not actually changing location. Done correctly, the character will appear to walk in place. The illusion of walking through space is only generated by translating the whole character at the object level relative to the ground at the same rate that the feet in the stationary walk cycle proceed from front to back.

B) With this in mind, where you do you apply the foot locks? If you apply them in the stationary walkcycle, the feet will fail to move properly while setting keys for animation. In order to complete the walkcycle, the feet have to move from front to back, so you can key the leg pulling up and going forward again for the next half of the cycle. If you apply them outside of posemode, when you are moving the character at the object level, where and how exactly do you apply them?

The solution that CAT uses (I believe) is for the animation software to generate walkcycles parametrically, not via keyframes. CAT knows what a walk (or run) cycle is, and you create and adjust it with values for such things as stride length, hip rise, foot pronation, and hand flop. Therefore, it knows what it means when “the foot is on the ground”, contrary to our situation where it’s just another set of keyframes to Blender. Since CAT knows what it means for a foot to hit the ground, it consequently knows how to locate footprints.

It is not clear to me that there is any existing way for Blender to do this, and why it was not included in the main portion of my proposal or given priority. My goal was to present a better way to use what is already there. This sort of thing, while it would be incredibly useful, is not accessible through the current toolset and structures.

A few things suggested themselves, though, as I was typing this:

  1. There is an ancient Python script called Walk-O-Matic, and I’m too lazy to look up who wrote it. Walk-O-Matic takes info from the user, then generates a series of constraint targets for a skeleton’s feet to hit. I never used it, but I read the docs, and it was certainly interesting. I don’t know how flexible such a system would be in conjunction with Blender’s other tools (NLA, Actions, path animation). Maybe I’ll take another look at it.

  2. A toggle button on bones for WorldPin. It controls an IPO with a 0-1 range. When clicked on, it sets a 1 key; when clicked off, a 0. When clicked on, it allows you to directly move the bone at the bone level, not hampering your ability to generate character animation keyframes. But when moving the entire armature at the object level, that bone stays at the world location identified by it’s most recent 1 key.

This would cause some problems for animators, though. Suppose you went to move your character around at the object level and the damned feet wouldn’t move! Oops, you forgot that you were working on a frame for which WorldPin was toggled On (1). I think that’s a sort of interface messiness that would be rejected by the Blender PTB.

Oh well, just more to think about.

Maybe this could work :
In pose mode the user select the a leg bones, that would tell blender 'this is a leg, you will work on these bones articulations"
-then he set up two special keyframes : ‘feet on the ground, feet leave the ground’ And he does that for each leg.

  • then when moving his his character the animator set 'pin legs on the ground. Blender has all the needed information (character speed and feet positions ) to ‘Morph’ the leg animation to constraint them to stay fixed on the ground.

Character animators rarely use “walkcycles” in the manner that you guys are talking about. Walkcycles on paths are only used in instances like a large crowd scene. Think about it, whenever you see any full body shot of a character (be it live action or CG) walking how long is that shot? Barely seconds. That’s because long shots of characters walking the same walk or running the same run isn’t good movie making. Parametric walking tools like footsteps are great for maybe starting an animation (and again for things where large amounts of canned animations are needed) but are not the key to good character animations. These tools are nice to have but they aren’t KEY character animation tools.

TorQ