Generating a Series of Floats to Code?

Hello,

I’m wondering how I would go about generating and appending a series of Floats into a list in it’s own Code.

I want the series to have a start and end “cap” (number) and for the code to fill in the blanks.

The list should start with “.001” and end with “.256”.

Also, I would like them to be converted to a string afterwards, but if this is not possible that is fine.

Thank you to all who reply!

Do you mean a piece of code that generates a text file or text datablock in Blender, that goes something like

.001
.002
.003
.004
...

?

import bpy

text = bpy.data.texts.new("FloatSeries")

text.write("
".join(".%03i" % i for i in range(1, 257)))

Well, I was thinking something that would generate it this way:

numList[.001, .256]

and fill in the gap in sequence by appending the next number to the list when the code is run.

I really just need a way to tell the code that the minimum number is “.001” and the maximum is “.256”, but in a way that it can read and apply that data by matching it to other data via materials, textures, and user input images ending in those numbers.

I’d like the numbers to read as a string though. Unless I can make it read the float sequence as separate strings.

Would it help if I gave you an Idea of what this will be going toward?

Would it help if I gave you an Idea of what this will be going toward?

It would!

If you want a python list from “.001” to “.256”, here you go:

your_list = [“.%03i” % i for i in range(1, 257)]

If you let it start from 0, you will be able to retrieve the string by index, e.g. index 40 -> “.040”:

your_list = [“.%03i” % i for i in range(257)]

>>> your_list[40]

‘.040’

If you wouldn’t mind helping me with this, I’d be really grateful. I just need a little push for each part, I don’t want you to do all the work.

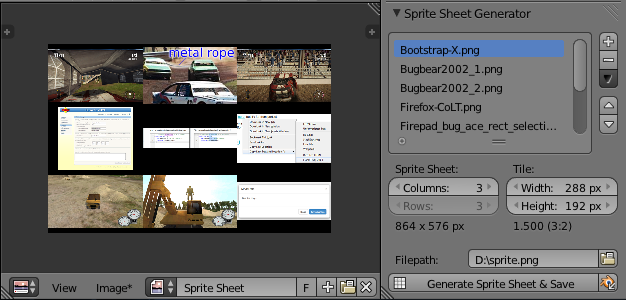
I’m trying to make an automated Sprite Sheet Generator, since most of the ones I’ve tried don’t do what I need or don’t have the settings I require. I basically need to set several ranges/limits to make it work properly.

I going need to set a Square Tile range for X and Y within X= “2” - “16” and Y= “1” - “16”. It’ll be in a dropdown menu.

The resolution of input images X: “16 px” - “4096 px” Y: “16 px” - “4096 px”

For the Tiles, I need the code to create a plane, material, and texture for every loaded Frame.

I’d like the code to work like this:

EXAMPLE (assuming Tiles = X: 2, Y: 2):

(B) = Button
(B/M) = Button to Menu
(DDB) = Dropdown Box

(UI) = User Input
(Auto) = Automatically Generated/Displayed

Set Tiles:
Step 1. (DDB)(UI) Set tileSizeX = “2” - “16” and tileSizeY = “2” - “16”.

Setup Frames:
Step 2. (B/M)(UI) Add Image from selected directory (selected via ‘Open Images’ Button on panel) ending with “.001”.
Step 3. Create a Plane named “Frame.001” @ coordinates (-1,-1,0) (First coordinates created according to Tiles XY).
Step 4. UV Unwrap Plane with either “UNWRAP” or “RESET”.
Step 5. Add material named “Frame.001” with shadeless enabled.
Step 6. Add Texture, Image or Movie Texture named “Frame.001”.
Step 7. Use Image Texture from Input Directory matching image name ending with “.001”. (Name fragment matching.)

Repeat Step 2-6 in sequence (Left:Right::Bottom:Top). Once second X tile is reached, reset position of Frame.003 and move Y 1 unit (tile space), and continue until second Y tile and X tile is reached.

Setup Camera:
Step 7. Add camera at (0, 0, 2).
Step 8. Set to Orthographic Render Mode.
Step 9. Set Orthographic size = Tiles size if “X” > “Y” then use “X” and vice versa.
Step 10. (DDB)(Auto or UI) Render resolution = Either: X= number of TilesX * Input Image SizeX,
Y= number of TilesY * Input Image SizeY, or custom output size (Keep aspect ratio)
X= “16 px” - “4096 px”, Y= “16 px” - “4096 px” in dropdown box.

Render Image:
Step 11. (DDB)(UI) Set Output type (.jpg or .png).
Step 12. (B)(UI) Set color BW, RGB (Or RGBA if .png).
Step 13. (B/M)(UI) Alternate Output Directory (Default to Input Directory)
Step 14. (B)(UI) Render Image, render out image at specified resolution to specified output settings.

Optional:
(B)(UI) Presets Dropdown???
(DDB)(UI) Create Animated Texture Test Objects (Plane, Emitter Object with Logic Bricks)???


I hope this make sense to you.

I’m going to create a mockup to give a better idea of what it will look and work like, and possibly make a WIP thread.

I will be releasing it to the public for free, and might possibly build a separate software for it using Blender as a base, which will be explained, of course.

Thanks for your help!

It seems pretty inefficient to place textured planes in a scene and render that to a sprite sheet.

What are other sprite sheet generators missing in your opinion?

It seems pretty inefficient to place textured planes in a scene and render that to a sprite sheet.

It does seem rather in efficient, but it’s the only way I can think of going about this. I have very little knowledge of how to code an actual image-related program, so I’m kind of stuck.

What are other sprite sheet generators missing in your opinion?

Mainly the option to make it compatible to use in Blender. In the ones I’ve used, there is not really an option to make the frame start for bottom-left and end top-right, So the frames are all jumbled in the Game Engine. The UI of most of them aren’t the most user friendly. The settings never quite get the results I need. Either the aspect ratio settings are as adjustable as I need, or if they are it isn’t glaringly obvious. They just don’t work for me. I figured if I make my own, I could have it exactly how I want it and get rid of the headaches.

Although I agree with you on the efficiency issue, I still plan to push on with the project. If not just to say I’ve done it, I’ll have a very helpful tool.

It COULD be done with pure Blender, but the image scaling method does not do any interpolation (=bad quality results). And a custom resize function written in python, that works with the .pixels directly, would be rather slow. You could try numpy however, which comes with Blender for all platforms since 2.70.

Nonetheless, I would recommend an image processing library such as PIL (py3k fork: pillow).

In fact, I downloaded the pillow installer and extracted the contained PIL dir to blender’s site-packages and experimented a bit. It turned out to be pretty simple to generate a spritesheet. I’ll post the code if you tell me that it won’t ruin your own efforts.

The only problem I experienced was a JPG crashing Blender. Looks like the file isn’t understood by PIL (no errors when using .verify(), but image object is cleared), not sure what’s the matter - even Windows image previewer opens it just fine, but PIL thinks it is a TIFF and I couldn’t find a way to specify the file type. Online sources state that it automatically determines the type by looking at the content, not the extension, but I doesn’t look like a TIFF in a hex editor, so…

I tracked down the crash problem to jpg files in general, reading and writing them just crashes blender. The jpeg library of the PIL build might be broken.

But works fine for png: