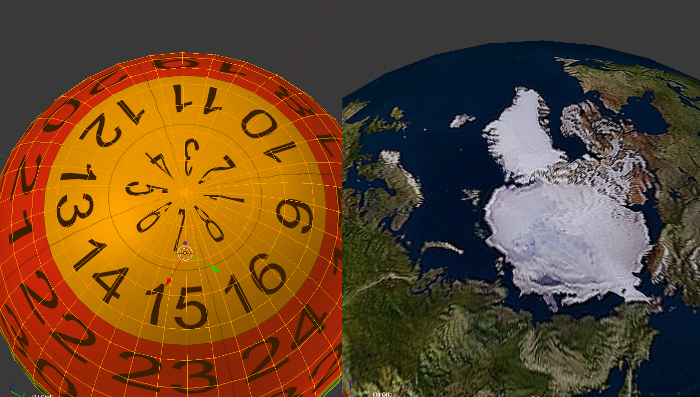
The problem: using a UV Sphere for a planet can result in frustration and, in extreme cases, severe pain:

Unmodified, a UV Sphere will give problems at the north and south poles made of triangles. Equirectangular textures will distort, and when using the Subdivision Surface modifier the subdivided triangles will result in a ripple effect.
You can labouriously craft new polar caps for a UV Sphere, or try to wrangle the UV tangle of an unwrapped Ico Sphere or polysphere - but there’s a better way to get perfect planetary poles!
Quick and dirty (if you know your way around Blender):
- 3D Cursor at origin, add a Grid, 37 x 19 subdivisions, and unwrap
- Make grid dimensions X:4 Y:2
- In edit mode, Move grid up Z 1 BU
- Right ortho view: Mesh > Transform > Warp - 180°
- Front ortho view: Mesh > Transform > Warp - 360°
- Pivot set to ‘3D Cursor’, rotate X 90°
- In UV/Image Editor, select left and right edge UV vertices, ‘Remove Doubles’ to join the seam.
- For north pole, merge opposing UV vertices (ie, 1st and 19th, 2nd and 20th, up to 18th and 36th).
- Do same for south pole.
- Enjoy your unwrapped sphere of quads.
Slightly more detailed:
- Make sure the 3D Cursor is set to the origin [Shift+C] and that you’re in Object mode.
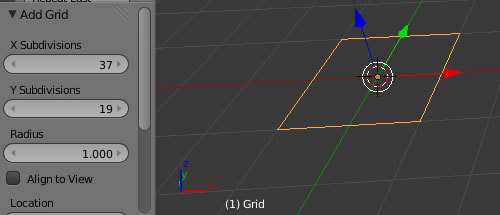
- Add a Grid: [Shift+A] > Mesh > Grid
3. In the Grid’s tool panel, setX Subdivisions: 37
Y Subdivisions: 19
- Switch to Edit mode: [TAB]
- Switch to Top Ortho view: [Numpad 7] (if the top view isn’t orthographic, press [Numpad 5]

-
Unwrap the grid: and select ‘Project from View (Bounds)’
Note: the bottom of the image above shows how the UVs evenly cover the equirectangular’s north pole. -
Now double the grid’s width by scaling X: [S] [X] 2 [Enter]

- Switch to Right Ortho view: [Numpad 3]
9. Move the grid up 1 Blender Unit: [G] [Z] 1 [Enter]

- For the Warp operations, [U]it is important the 3D Cursor is at the origin (0,0,0).
From the 3D View toolbar: Mesh > Transform > Warp

- In the Warp tool panel, setWarp Angle: 180

- Switch to Front Ortho view: [Numpad 1]

- From the 3D View toolbar: Mesh > Transform > Warp

- In the Warp tool panel, setWarp Angle: 360

-
(Yellow arrow) Change the Pivot Center to ‘3D Cursor’
-
Rotate the grid 90 degrees around X: [R] [X] 90 [Enter]

We now have a nicely UV-unwrapped sphere - but in its current state it has an ugly vertical seam and nipples at the poles.
To fix the seam and nipples, we need to merge some vertices. Using the ‘Remove Doubles’ command on the whole sphere will clean up the seam, but it also has the undesirable effect of converting our polar caps to triangles.
The solution is to selectively merge, starting with the seam.
- Change the the Timeline window to ‘UV/Image Editor’ and drag it up so you can easily see the UV vertices.

-
(Yellow arrow) Turn on ‘Keep UV and edit mode mesh selection in sync’.
-
Deselect all vertices: [A]
-
Select the left and right edge vertices: then drag the selection box around all the left edge vertices, then [B] and drag the selection box around all the right edge vertices.
-
With the mouse pointer back over the 3D View window, [B][W] > Remove Doubles
This operation should remove 19 vertex.

Above: Before and after the edge merging, the nipple remains.
We’ve now merged the vertices along the seam. Now to deal with those pesky nipples.
-
Deselect all vertices: [A]
-
Position the sphere so you can easily see the top polar cap. Wireframe view works well. You will be merging each vertex and its opposite.

- Select the 1st UV vertex (1) on the top edge [RMB] and then the middle one (2) by holding [SHIFT]+[RMB] (it’s the 19th vertex from the left).
The last vertex along the top will also be selected, since it has already been merged with the first when we removed the seam.
Both vertices should be selected, and you should have a nice straight line through the sphere’s pole.
Note: If you select a wrong vertex, hold [SHIFT]+[RMB] that vertex to deselect it, then [SHIFT]+[RMB] the correct one.
- With the mouse pointer back over the 3D View window,
[W] > Remove Doubles
This operation should remove 1 vertex.
(You could instead merge them with [ALT+M] > Merge at Center, although in this case ‘Remove Doubles’ is nice and easy).
Now the fun really begins, we have to work along the first-half of top line UV vertices, merging them with their opposite.

- So you don’t lose track of position, [SHIFT]+[RMB] on the 2nd UV vertex (1) and then [SHIFT]+[RMB] on the 20th (2). Then [SHIFT]+[RMB] on the 19th (3) to deselect it.
You should have a single straight line highlighted through the pole.

-
With the mouse pointer back over the 3D View window,
[W] > Remove Doubles
This operation should remove 1 vertex. -
Repeat this merging process along the top line until you reach the middle - the 19th vertex. Now every first-half top-line vertex should be merged with it’s corresponding second-half top-line vertex.

Above: Before merging, and after. The good news is our sphere’s north pole is now smooth!
The bad news is we need to repeat that process for the south pole. Luckily you are well practiced 
- Repeat the process for the south pole.

Above: Before merging, and after. The distortion is a result of the texture, not the mesh or UVs.

- Your sphere is finished. If everything has gone to plan, you have perfect planet poles! Now you can add a material and textures.