My problem is that i don’t know how to use-it, and there-s no tutorial. This addon works with the standalone Blendercam version ( it shuold be copied under …/addons folder, if I understand correctly. The standalone version of blendercam is : http://blendercam.blogspot.cz/p/download-and-installation.html
… and the results would be:
Addon is supposed to work on Blender’s BlenderCAM version (it could be used on plain 2.74 where required numpy library is included by default but it won’t show up since plain Blender doesn’t have BlenderCAM render engine).
All you need is to set up Scene: arrange your 3d objects as fit and set Camera. To better use Z pass information which is all what needs to be rendered you could set Camera Limits visible and adjust Start/End values so that orange line from Camera covers only your Scene’s depth.
Also, you need to set Render Output to OpenEXR file type and use Compositor window Image nodes to take Z pass to render Output. By default it is set to Color information which you do not need. No lights are needed to get Z pass.
Rendered image then is set in addon’s Input field. Tweak parameters till you find resulting output image fit your needs. Output image from addon is in turn to be used as a texture for Displacement modifier for object you would mill later. BlenderCAM would be used to render tool path. http://www.pasteall.org/pic/87803 http://www.pasteall.org/pic/87804
there s indeed very few information about this great and underestimated feature
a lot of experimentation comes with the settings, in my case the object further than the camera is better defined in the Z pass than the closer oner
probably has to do with camera settings
“To better use Z pass information which is all what needs to be rendered you could set Camera Limits visible and adjust Start/End values so that orange line from Camera covers only your Scene’s depth.”
hope this tip will help me out
A few days ago i discover blender and i found on this page this addon bas-relief but when i click on calculate relief i got this error:
Traceback (most recent call last):
File “D:\Apps\blender\blender-2.76-windows64\blender-2.76-windows64\2.76\scripts\addons\basrelief.py”, line 946, in execute
relief(br)
File “D:\Apps\blender\blender-2.76-windows64\blender-2.76-windows64\2.76\scripts\addons\basrelief.py”, line 717, in relief
tonemap(nar)
File “D:\Apps\blender\blender-2.76-windows64\blender-2.76-windows64\2.76\scripts\addons\basrelief.py”, line 601, in tonemap
maxheight=i.max()
File “D:\Apps\blender\blender-2.76-windows64\blender-2.76-windows64\2.76\python\lib\site-packages
umpy\core_methods.py”, line 26, in _amax
return umr_maximum(a, axis, None, out, keepdims)
ValueError: zero-size array to reduction operation maximum which has no identity
location: <unknown location>:-1
If anyone can help me with a solution or a place where to find an answer i will appreciate very much. This is the single web site where i found how to use this addon.
> This is the single web site where i found how to use this addon.
Ciobanu, I’m getting the same error. not sure what I am doing wrong. :(( This looks like one of the best ways to achieve a bas relief without spending a fortune on software. I really need to figure it out!! driving me nuts!!
Hello bdragon254,
After i try it a few days to use the blender bas relief addon, i give it up to try. I started learning programming - Python to see what couse the error. And i discover that the error was not from addon, it was from the wrong settings.
Here are the steps for bas relief addon:
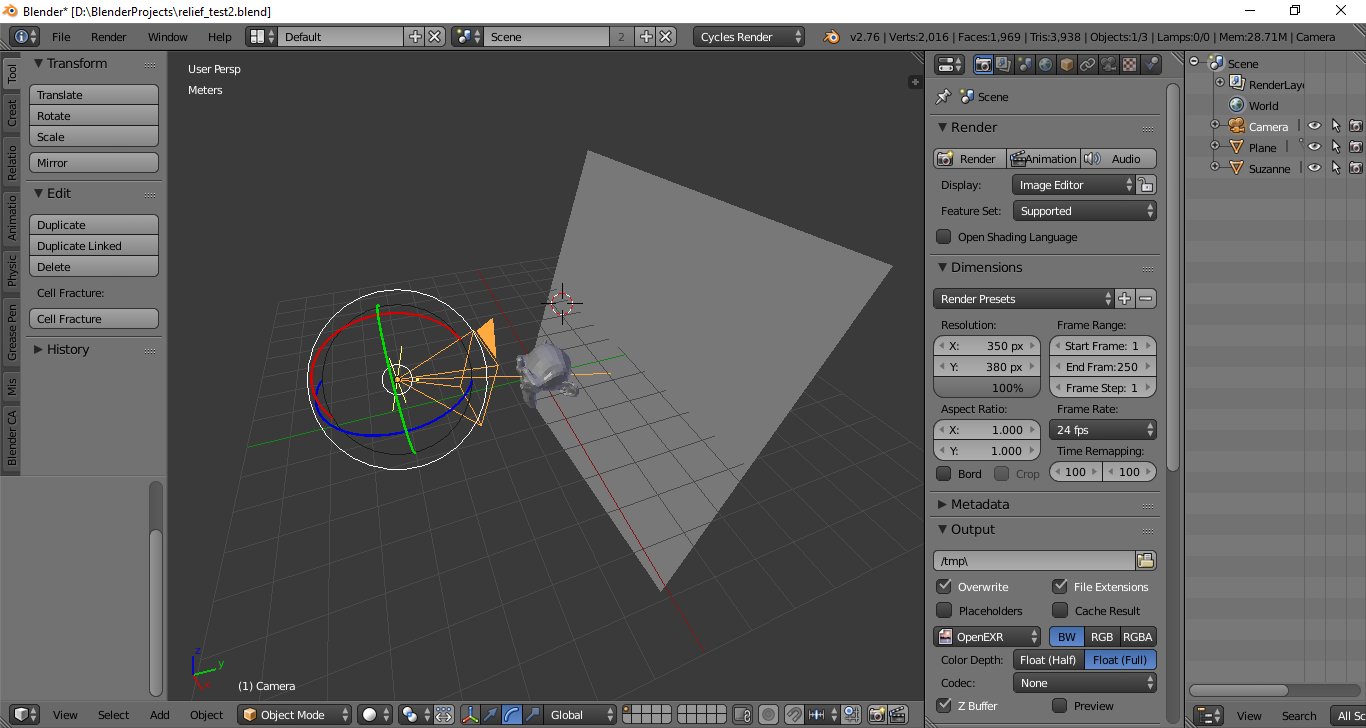
First set the engine to Cycles Render;
All you need is to set up Scene: arrange your 3d objects as fit and set Camera;
Important: add a plane behind scene objects;
Go to data -> Camera and check Limits to be visible;
Go to data -> Lens and adjust Start/End values so that orange line from Camera covers only your Scene depth;
Go to render -> Output and select OpenEXR, select BW and check Z Buffer;
Open Node Editor and select compositing;
Add the following nodes: Render Layers, Normalize and Viewer;
Link Z from Render Layers to input Value of Normalize and the output value of Normalize to Image input of Viewer;
After rendering change the engine to Blender Camera;
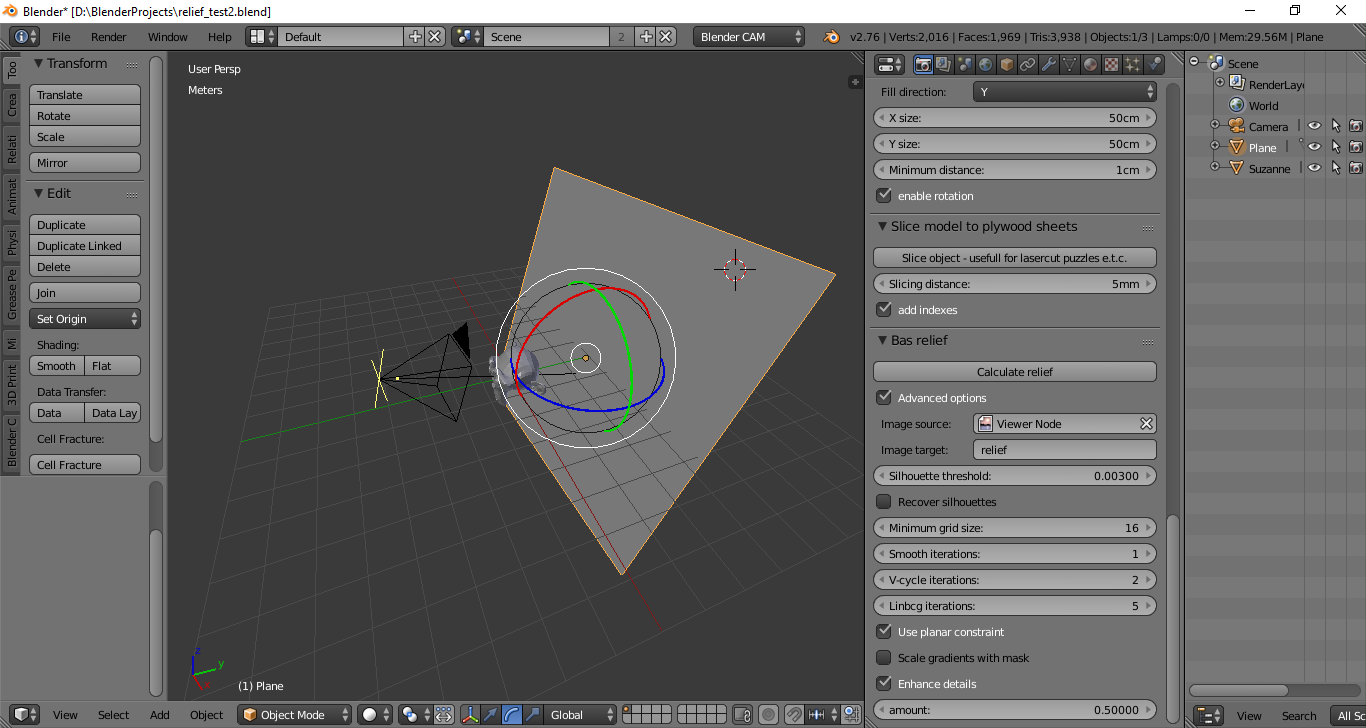
Go to Render -> Bas Relief;
Select Viewer Node at Image source;
Write a name for file that will be created at Image target;
And press Calculate relief;
*because the limit of the post to 3 images you will find the screenshot in a next post.
A file will be created with extension .exr in the blender folder.
This is the grayscale image that you can use with Displace modifier to create the bas relief object.