Sorry if this was covered somewhere, I tried looking but didn’t see anything. I basically wanted to create a mechanical chain for a work project, but I didn’t want to do it all physics based. I essentially followed a tutorial on making tank treads and applied a similar approach with an Array and Curve modifier. Once I got the chain looking nice I applied the array and added some things to the chain that would travel with it. Moved the curve, everything rotated nicely.
However, once I moved the whole assembly a certain distance I realized that the chain would slowly expand over time and not stick to the curve’s path. I noticed that the dimensions of the chain were changing with the movement and tried to keyframe those force them to remain the same, but that just broke everything.
Any advice on how to fix this so that the chain stays on the curve?
Thanks!
Move the curve and the chain together over one frame is one way around this issue sometimes, but I am not sure this is the solution for you since I cannot guess what is in your file, so please post a blend file here with the curve and chain in it and I will look at it.
Cheers, Clock.
BTW, Welcome to BA! and please note that your first 10 post will be moderated so you may have to wait for them to appear here.
Ah! That did it. When I moved the curve it rotated the chain, when I moved them together it didn’t rotate, just changed position, but if I keyframe them both to move from point A to point B at the same rate, it all looks good. Thank you!
I was playing around with keyframing the curve’s scale and that was creating overlap in the chain, so your fix was much simpler. Thank you again!
Ok, nevermind, thought I had it fixed but it was just less noticeable, when I moved the chain longer I noticed it again. I didn’t post the file previously cause my company can get a little… confidential crazy sometimes, but I’ve removed all of the stuff besides the curve and the chain in question so I should be alright =Dchain.blend (2.52 MB)
You had unapplied scales on your curves and meshes these will cause you problems so you should either apply rotations and scales (CTRL+A > “Rotation and Scale”) or preferably do all your alterations in EDIT Mode only, i.e. don’t scale or rotate things in Object Mode. :ba:
You have not drawn your chain accurately - the links must all be in-line along the Y axis, not sloping up slightly as you had it.
You have made all links where you can simply make one set and use an array for the rest.
So here is your file back with a new version from me - just jigged a bit and on a new layer - you should still make the chain links more accurately and dead flat along the Y axis.
I have put a basic animation in it - just press PLAY, Oh BTW you can move the chain mesh in Y absolutely HUGE amounts and it never deviates from the curve.
PS. When you add animations there is no point key framing scale and rotation if you are only wanting Location - Keyframe LocRotScale keyframes everything! Just RMB click the location in the transform boxes and select “Insert Single Keyframe”.
Sorry! I’m pretty new and just picking things up as I figure them out so I’m sure my file was a mess from how it should be done haha. Changing scale only in edit mode will take getting used to, but I’ll work on it.
It was likely how I drew the original curve, but the chain links didn’t meet up on the ends, so I adjusted the Y to make them fit, I’ll adjust the curve next time and try to leave that alone!
I had to add to add alternating objects to the chain at certain intervals… so I applied the array and added the objects manually in edit mode… imagine a mining conveyer belt with platforms every few feet to move stone up a belt and out of the mine, except it would alternate between two different kinds of ‘platforms’. I had no idea how to do that with the array options.
On keyframes, I was just following something I saw in a tut, does that method lag things up or is only keyframing the thing that changes just best practice?
Thank you so much for the help, I have no idea what I’m doing so any help is great!
“Sorry” is not required and does not matter - we are all still learning!
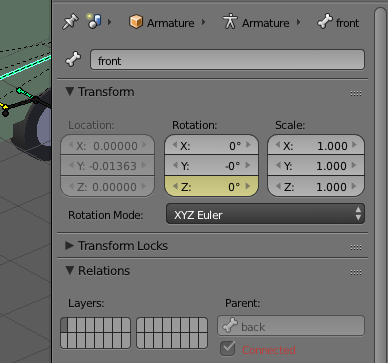
So to add keyframes, just RMB click the transform box as in the picture below and select “Add Single Keyframe”, once you have typed a value in at the appropriate frame in the time line, if you need to keyframe all the values, just select “Add Keyframes”.
It does not matter too much for small projects, but when you get to large ones, it can seriously slow down rendering of animations, so it’s “good practice” to do this rather than “wrong”. You can tell Blender to just insert required keyframes in User Prefs, I think, but as I never use the “I” key to add keyframes anymore, I forget exactly where it is.
For your array, I just made the smallest section of links I could, and then added the array modifier, It saves on verts and helps animation speed.
You can also apply Location as well, which helps in many cases, but is not so important, generally. Also watch where your meshes’ origins are - they can also cause you problems if they are not in the right place, like with Mirror Mods for example.