Hey guys, I was wondering how to use the nodes or something to make an object with the emitter shader to glow all around rather than just on a surface, for instance, being in a dark room then seeing a glowing orb with the blurred light around it.
I tried looking for something but can’t find anything that doesn’t involved the compositor, I’m trying to make it as a material, not for “Photography”.
I think the thing you’re looking for is called “volumetric lighting”. It’s either volumetrics or post processing in the compositor. Beats me why you would NOT want to use the compositor, nothing to do with photography and everything with getting the result you wish.
I cant think of an easy way to achieve this using straight forward cycles materials. You may be able to do it with a volumetric emission material on a slightly larger version copy of your objects - but I doubt it will look as good.
The easiest way is to simply use the Glare node in compositor and set it to “fog glow”
I might as well use photoshop then if I have to use the Compositor, like I said I don’t wanna be involved with it.
It’s… unethical imo to use photo editing on a 3d project, unless it’s a texture then I guess you can say in the case of 3d design and “photo Shopping”, I dislike mixed media. o.O
I saw one guy make a video of doing it by making a Partially Transparent texture and adding it to the orb in some fashion that it made it look like it glowed, it also “blended” the emitted color of the light.
Then put some dirt on the lens. Recreate reality, though consider loooonger rendering times.
Honestly, friend, “why don’t you want to ‘be involved with’ one of the fundamental tools in the Blender system?”
Likewise, why do you confine yourself to the Cycles renderer, when the Blender system offers three (BI, Cycles, OpenGL)?
Here is, I think, a very good way to look at it: “At the end of the day, you’re going to wind up with a rectangular array of several million (R,G,B,A) data points. How you get there, is up to you. Just make it quick, efficient, and flexible.”
I candidly suggest: “don’t look to ‘the renderer’ … to any renderer … to give you au fait accompli.” Why? Because that’s not the most efficient, nor the most flexible, way to do it. (You really don’t have “X number of hours to wait for something, only to have to do it all over again over again over again …”)
Long before any of this digital stuff came along (although I’m sure he would have been delighted with it …), a famous photographer named Ansel Adams said it best: “A picture is captured in the Camera, but it is made in the Darkroom.”
In this analogy, “the renderer(s)” is “the Camera,” because this is the source of the raw image data. (You have three different types of Cameras to choose from … feel free to use them all.) Post-production is “the Darkroom,” where the image data from the source(s) is transformed into the final deliverable. The final image that the audience sees is not the product of just one step or tool. And, there’s a very compelling reason for that.
That hit-song that you heard on the radio was not recorded in one take to a shellac disk or a wax cylinder, as it once was. There’s a reason for that, too, and by-the-way it’s the same reason.
it would be nice to have the equivalent of bl halo ect in cycles
anyone knows if it is coming soon ?
happy cl
Except that compositor is built into blender and can therefore be integrated seamlessly into your render and tweaked on the fly - as opposed to photoshop which requires that you export the image then play around with it.
uhg, I’m not doing this for Picture purposes though lol, I’m doing this for actual asset purposes, hence in other words the compositor does nothing for me unless I wanna market a false asset that doesn’t glow the way it does in the composited picture, plus I wanna build a portfolio that shows my Modeling/Graphic skill, not my photo editing, using the compositor to edit a rendered image so it looks like something has a glowing/glare effect isn’t credible.
Figured it out :), and I didn’t have to edit a rendered image.
Unethical, wow. I bet you only use physical based render engines and model on molecular level too, right, 'cause using tricks to fake material properties, surface conditions or light sources are of course highly unethical. So, naturally, is using camera settings like focus length (field of view), aperture (depth of field!)… Because in its current implementation it’s photo shizzle, not what the naked eye would see! But seriously, why don’t you learn to use the tools made to do the job instead of refraining from everything that’s not strictly 3D-modeling? In the end only the result counts and it’s fake / art / a model anyway.
To repeat myself, the only way to get a visible glow (in real life as well as in Blender) without using a filter or other post production is by adding an atmosphere (real life: dust or vapor) to the environment. In Blender or any other 3D software that’s called volumetric lighting but be aware that it can be very hard to set up right, takes ages to render and has other disadvantages. Without an atmosphere, there’s no way you see a glow around a light source.
Well sorry to burst your bubble but when building a portfolio for a potential Employer to see, you don’t wanna take the easy route and fake something to look like it’s doing something, when really it was just edited into the rendered image and isn’t actually apart of the project, that’s false advertising.
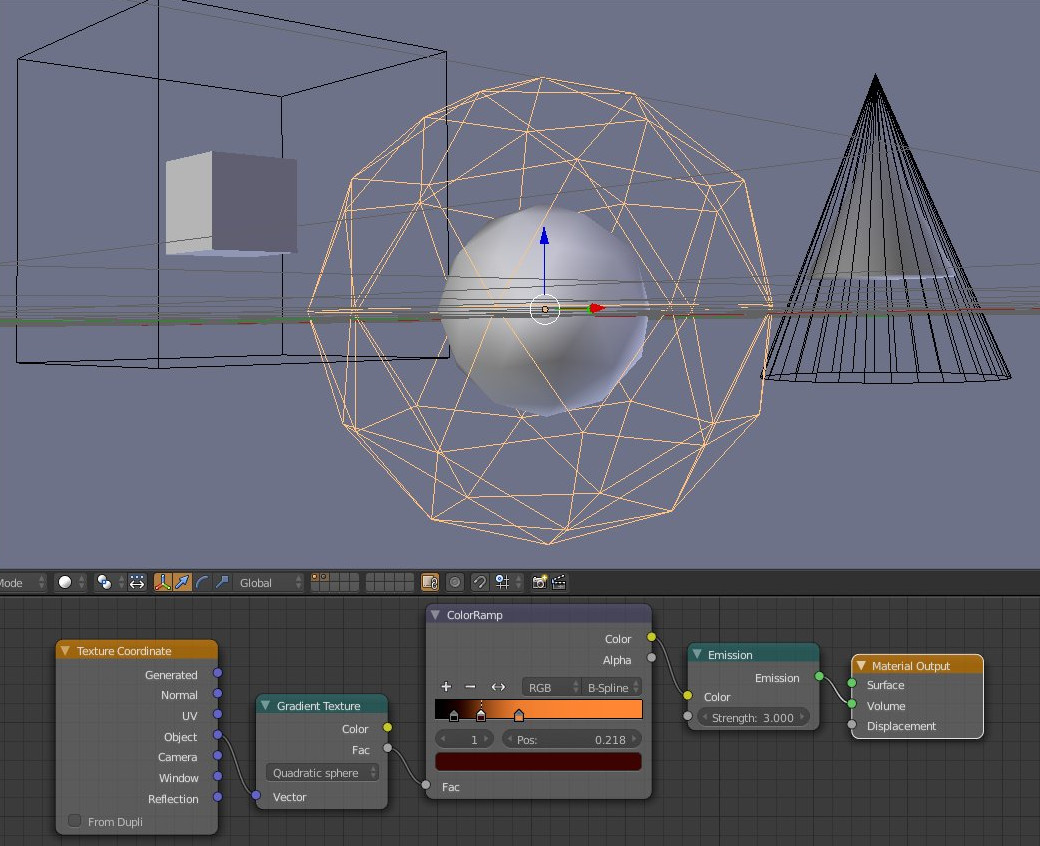
Currently it only looks like it works for Cylinders, but I can easily (because of it’s setup and Reverse engineering) make it work for cubes and Spheres.
It also renders just fine with 1000 samples in under 20-40 minutes depending on your system.
no atmosphere or particles.
But unless you are talking about glare caused by atmospheric scatter - which is easy to get using volumetric scatter in the entire scene - most glare/flare effects are caused by the camera/lens/eye - whether they be defects, internal reflections, type of film, type of sensor etc
They are not inherent to the object or asset and would appear different depending on whether the object was viewed by a camera or the naked eye, what type of lens was employed on the camera, whether any filters were used - even the exposure length can have an effect.
As the poster above says - in the absence of an atmosphere/dust and given a perfect optical system - no object would display a visible glare. Any glare effect added whether in post production or via modelling/materials in inherently an aesthetic cheat.
yes, it would be really nice to have something like internal render Halo in Cycles!
@MorningStarz101, can you put an image sample of what you want to achieve? in what kind of object you want to apply the effect?
Maybe it can be faked the glare/glow. Using an overlapped object to fake the glow, with emission as volume and some gradient.
did some test with volume In cycles and have not really found a nice way to mimic Halo in bl!
we need that in cycles no questions here
happy bl
What I have said above might work better in solid and uniforms objects. I do not know much about nodes and materials, I’m sure someone with more knowledge could improve this:
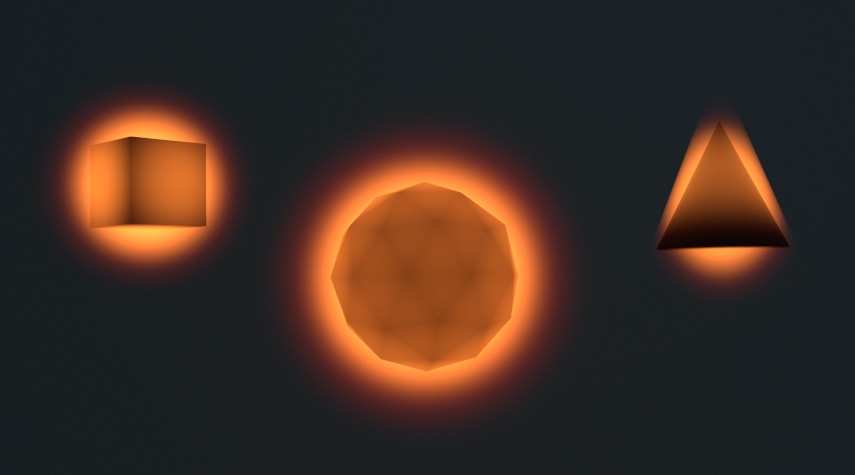
Exactly what I was talking about, thanks lol, finally someone gets it!!!
Although I have found another way to do this, this is much more simple looking, love it, love you, love life, woot!
Finally? This very thing was suggested in post 3 ![]()
I didn’t Quite Understand where you were going with what you were saying lol, the picture the other guy posted clarified things up for me, earlier today I also had the epiphany that I could do what he did but wasn’t exactly sure how, sssoooo thanks you two ![]() and everyone else for participating in trying to help.
and everyone else for participating in trying to help.
If you want to use a second object and a fancy material to produce something that resembles a glowing object, that’s of course your right. But I still can’t get my head around your fear of post production or compositing. If you think professionals don’t use post prod or compositing, you’re wrong. They do. In professional productions (whether it’s commercials or Hollywood movies) there’s not a single rendered image that does NOT get a post production treatment, being slight colour corrections or z-depth blur or way more extreme actions. Don’t see this as a personal attack because it’s not meant to be one, but I think you need to rethink this topic. For a portfolio, it’s only good if you show you know how to use the tools provided by your software of choice. In visualisation, there’s simply no such thing as cheating, or maybe everything you do is cheating.