So just a quick, because I seem to have this issue with pretty much every project i’ve tried working on. Everytime I watch a tutorial on youtube of course things come out fine, but when I begin to do weight painting myself it starts to deform weird. If creases really bad when I start to move the mesh no matter how much I change the weight or the strength of the brush I use. and I don’t know why.
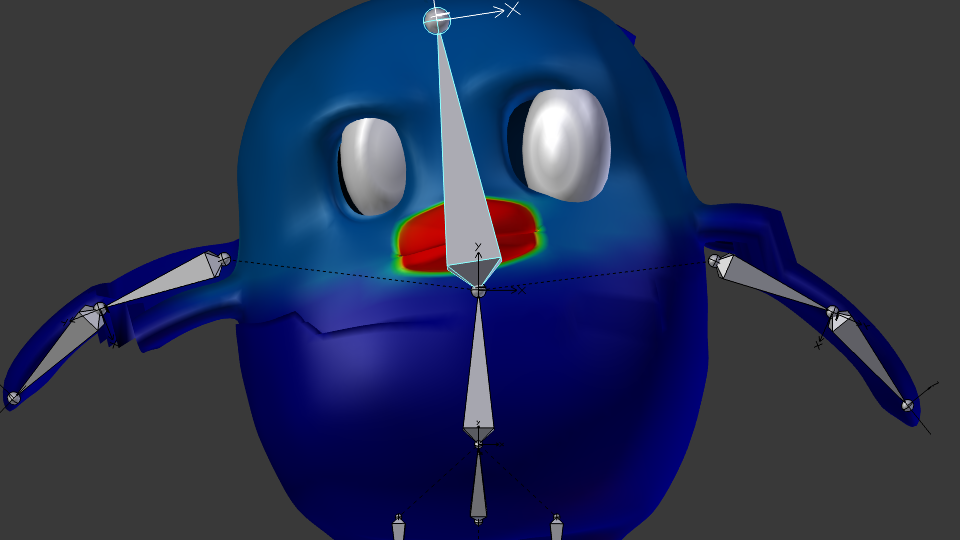
Here is and example of the issue with little to know weight and it seems to act as if the a ton of weight where it is creasing. The bone below it hasn’t been painted and has none on it, so would this be an issue with the rigging itself? because as I stated before it happens on all the projects i try on. So I don’t know.
Weighting determines the influence of 2 or more bones on a vertex. If only one bone is assigned a vertex then any weight above 0 will cause 100% influence over it. The bone controlling the area where your "creasing’ appears needs to share influence with the bone below. The weighting between the 2 bones determines the deformation between the two.
That’s exactly what the issue was. Thanks Larry. I never added any weight to the other bones, because I assumed they would do the samething. Thanks. I’ve never thought the Blender community would be so responsive and helpful. You guys are awesome.
Ok so it solved the issue but now another ones arises. Now when I move the head the mouth and the head start to deform really weird. Here is the link to the .blend file. Im not trying to do anything fancy with the rig, which is why it lacks a lot of bones. This is just a project for me to get the hang of weight painting so don’t just it too harshly lol
You’ve got the vertices for the head weighted to three bones, the head bone, the spine bone and the hip bone. If you then change the weight of some of the head bone vertices to be higher than the rest, they will travel faster than the rest of the vertices and the deformation will not be smooth.
One way to fix this would be to use the Smooth operator. Check Vertex selection for masking down by the layers, select a bunch of vertices on the head (or all of them), then click Smooth, change the factor to 1.000 and they will be smoothed.
What I like to do instead though is to use automatic weighting. If you select the mesh and then shift select the armature and parent it with Automatic Weights Blender will do most of the work for you. You get very smooth deformations, which can be bad if you’ve got just a few bones since the head bone will move the wings a lot and so on.
To fix this you can add bones to help the automatic deformation process, you put them where they’re needed, the bone will have an influence based on its size, so you can put a few at important areas like near the wings, on the beak and so on.
I made an example project where I didn’t really spend much time on it but you’ll get the picture and you can see that you get very smooth deformations. The important thing is that the added bones need to have Deform checked and you need to disable deformation for IK bones (pole targets) and so on. If you want to change the influences you can change the bone sizes and then just parent with automatic weights to see the new weights, so iteration is pretty fast.
Man do I still have a lot to learn lol. Thanks a ton. This is really helpful information. I’ve been learning about rigging also, but I just started and never would’ve thought about making the rig this way. Here’s another quick question then. Is it generally ok to use automatic weights on human rigs also? and what are some of the drawbacks to it as opposed to using “With empty groups” because using the empty groups seems to give me the most problems. Basically when should I use with automatic weights and when should I use with empty groups, because this is kind of confusing to me.
Yes, you can use automatic weights for anything. There are no real drawbacks except that you will get smooth weights so you will need to add bones like I did to refine the weights.
You would use parenting with empty groups when you don’t need smooth groups, like adding a suit of armor to your mesh. You would then parent with empty groups, then for each part you would just add the weights in the vertex group panel by selecting the correct group (shoulder bone for shoulder armor part) setting the weight to 1.000 and clicking Assign. Metal doesn’t really deform so this would be better than using automatic weighting.
Edit: You can also get automatic weights from a single bone or a few bones by selecting them in pose mode, then going to weight paint mode and pressing the specials button (w? maybe) and doing Assign Automatic from Bones.