I have a problem (again) and do NOT know how to solve it despite looking thru all the WorldWideWeb ;). But now straight to the problem…
On the picture U could see the sphere with the HAIR on it made using the “Particle Editor”. The HAIR has the WAVE option selected and for the maximum visibility of the problem the FLATNESS is set to 1.0. The problem is obvious … is there a way to rotate that flatness?
My needs are haveing the flatness towards the head from top to bottom as normail real hair is. On the image somehow every children group is perpendicular to the ground and I need it horizontal.
Geez, I hope its understandable guys…
Sincerely, JayM
PS: Another strange thing is that if the source mash object is rotated the flatness direction changes!!!
The only way I know how to do that is to use many many planes as hair emission, each one with 1-3 parent hairs and 10-30 children. It is time consuming, although as so many will be nearly identical you can duplicate them in object mode and rotate/scale them a little bit.
In fact it does NOT working either because when U add the hair to a plane the childrens are perpendicular to the ground so there is a need to rotate the mesh BUT … when U rotate it the editing option in particles does NOT work properly anymore and when bending the hair some strange rotations will appear and the result is horrible…
The picture shows the result with the spline set to 5 so the line has to be fluent … and also the rotation of the mesh to achieve a flatness needed is - how to say - weird and unreasonable.
Huhu, did you try to play around with the options ?
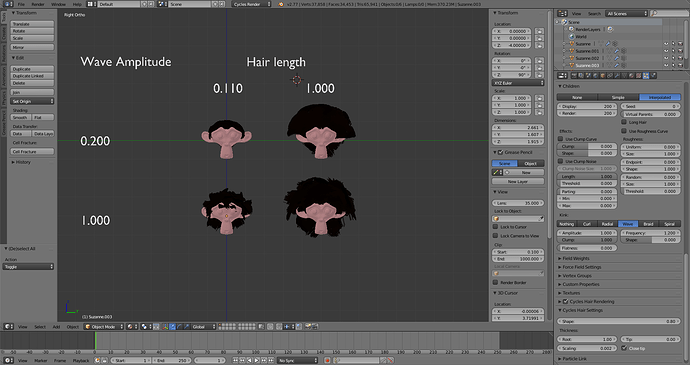
The property flatness controls how children are grouped around the parent hair in the same axis, like you can see in your screenshot. To make a flat hair cut with the Wave option (and the others), decrease the Hair length. The amplitude value will give you a control on the wave effect.
There does seem to be a bug whereby if you add a plane, add a hair system, change the mesh in edit mode, and then try and style it goes crazy and unusable.
Try this:
1 Add a new plane.
2 In edit mode scale it down to abou the correct size.
3. switch to object mode
3. Add a hair system, 1 parent 40 children
from this point on don’t change anything in edit mode.
4. in object mode, rotate it, scale a little if you want , comb it etc…
4.
I edited NOTHING in edit mode… (mean shape or size of emitter)
My hair size is 0.5
using amplitude of 0.2 and clump of 1.0 (in fact does NOT seem that this clump has any effect)
I need the children to be in one line with ground instead of that perpendiculat rotation in default, and when I rotate the plane in OBJECT mode to turn the flatness in a way needed then in a particle editor when shapeing the strange rotation glitches will appear
The only thing I found out how to rotate the flatness is set FREE the hair root and with only this one selected hit “G” and move it a little because this MOVE has the inluence on the hair ROTATION! The persisting problem is that sometimes I need to place a hair in an exact postiton and Im not being able to rotate the flatness properly using this method on that exact place.
If U could send me the .blend file with a plane with an attached hair (one or multiple) which doesnt change the ROTATION during the manipulating (rotating) in OBJECT mode than it will be OK, because I only have to position the “face” where I need and make certain changes but I tried several time and never success.
I mean rotation of the flatness when rotating the object, plane in our case, in the object mode mate.
Im trying to follow the tutorial made for Blender to make a long hair using the particle editor and thats the reason of importance for me. The method described earlier (move the hair root) helps the author on success but it looks like the new version of blender has slightly different behaviour and Im loosing the point in trying.
In fact the flatness is kinda important to achieve the result I wanted U know? I will try to make a progress myself using the standard methods and I will see if I find something usefull. In any case thx for Yo help and effort mate!
Sincerely, Jan
PS: If I will fail I will try to make the rest of the hair using the work-around method U mentioned in previous post because it sounds like a way to go - THX.