How to make a natural speed or control the speed for a rollercoaster when using a follow path. Need a good tutorial or advice.
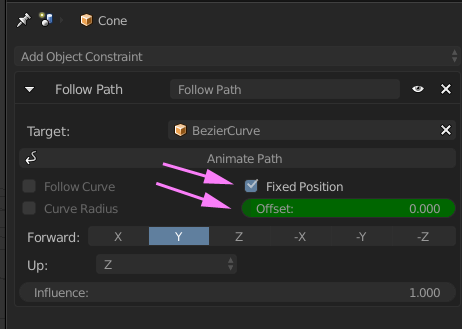
One way is to check “Fixed Position” in the Follow Path constraint panel. Then you animate the Offset value, which represents a fraction of position on the path; 0 = start, 1.0 = end of path.
Say the peak of your roller coaster is at exactly half the length of the path. In a 100-frame animation, you might keyframe Offset as follows:
0.0 at frame 0
0.5 at frame 80
1.0 at frame 100
The train would use 80% of the animation time to climb halfway up the track, and drop the rest of the way during the last 20% (ie, faster). You’d have to tweak these values as this example wouldn’t actually look realistic, but it gives the idea. You could even make the train stop or go backwards with this technique.
You could use rigid body physics to get the correct speed. Make an elongated plane and add a curve modifier with your curve as the object. Make the plane a passive rigid body. Add a sphere and move it to the top of the plane; make it an active rigid body. Run the simulation and bake the simulation to keyframes (to make the next part easier). Select your rollercoaster car and keyframe the follow path offset. Then move through the timeline and add keyframes to the offset to keep the car in time with the ball. Here is a simple example.
speed.blend (625 KB)
@AlanK: Great idea, using rigid body physics to model the motion. I wonder instead of subsequently animating the offset value to mimic the sphere’s fall, could you change the ride’s position by parenting if to the sphere, or with a copy location constraint?
Edit: Parenting or Copy Location are only partial solutions because the roller coaster cars wouldn’t rotate to follow the curve.
Here’s an example of a simple way to do it - just press Play to see it all work. You can change to Camera View as well, the camera is parented to one of the cars:
roller-coaster.blend (1.11 MB)
Feel free to take the blend file apart and see how it works. Any questions, just ask, I believe this is the easiest way to achieve what you want. The meshes are very simple, it just shows the principles of the animation.
Cheers, Clock. 
PS There is an object revolving around the first car - it’s there just to show someone else how to do this, you can ignore it if you like. I originally posted this blend file in answer to another question posted here.
Thanks never thought increasing speed at some points would be that complicated.
Unfortunately the laws of Physics are not simple. The various accelerations, both positive and negative, are complex. falling or rising is simple - the acceleration is 9.81 m/sec vertical, you calculate the horizontal component according to the incline angle. Rotational accelerations are r * angular velocity squared - again pretty straight forward, then you have to combine both of these together with the anticipated loads, frictional forces and drag coefficients. This is why roller coaster design is very complicated, so you do not exceed safe acceleration forces, or over-speed, or the risk of the cars slowing too much then running back. You can fiddle it all so your animation looks nice, but it’s basically a case or keyframing the offsets at various stages along the ride to achieve your animation.
Cheers, Clock.
PS I can talk you through all the maths if you like, but I suspect you will not be taking me up on this…
Many Thanks looks very good.
Question did you slow down and speed up by making Drivers in the graph editor?
Car 1 is positioned by keyframing the offset values on its Follow Path constraint.
Cars 2 & 3 use drivers in the Follow Path constraint to keep them just ahead of Car 1.
The differing speed is controlled by keyframing offsets at various stages of the path of the cars and then adjusting the Handles of the F-curve to control the rate of acceleration.
Hope this helps you - my blend file is not mathematically perfect, that would take a lot of computation to work out where the cars would be at various stages of the ride. So if the total time for the ride is 5 minutes, you would calculate where it is after say every 20 seconds, work out what proportion of the total distance that is and then keyframe that offset value at the appropriate Frame. It may be that the car should be at 0.05 (5%) of the total distance at frame 100, so you set frame to 100 in the timeline, then key 0.05 into the Follow Path Offset, then RMB click this value and select “Insert Keyframe”. You would then proceed with all values in your calculated timeline.
Cheers, Clock (Still an EU citizen and proud of that!)
Really curious about the version of Blender UR using mate because when I tried Yo file the “train” behave opposite the reality in most cases … slowly down and fast up ![]()
JayM
I didn’t spend too much time tuning it, just to give the idea of how it is done. I used 2.65 when I did the file way back when… If I get some time - Ha Ha! - I will tweak the speeds so it looks right.
Cheers, Clock.
Ouch, I thought it was already tweaked so “excusez-moi” mate 
JayM