Hey Guys,
I finished this image a while ago and uploaded a similar post in finished project section on 9th July but for some reasons it still hasn’t shown up. I wanted to show my work to everyone so I decided to upload it again but this time on focused critique hoping that I could improve this image. This is actually the first car I have modeled. Do tell me how the render looks and I would also like to know if this image is good enough to be posted on Art Station.
And if anyone knows why my image didn’t show up in finished project section do tell me that as well.
Thank You in Advance…


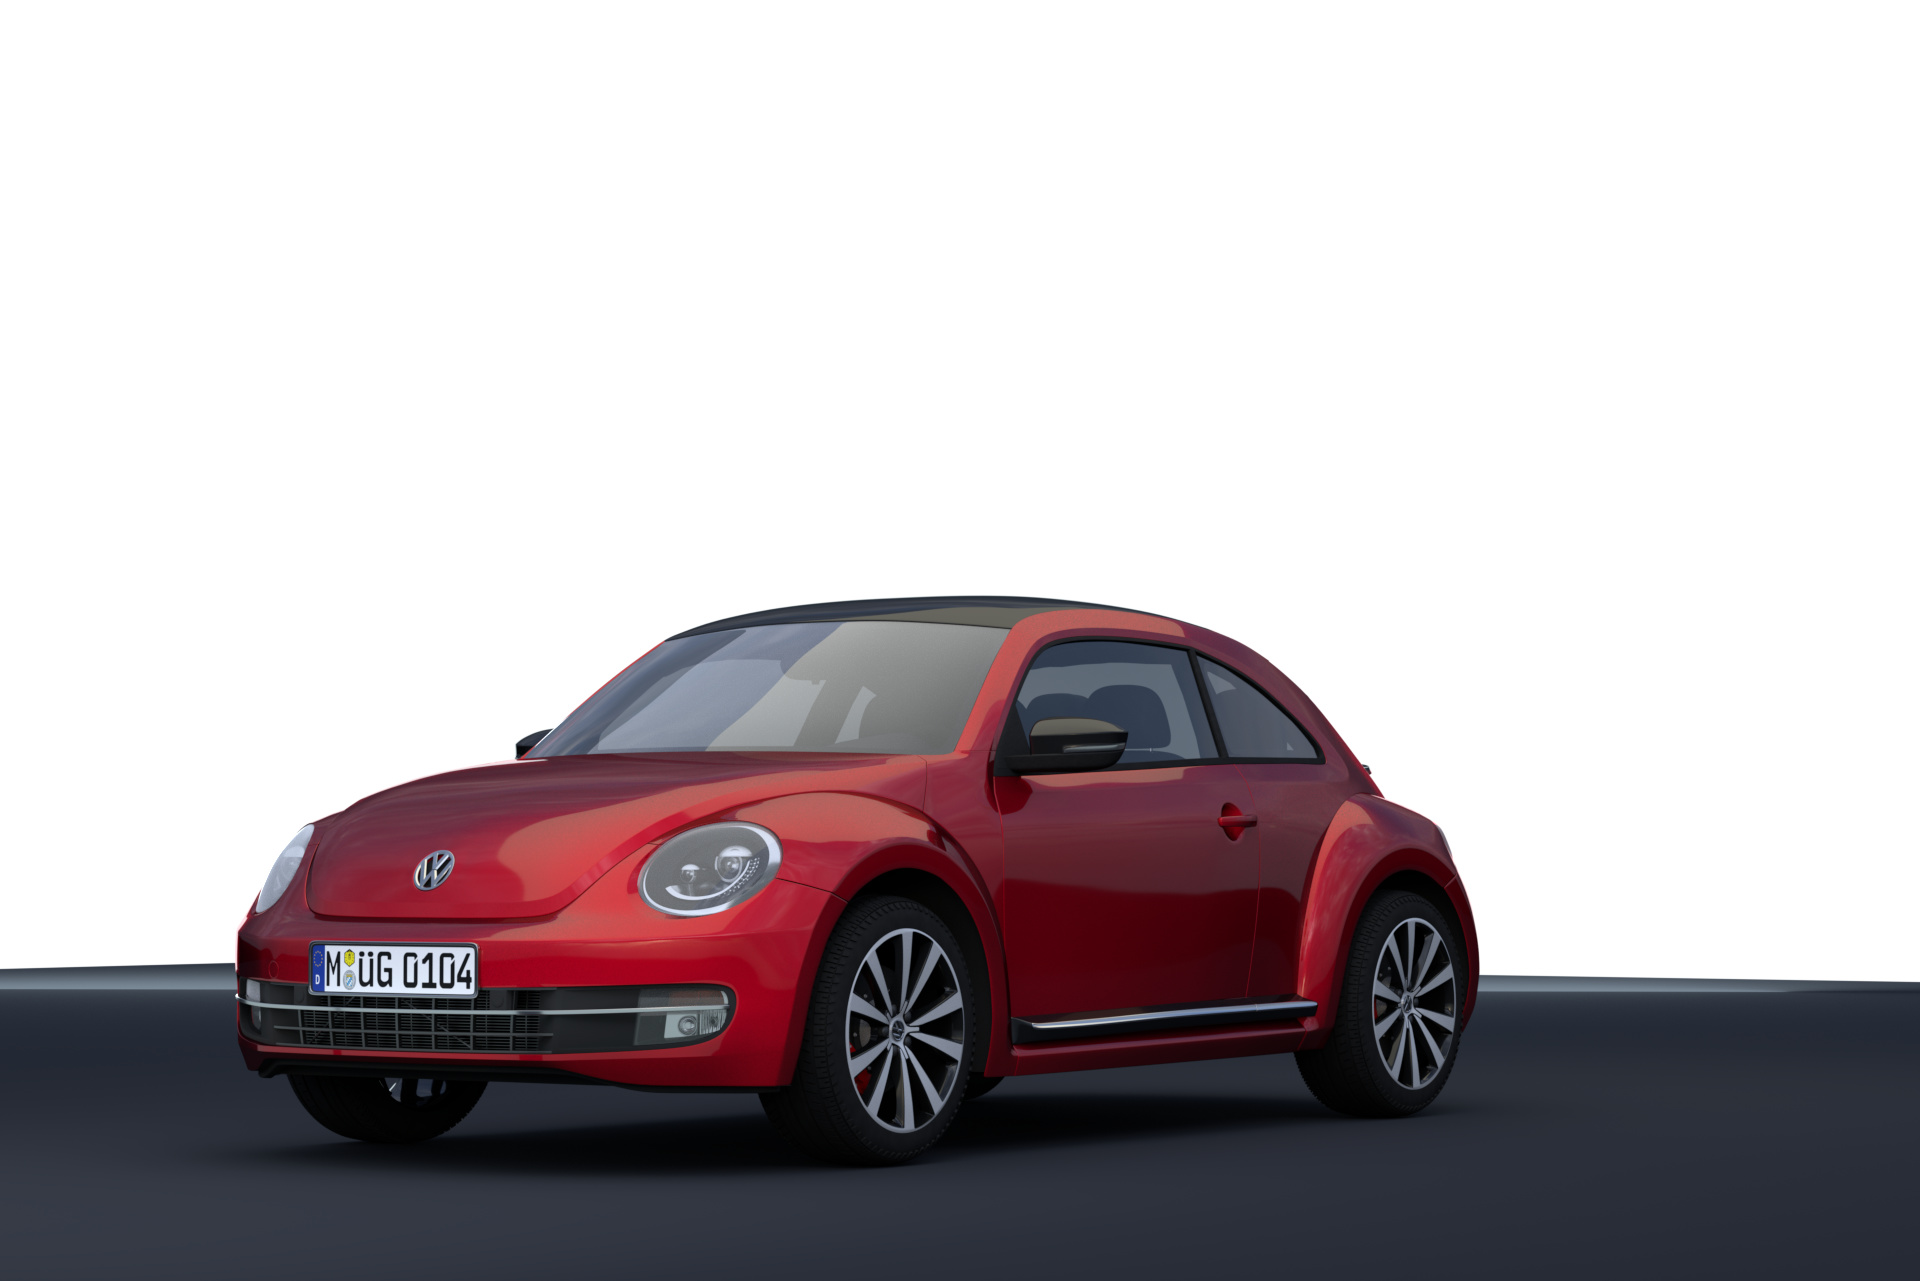
The road kind of feels too narrow for the Beetle, kind of detracts from reality
Thanks bro I appreciate your reply…
I’ll make sure the scale looks better in the final image.
In the mean time I am hoping I could get some critiques on the materials and lighting.
Thanks.
Was this done in cycles or blender internal?
It was done in cycles…
Does it look good…
Don’t worry it looks good. I was just making sure which renderer you were using. It looks sort of like a studio set up. Not sure but I think it is the lighting or the material reacting to the lighting. Can you please show your material set up for the windows and the headlight plastic?
Looks great! Good job! I agree with the comment so far: The beetle is to large for the scale of the road and I think you should try and find an HDRI that matches the environment better. Over all the image is suffering a little for to much post processing. Crushing the blacks is making it look like you are trying to hide imperfections. It’s very common for new CG artists to use to much contrast when they start out so I may be a bit to sensitive to it. Your call in the end but I’d rather see everything in the image rather than hiding huge chunks of it with extra blacks.
First of all… Sorry if my feedback is a bit rough.
I think RodDavis is right. It looks like you have rendered a beetle with a studio setup and then just put an image that has nothing to do with the ‘actual’ environment (The reflections on the car). When I render a car I always try to use the HDRI image as the background image as well to make sure it looks like the reflections on the car have been cast by the actual environment, that you see in the background.
Furthermore, you could improve the lighting by making it more dramatic and ‘contrasty’.
It is way easier said than done, but I think that you at least should try some different lighting setups (And some HDRI images for lighting as well)
Two examples to illustrate my point:
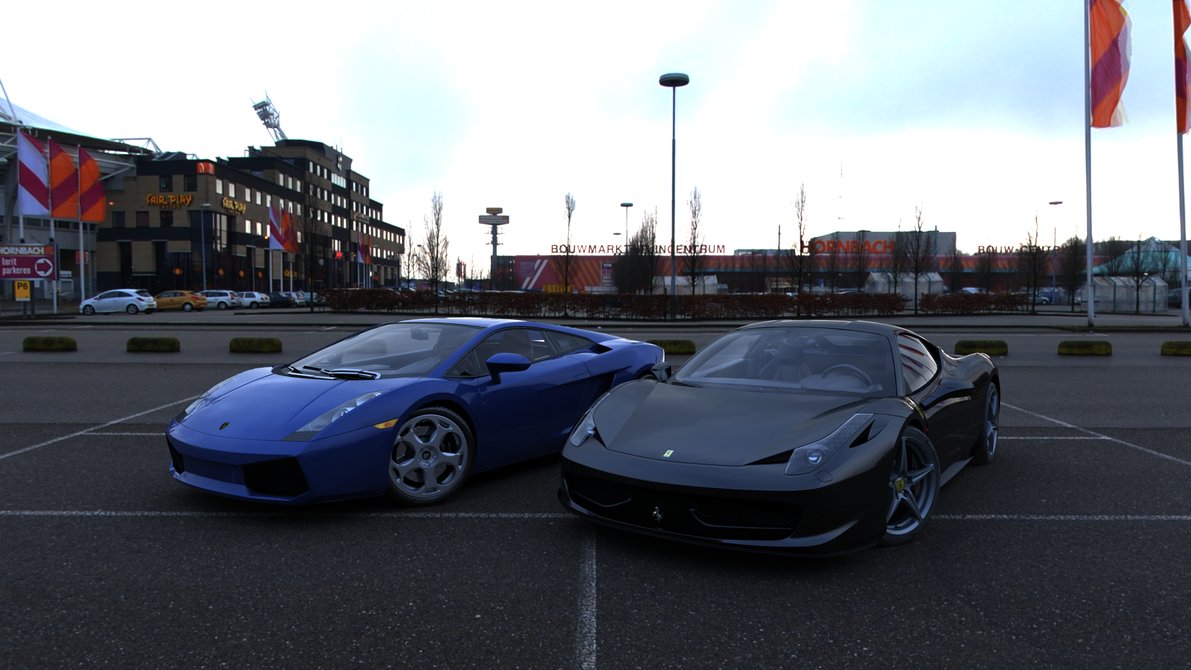


The reflections on the cars on the first images are basically just a grey-ish blue color with minor variance, while the reflections on the second image to from almost 100% white to very dark. I find that those reflections in general look a lot better.
I hope you can use my feedback. Don’t get me wrong! I think you have done a great job with this render already. Considering it is your first car render I am really impressed, but I wanted to give you some feedback that would help you improve your render.
Really don’t worry axelblaze I was just paying attention mostly about lighting and materials. The model looks awesome. I knew that you were also more focused on material and lights. Why I asked for the materials of those parts mentioned because I wanted to see if there was any diffuse in those materials. Mainly in the head light covers seem to have this effect though it could be lighting. Most materials seem to work but I’ll wait for the next update. Sometimes materials needs to be tweaked in different lighting setups.
I can’t wait for the update :)!
Tip / PS: If you want to look for some materials where it looks best with most lighting scenarios. I suggest looking at Macio’s PBR materials in this site if you want materials ready for you. Cynicat Pro’s and Andrew Price’s(BlenderGuru) PBR setups give you more of a control as an artist. Cynicat Pro has a series of videos on youtube that talks about workflows using PBR. Andrew Price seems to recap on Cynicat Pro in two videos but has some other points that most may not have been more aware of.
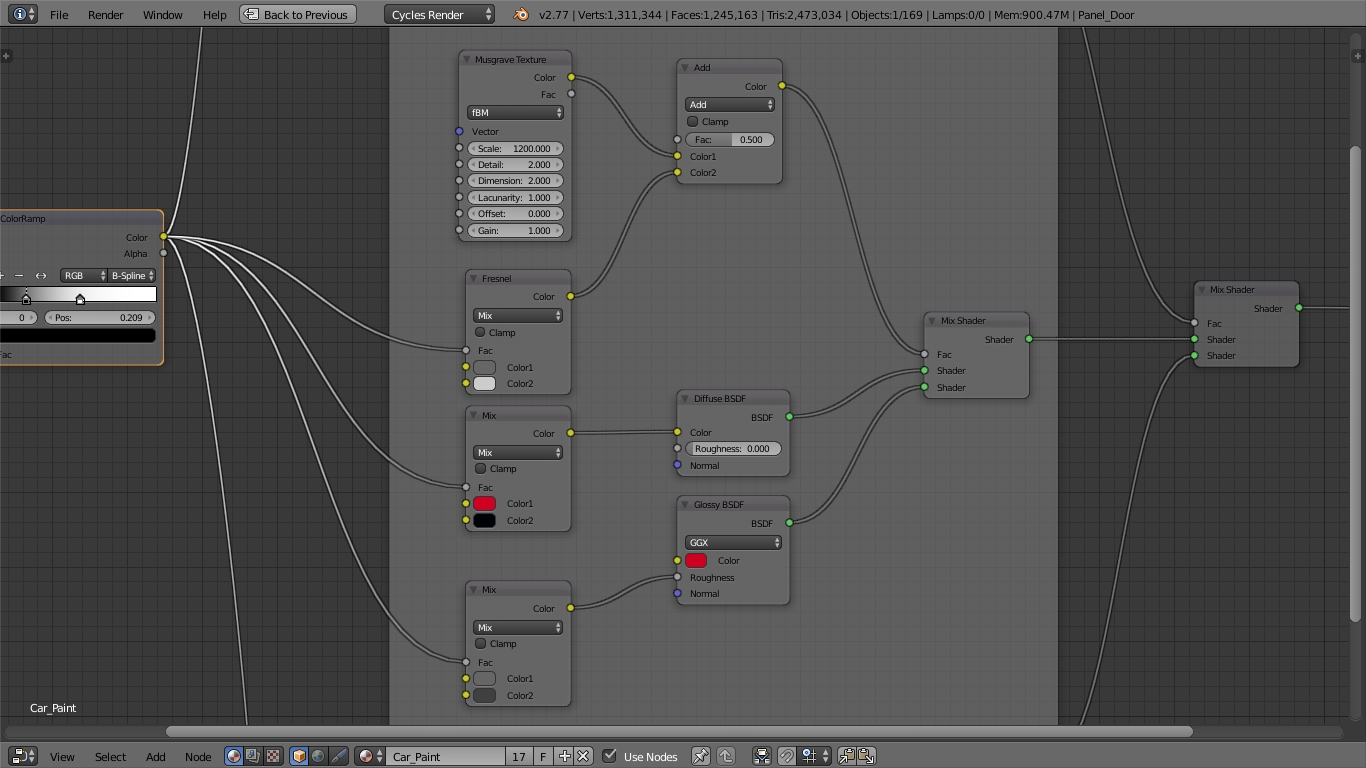
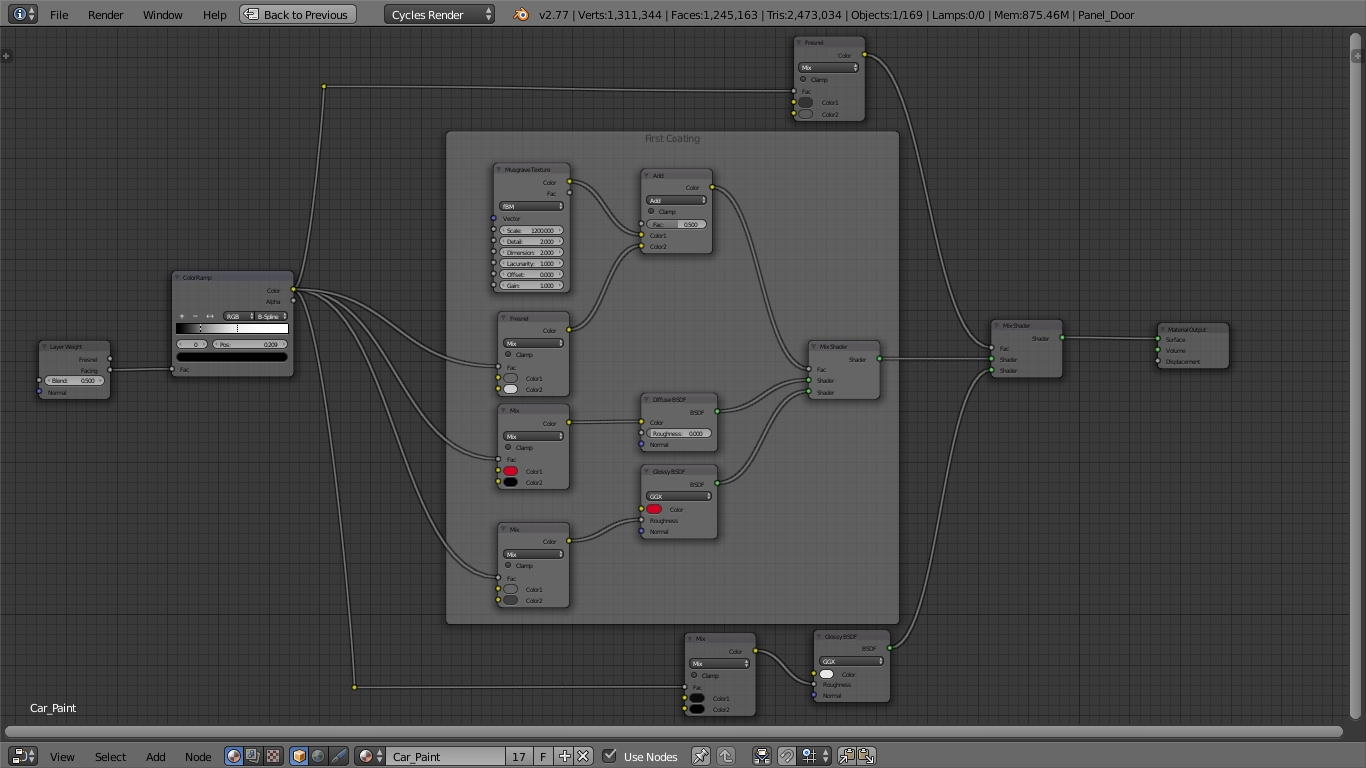
The Car Paint is made from a tutorial by Kent Trammell and the headlight plastic was my own experiment but needs some changes as I followed Andrew’s wrong PBR tutorial but I will fix that in the next render.

I guess trying to make the scene look good I actually over did the lighting and messed up. I used a three point mesh lighting + a soft box + an overcast hdri with double it’s actual power.
Indy_logic sorry but I did’t really understand your point, I would really appreciate if you could explain in a simpler way…
Thanks Guys and don’t worry about being a little rough, I believe i can take that…
So do tell me my mistakes and also do suggest how I can actually improve them.
Oo yikes, yes too much lighting for this scene. Try something simpler and match your lighting to what your background is doing and of course use an HDRI.
That fresnel is correct. You can divide the inverted F0 but you don’t have to. I tend to use the corrected fresnel instead of the metal/F0 fresnel for my dielectrics. Anyway I tested your headlight material. I suggest to leave the diffuse out of the headlight material. Its giving an odd fog and will give you incorrect reflections. This was the main part that seemed off to me. I tested the transparent and glass part and that worked nicely. If you need a fog like sheen I suggest bumping up your gloss roughness. Be sure to look at Andrews video again. He updated the Dielectrics.
The paint seems to work out nice. I wouldn’t really bother changing it unless it is hard to light without changing the materials. If that is the case then it is pretty easy to make a metallic car paint using Andrew’s PBR nodes. I haven’t tried a regular paint color or a matte.

This one is a basic metalic car paint I threw together yesterday and it is using Andrew’s New nodes. Concept to this is a base coat and then using the reflection node for a reflective shine.