Hello! I’m try to make a realistic portrait of my father, I’m learning in the go, so much of the tools I’m using, are the first time. So probably I’m doing things the hard way and I need help to find better or simplest ways.I’ll use this post also to make like a external memory of my journey from a beginner in blender, to a confident user (hopefully). I’m using exclusive blender, (some gimp)
I’ll post some of the last renders here and then in the comets some of the things I have done (maybe some one find that useful)Then in the comments, I try to go thru all the parts of the process:
Sculping: Nice and easy! blender is fantastic!!!
Remesh: Try to make a mesh so I can animated later.
Hair (why why why it is soooooo hard!!!) Many many different hairs in one person!!!
Bump mapping: I use cycles in blender for this, view-port in real-time, with texture painting is a feature coming to blender, so I’m using the last build (it crash from time to time)
First lets talk about sculpting:
For this one I had the luck of do it live, (with the person near me) of course, my father. It was relly fun, and he also enjoyed the process very much.
I started with a cube, then subdivided with the modifier, and then apply, First the shape, and then more into details. At last I activated dynotopo, and start refining. And the result is this:
The only thing that I have to be careful with dynotopo is to no go so far in the details… at the end, it is a complete mess, and blender has problem moving it.
Then the retopo, I try to make has clean and simple as possible, for that I use for reference SINTEL, and then accommodate the different flows and parts of the anatomy, for example my father has a prominent crease around the mouth.
It is very very time consuming. I’ll would like if you can tell me if there is something to improve, because I have never animated a character, so in reality I don’t know if it is going to work or not.
Of course I have to activated the magnetic… thing, so blender puts the vertices on top of the sculpt mesh, It is like… the fourth time that I made a Retopologí, but still in places I get crazy like the ear…
Some tricks I like to use: G+G, Control+R, F, Mark seam to hide parts of the mesh with L an then shift H, Alt H to go back, very useful for the interior of the eyes, the mouth, to do the ear, and the interior of the nose, Lots of control and clic to extrude, some E to extrude, and then S to scale, or R to rotate, with X, Y, or Z to move in some concrete direction.
I have to be very careful with E, some times you can let a vertices lost… I have to many… and I hate it!! Any how… time consuming, but fun to. I think I have sooo much to learn, Look at the ear… it is a disaster… but it works… I don’t know.
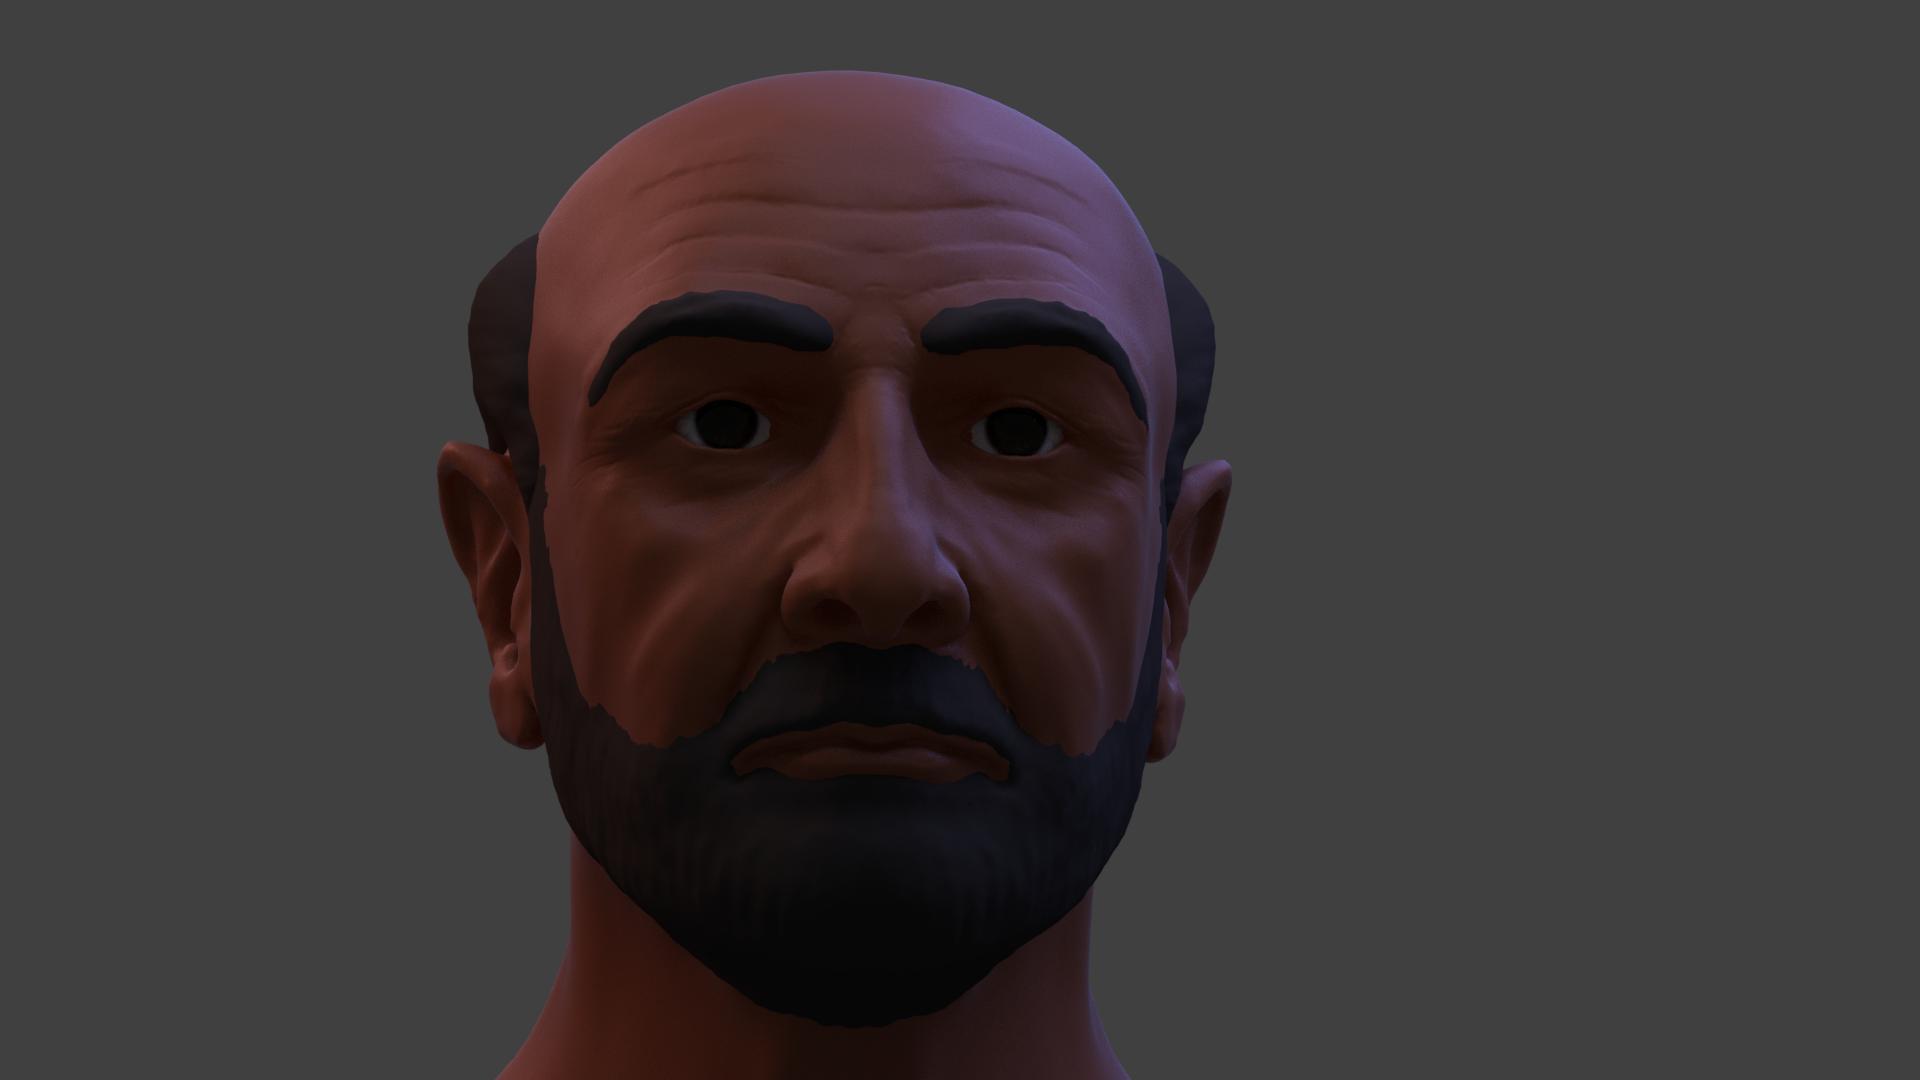
Let’s hear it for cropping! The first portrait in post #1 is excellent because it is a tight crop, and because of the novelty of using red-and-blue light.
When I look at images #2 and #3, I see, “a portrait of a man’s head.”
But, when I look at the tightly-cropped image #1, I see “a man looking at me.” I wonder how to interpret the red and the blue …
“Mis-ter Bond … I know that you … … anticipated … … emerging from your … present circumstances … … … ‘alive.’ …”
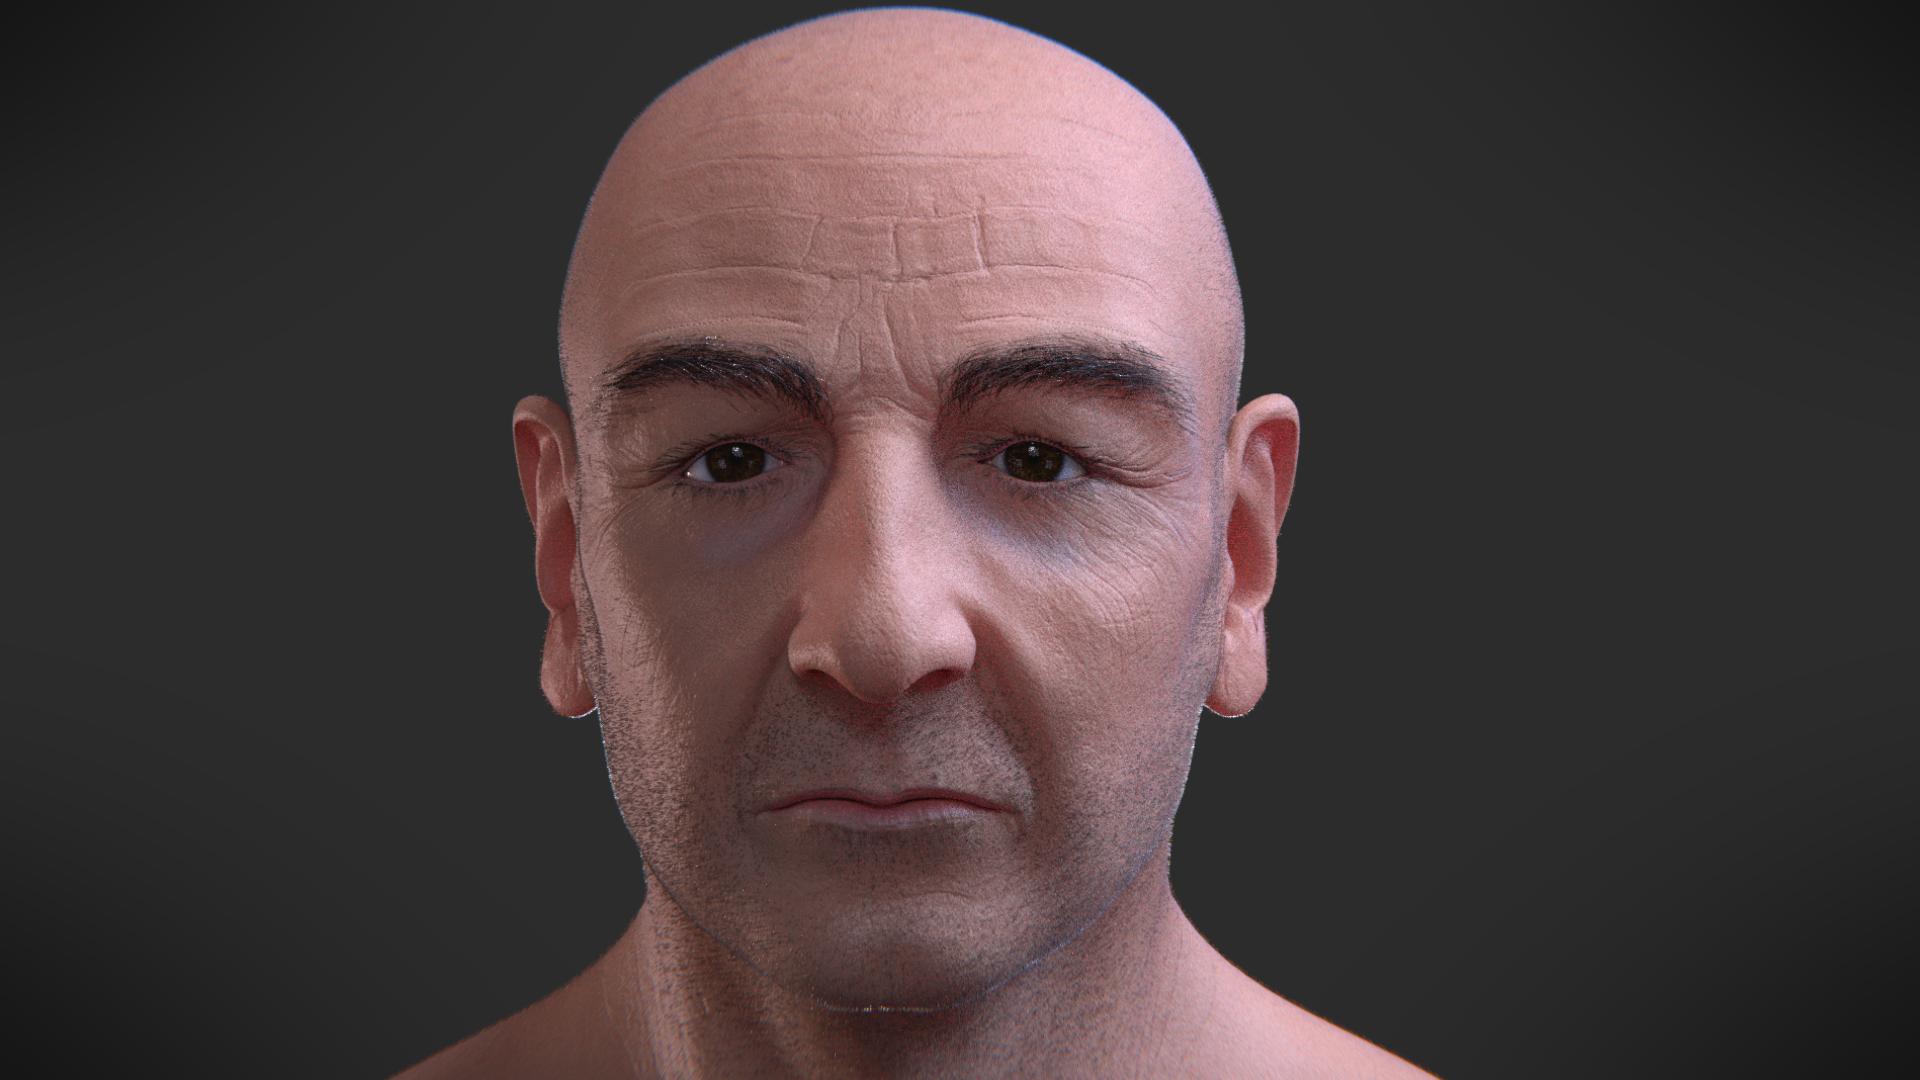
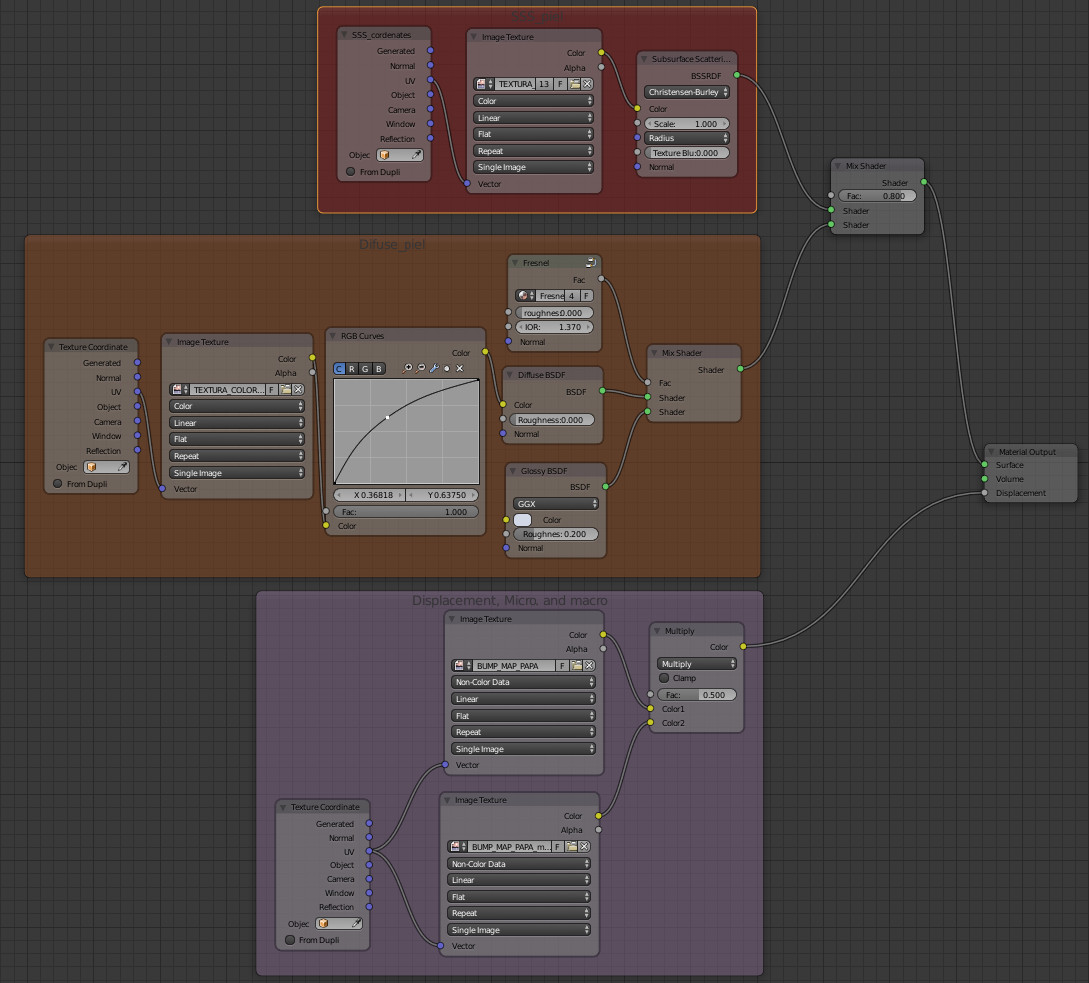
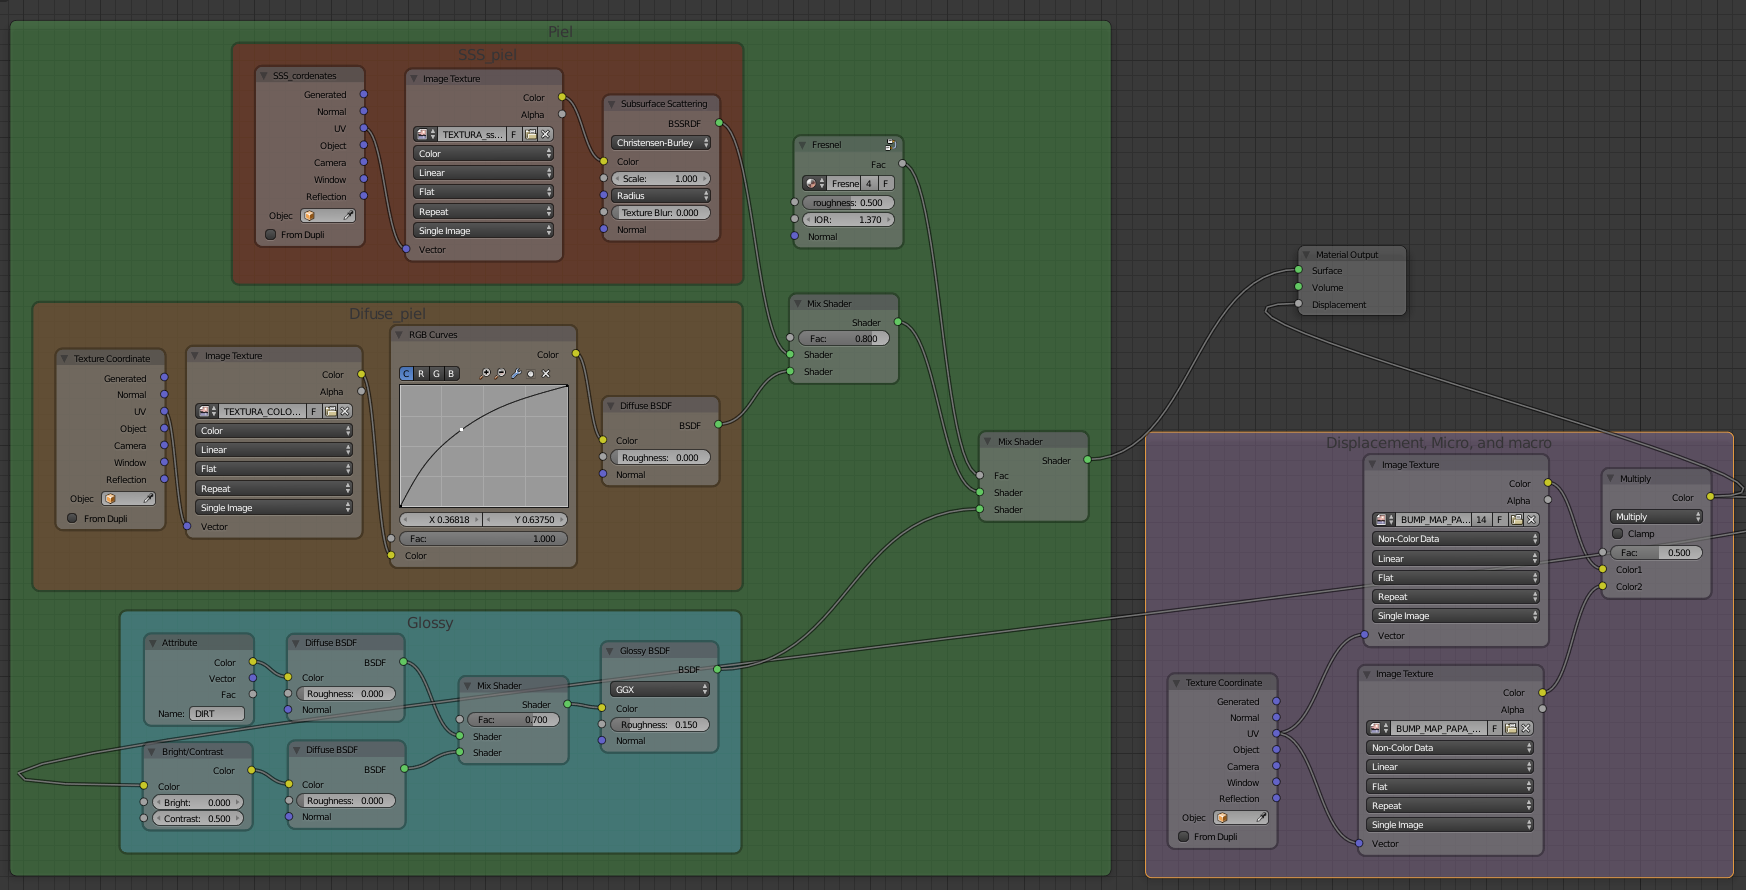
Well, I take the lights out, and I find that the textures are just… horrible…, so I did some changes, but it is soooo much more dificult to get it natural… I have to learn a lot about realistic skin and the shaders…
here is the render:
The modelling and bump mapping is really nice and detailed~…but maybe paint in more variation to the skin texture so it looks less flat? And also add some subsurface scattering to the material so the skin looks more fleshy. The model looks really good though!
Chebylshev, Thanks for the comment!
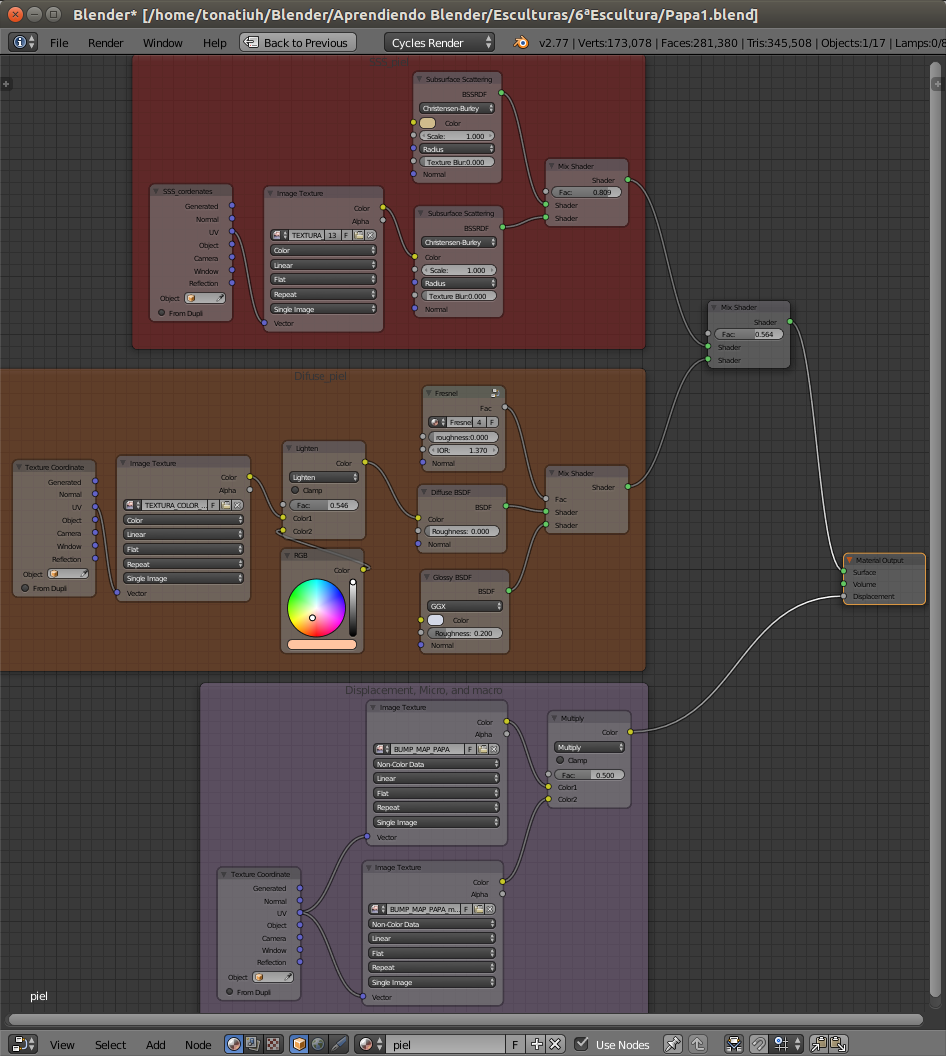
I starting with shading and skin paint, but I fell I’m not getting there.
I have two bump maps, one I did to simulate micro-bump of the skin (just a noise that I have to rework so it is real skin) and a more obvious bump maps.
I have a image for the red scattering so it show more in some places, and an yellowish for the fat and the cartilage, just, color, not image. I made the glossy of the skin a bit blue, just a bit, for the oiled surfaces of the skin.
Then an image for the texture color, but I thing it is to dark… and you can’t see it properly… I have to change something…
Well… I try to refine the way I’m doing things because it is not working properly.
Yeah, skin is really tough to shade…Maybe you should keep the light sources so you can see the SSS and glossiness better. Did you paint the diffuse skin texture from scratch, or projection paint photo textures onto the skin texture?
I wanted to all be made by me, no take anything from pictures, so I paint it from scratch, I have a loooong way to go, but something should be showing up by know… The hdr light just take out all the detail, the “study” lights let much more detail to be shown…
I think I have to find a light ambient, that is neutral, so I can see what I’m doing… But I don’t have references, what it is strong light or what is not, witch system… a back plane with one or two lights? three light setup… I’m lost…
Haha, I suppose using photos can feel a bit like cheating, though that’s not always a bad thing I thought your coloured light set-up was pretty good, though if you want it more neutral to see what you’re doing better, you could desaturate the colours and brighten the lights a bit…
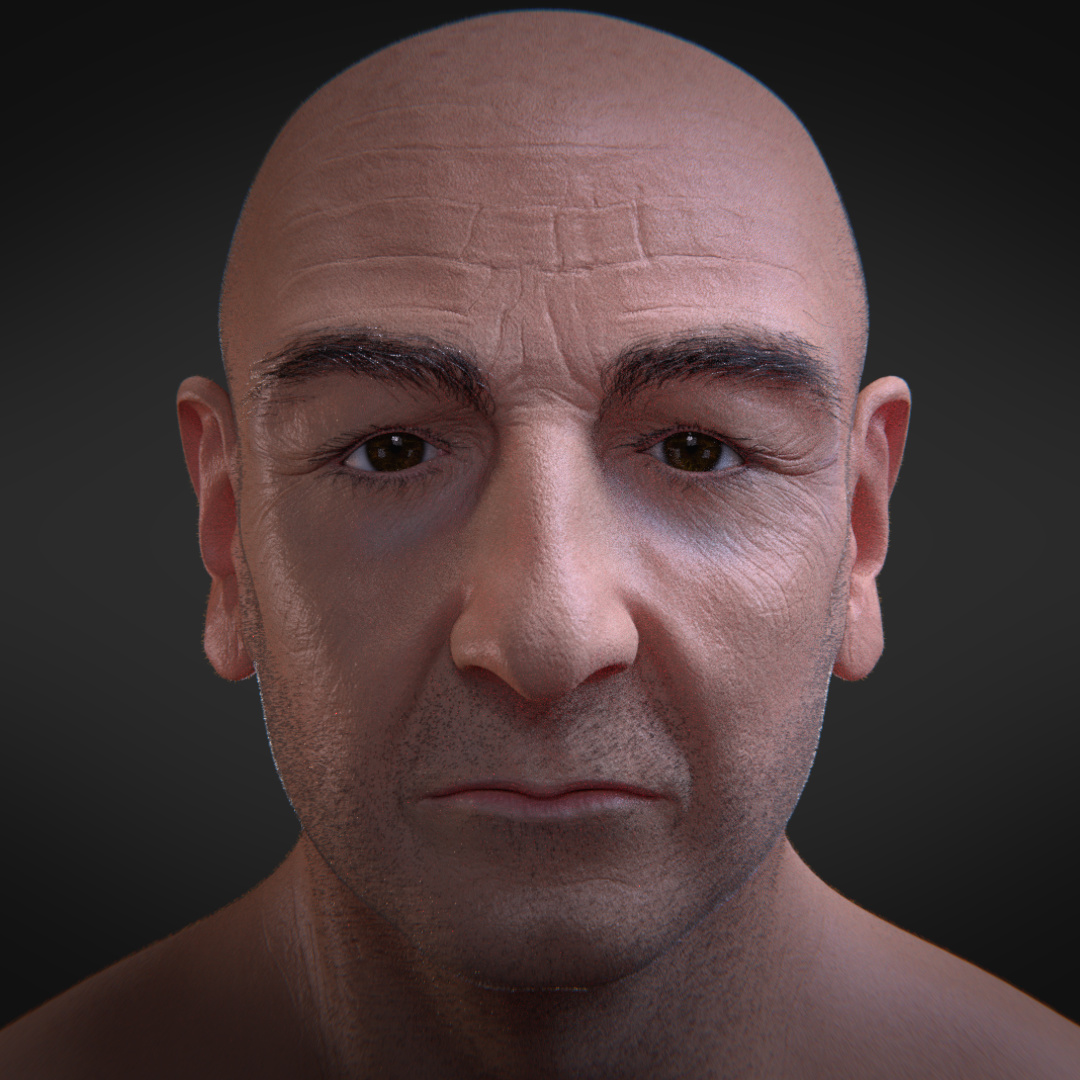
I think I have a break thru!!!
I simplify a little the nodes, lees SSS and I change a little the colors of the skin paint texture, lees red more blue and green, and lees darck.
And I think now it is much more realistic, too simple, but nice. now you can see a little of the colors of the skin, look at the top of the head.
Hello! It’s looking awesome! Try mixing the diffuse layer and SSS layer together but add the glossy layer after that mix instead. I’ve found that works best for skin :).
@RodDavis, I made the change, and improve a little the glossy, Y put dirty vertex, and the bumps maps as the color of the glossy, that way I think it will make a more realistic glossy, it seams that the skin that it is compress is more glossy than the skin that is stretch… (maybe… I’m in doubt now…)
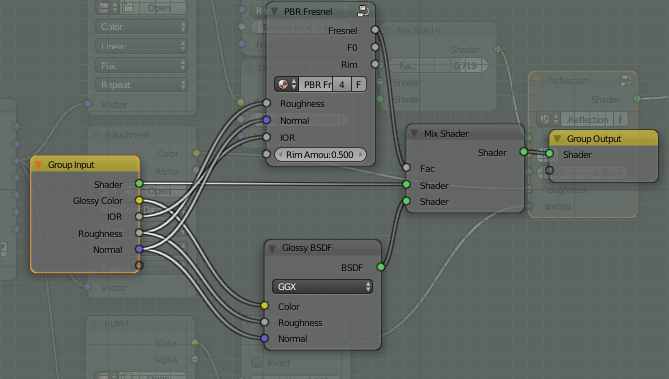
This is the basic refection layer setup. Also allows you to change the gloss color. I personally like the fresnel over F0 most of the time if it isn’t a metal.
To get the full function of the PBR fresnel you need to use the normal values as well as the roughness values. That is why I will add a either a normal map node or bump node.
@RodDavis Wow, Thaks!!!
It is to complicated for me, but I try!!! ou yeah!!!
I have some questions hehe:
-what image do you put in Roughness? I put a combination of my two bump images.
-I used the cynicatpro Fresnel, it uses the normal and the incoming geometry (I don’t really understand how that works…) it is not enough?
-with your approach I lost the ability to make him sweaty, or dry, or medium. (well I don’t know yet how you control it with an image)
That last one, is the only different that I find, what I’m not seeing?


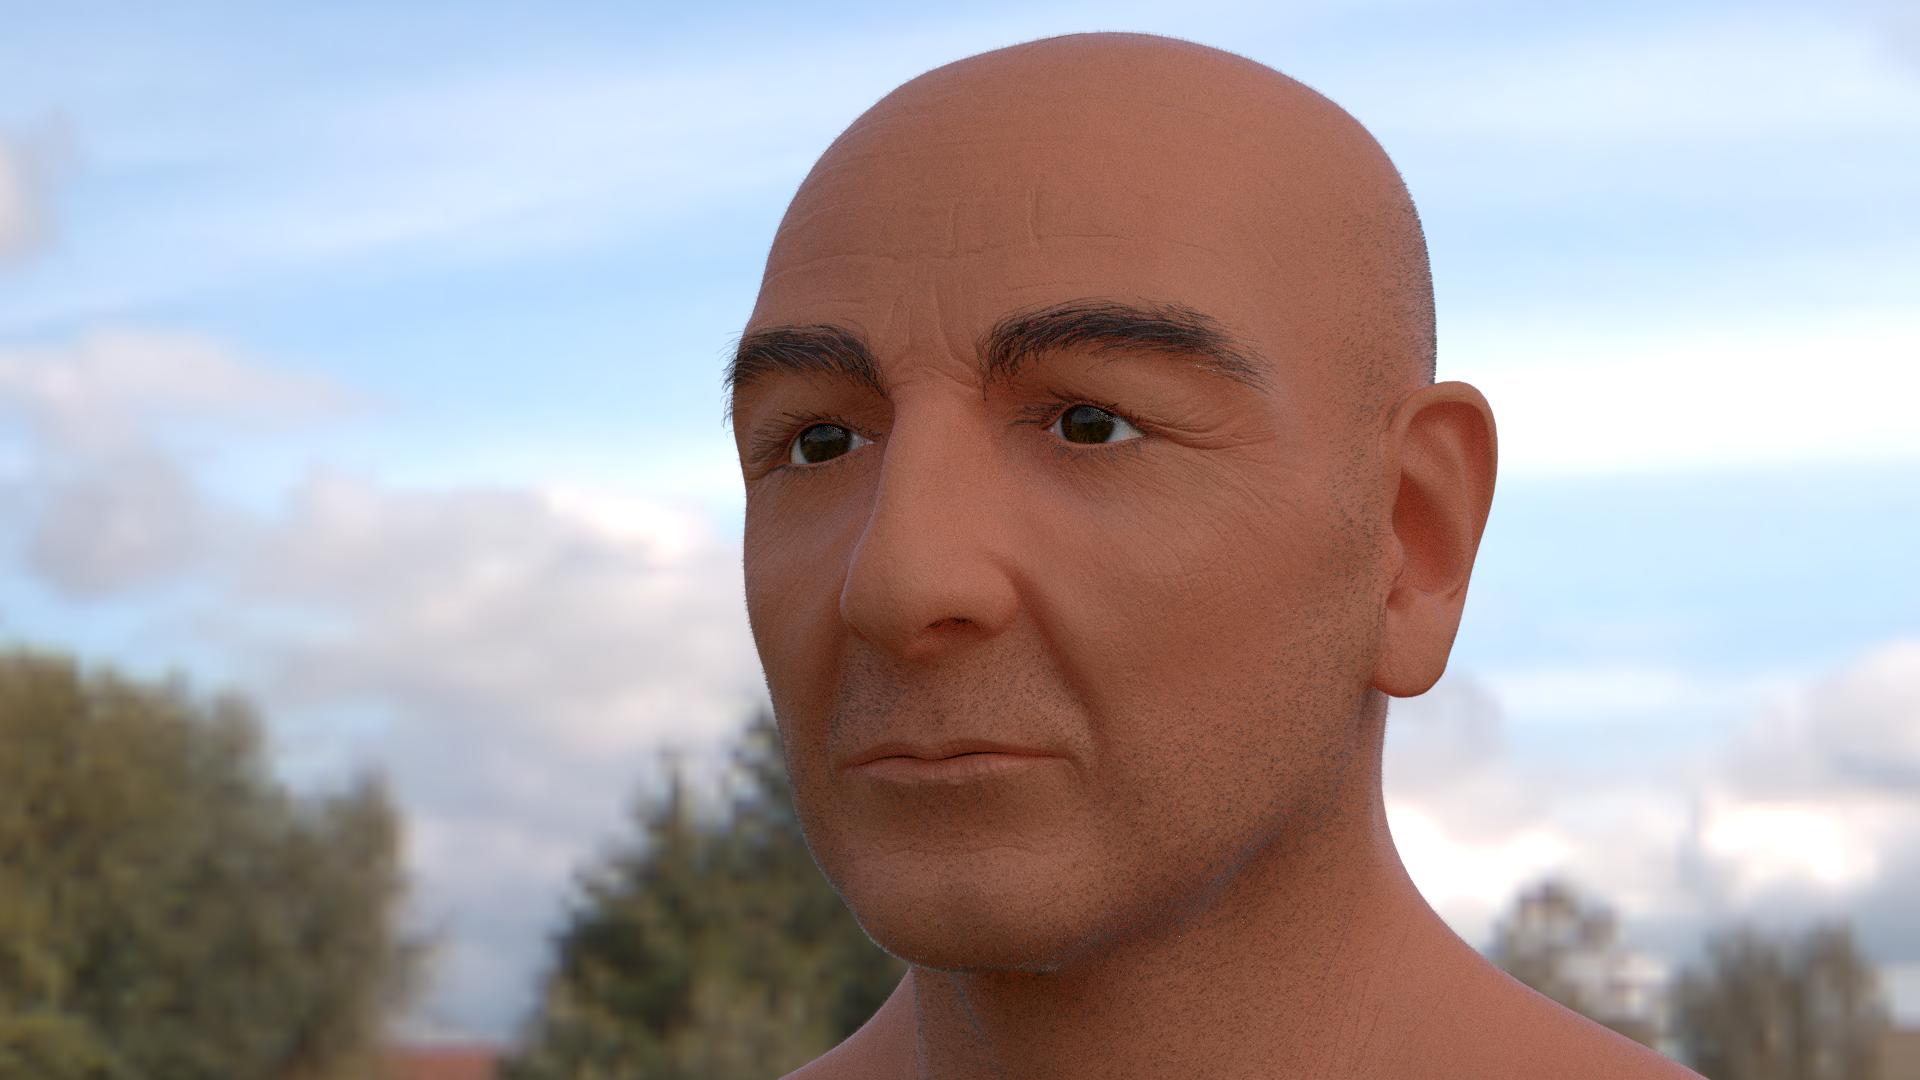
 I thought your coloured light set-up was pretty good, though if you want it more neutral to see what you’re doing better, you could desaturate the colours and brighten the lights a bit…