I cannot find explicit discussion or a timeline on the future of an internal Blender muscle rigging system, other than it may be planned for 2.8x.
In which case, I feel it’s important to discuss what features a muscle rigging system should have.
Personally, I’ve had need for the following:
• Curve Controller — Simply a curveable ‘bone’ that stretches OR extrapolates the curve between it’s two control points (head/tail). When the length shrinks or grows relative to rest length, the curve should either buckle like the current IK constraint does, or extrapolate/interpolate the curve (not scale). The curve is set via control point(s) in either bezier or nurbs fashion or with fall-off methods. Ideally, these control points can be hooked/parented to anything, and have their position(s) defined as a % along the muscle curve.
Comment below with features you want/need a potential muscle rig to have.
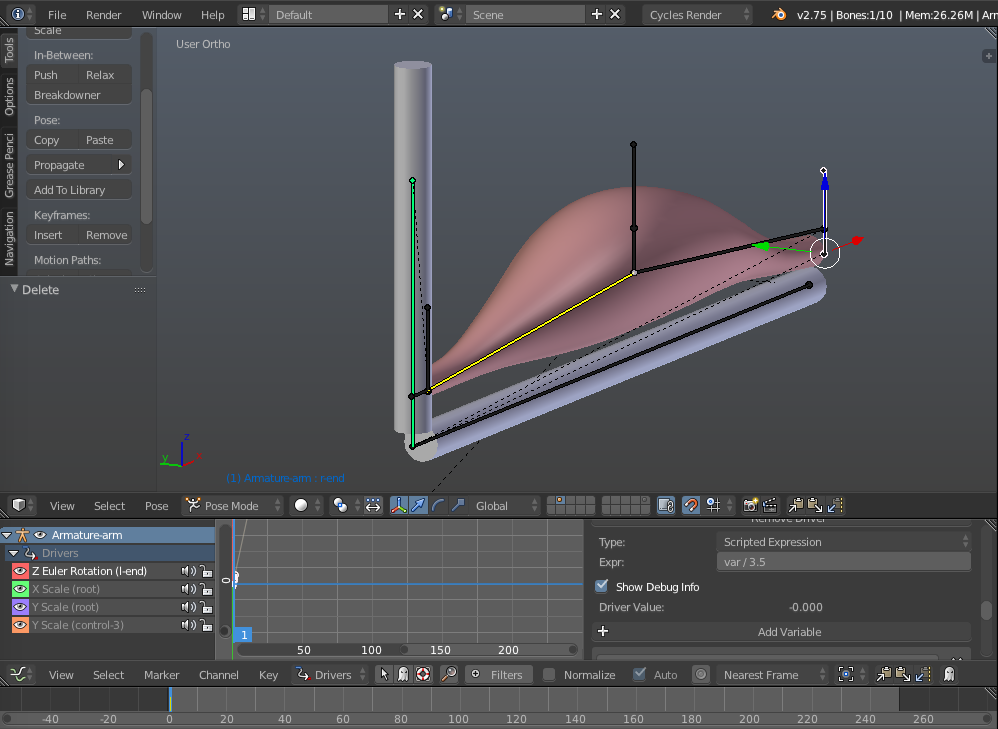
I have used Drivers to make objects, like rubber springs “bulge” as you compress them, the principle is to add a driver the the bones X and Z scale factors so they increase as you decrease the Y scale factor. It’s a workaround, but a nice routine to do this automatically would be nice.
For a muscle to do this I guess you would want it to grow only one side so it appears to be constrained on the “bone” side and does not grow through it. This would require either a system whereby the bone can be scaled differently in -X and -Z to what it is scaled in +X and +Z, or some method of constraining one side of the muscle. Maybe this would be a nice feature? I could certainly use different positive and negative scaling factors in some of my models.
Thinking about this further, can this kind of deformation be accomplished by using shapekeys to bulge the muscles as they shorten, I am no expert on shapekeys, so another view of this would be welcome.
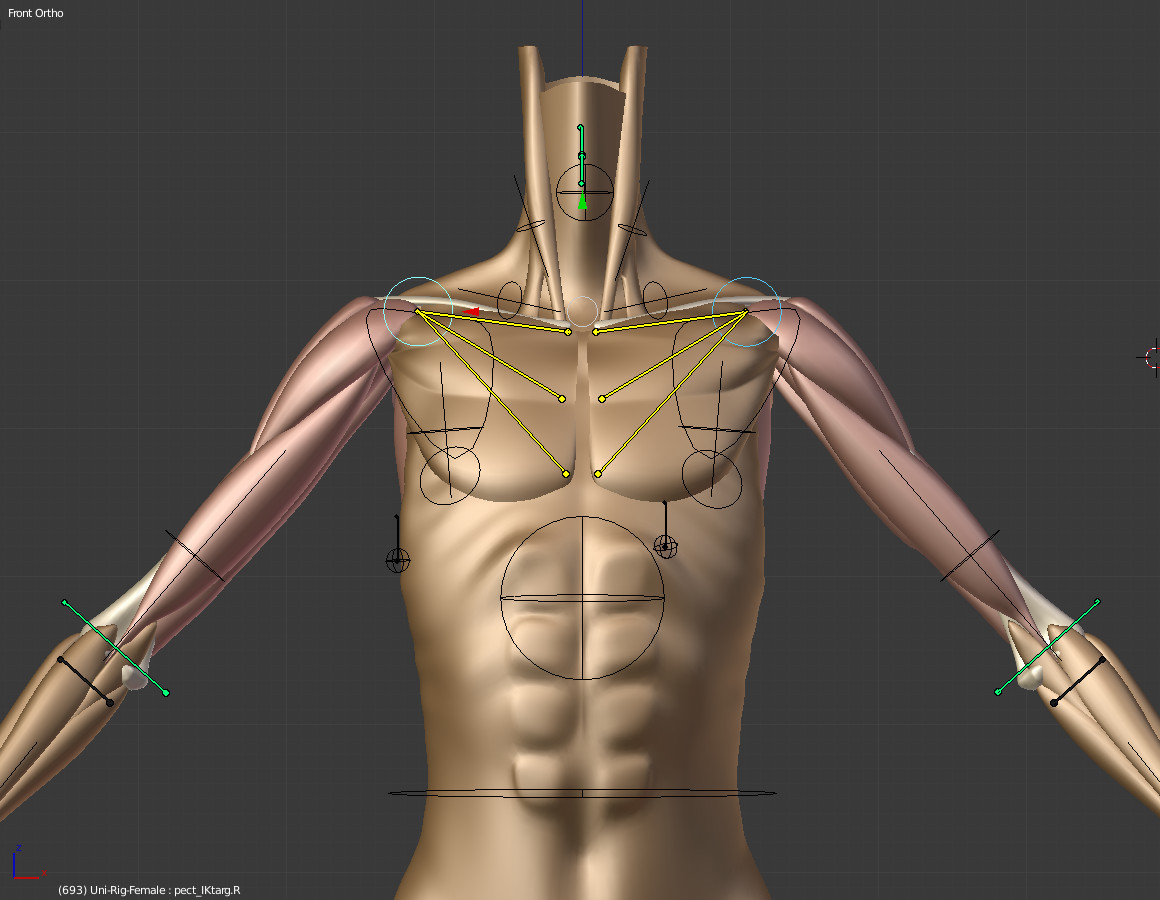
@ clockmender: My experiments & rigs have used Transformation constraints rather than Drivers, as they are more intuitive for me. The differential scaling of muscles is also fairly easily done – in most case the muscle is modeled in its extended (relaxed) form, and flexing of the joint the muscle is involved with causes a reduced scaling in Y (along the muscle’s long axis) in conjunction with an increased scale in X & Y, both of which are perpendicular to the Y axis of the muscle. Transform constraints provide this level of differentiation of effect as one of their prime functions. This is of course the simplest scenario, exemplified by the bicep muscle. Other muscles may need more complex treatments, for example the pectorals, which in my rig have a triad of constrained bones that always work in synch, transforming the bound mesh based on relocation of the point where the pectorals insert into the upper arm:
Stacked transformation constraints can provide a broad range of synchronicity of motions for such constructions. They also allow for synched transforms of multiple mesh elements, such as are needed in the shoulder joint:
When the shoulder is rotated, the constraints system automatically affects the pectorals, the trapezius, the collarbone, the armpit, the deltoids, and the scapular region in the back. Obviously careful & accurate weight painting is a critical factor in accomplishing this level of synched control. Auto-weighting is NOT an option
By setting these constraints at less than full influence, manual adjustment is also possible for fine-tuning of the deformation. The highlighted controls do this for the pectorals in my system. Most of my constrained bones have this manual option, but a few are fully constrained. In addition I have included bones that allow for positional shifts in certain muscles, again as a matter of fine-tuning a particular deformation.
It may need some more thinking about and refinement, but it would be nice if it were easier to setup, say as an add-on whereby you just set some control factors that fed into the Drivers rather than having to key them in all the time in the Graph Editor. I was trying principally to get more accurate control over the muscle than I had managed in the past, whilst keeping it from colliding/overlapping the bone. The meshes are very simple just too get an idea of what is happening.
I prefer Drivers myself, I find them much more predictable and controllable, since you can use many maths functions in the scripted expressions, just a personal preference. :yes:
Let me know what you think.
Cheers, Clock.
PS You will know that “Autorun Python Scripts” must be enabled in User Prefs for these Drivers to work.
EDIT:
I forgot to say - that’s a really nice muscle model you have there!
EDIT2:
Just realised I got one of the Drivers on a wrong bone axis - this should be better! :o
I really got my fill of Blender’s API & scripted math functions doing “Kata.” That effort predated the Transformation constraint (and a few others as well) so ALL my bone-bone interactions that were used to perform corrective deformations & early muscle imitation (on the surface mesh only, though) were accomplished via BlendScript. Now I don’t mind a little scripting but given 1) Blender’s tendency (at that time, before the API was overhauled) to divide functions among a number of active “spaces” and 2) a less than transparent API interface, it was, to say the least, a bit of a nightmare for a hobby coder. But, it DID work, at least for the most part.
The new set of constraints (somewhere around 2.5x iirc) did everything my scripts did and more, and were more intelligible to me. But I agree that scripted drivers are very powerful, and can see how they could be used for very similar purposes.
Thanks for the kind words on the muscle modeling. I recently did a fine-tuning & polishing on it to clean up some areas like the shoulders and thigh/hip joints, and should have it rendered out & up for viewing in a couple days.
Just found Kata on Vimeo - stunning work sir! It predates my involvement with Blender, I started in April 2014, so I never knew the pain you went through with earlier versions!
I look forward to the muscle update. I have always been a Maths fan, developing Gravity Models and Finite Element Analysis tools, based upon Matrix Algebra, for a living, hence the preference for Drivers.
Woah, I looked it up and that’s definitely a solid rig, deforms super well ! So eventually the mesh is just shrinkwrapped to the muscles ? I always assumed this approach wouldn’t work unless the mesh was lowres enough, for fear it would stick to all the creases between the muscles. Unless maybe a delta mush is added on top…
You’re correct, if the skin mesh is too dense in vertices it will not work well. Also, the skin mesh is not “just” Shrinkwrapped – it is driven by the same Armature as the muscle mesh and has much the same vertex weighting. As mentioned in the video, the muscles were built from the skin mesh, preserving much of the vertex weighting. Thus the Shrinkwrap need not have 100% influence, helping keep the skin floating easily above the surface. Usually, LOL. Under deformation it takes a lot of tweaking to get the vertices locations and weights to balance properly. One of the reasons this kind of system is not for the lazy or impatient
The principle goals of my system were to help deformation in problem areas like the shoulder by having the muscle mesh preserve volume and define deformed shapes better, and to also provide a more dynamic muscle definition than normal mapping provides. It also simplifies the use of soft body physics, as it can be applied to the separate portions of the muscle mesh instead of having to be carefully dispersed over the unit skin mesh.
“Delta mush” – what a GREAT term for what I really wish could be done! Vertex hopping, abrupt jumps from one muscle surface to another, is a real hassle to resolve, and a little mush would go a long way to softening that. But I know of no way short of major scripting/coding to accomplish it – it’s way beyond me. So I tweak & tweak & tweak…
Just a thought - given that there are no air spaces between skin and muscle in a human, hopefully, would it be possible to have some kind of squashy “filler” in the muscle boundaries where these issues occur? Perhaps physics could be used so this space is filled with a pliable mesh that deforms so it does not go inside the muscle, but keeps the skin on its correct profile. There may be no such facilities in Blender, but this could be a development for someone with good coding experience. It seems that this is one area where advanced anatomical modellers like Chip are “fudging” things to get what they want, but perhaps others with the coding abilities could make life easier for them. I have to say that my coding abilities do not stretch to this area of programming, or I would certainly have a go at it.
The other option would be to allow the Shrinkwrap modifier a little latitude when it comes across a “discontinuity” in the underlying structure, thus enabling a tolerance value to let the outer skin mesh “bridge” the areas between muscles. Has anyone tried to alter the Shrinkwrap, so it can work within a tolerance like this? It may be that it could look at the proximity of vertices and if it sees marked deviation between two or more vertices that it attempts to smooth the transition. How does that sound?
This picture should illustrate what I am rambling on about:
The two cylinders represent the muscles and the outer shape a mesh that represents the skin, the Shrinkwrap mod would allow the skin to move away from the underlying target mesh where it sees a big discontinuity of a certain depth over a specified distance, the user would then be able to choose how much the “skin” can move away from the underlying mesh where this occurs so a “smoothing” factor is introduced.
Makes sense, that’s probably why big studios use cloth simulations on top of their muscle rigs : they allow for this kind of smooth interpolation, and they add the wrinkles & stuff on top of it.
@chipmasque I didn’t make up this term, it’s an actual modifier in Blender ! It is called corrective smooth actually, you should try it, it might solve some of those issues… (delta mush is the same thing in other software)
This is exactly how I envision a “mush factor,” as a kind of viscosity to the Shrinkwrap influence to inhibit abrupt jumps. The vertices must flow over the muscles, it can’t be a fixed pinning, but a means of modulating that flow would be extremely valuable.
This would also help with the problem of trapped vertices – even with “Stay Above Surface” enabled, there are times when a vertex will abruptly jump inside the target mesh when undergoing deformation, leading to a “dimple” forming on the surface skin. Like hopping, it takes a lot of inspection and finessing to solve these little points of error.
Skin mesh topology is a critical factor in these considerations as well. By carefully adjusting the loops as they describe the skin’s contours, they can be placed to optimally respond to the underlying muscle “terrain,” making the fit more stable. But in areas like the shoulder where the deformations can be rather massive, that optimal fit is highly dynamic, with constantly shifting best solutions to the skin mesh geometry. So the only option is a lots of testing and a “best general fit” result.
Maybe we can get a programmer to look at this and see if it is possible to modify the Shrinkwrap tool. Over to the coders, lets see if we can come up with a workflow for this and put a proposal to Blender’s creators…
>Sigh< I really need time to get caught up on what’s new in Blender, but I get so buried in various kinds of technical and artistic problem-solving it’s difficult to come up for air. Thanks for that tip, I will definitely look into it.
I know the feeling, been out of the loop a bit myself.
Very interesting read so far.
At one time or another, I’ve tried muscle rigging with an all bone solution, but never really got anywhere with it.
But then again, I’ve never spent the time chipmasque has on this subject.
Having said that, the OP hasn’t posted back.
There is an add-on for some sort of muscle system on blender cookie, but I can’t find it. The site is too focused of selling me courses…
From what I’ve seen and played with, an all bone muscle rig would probably be the best foundation to build a muscle rig on. This way, you could take advantage of rigify’s code.
I’ve been thru the rigify code more than a few times, but it’s a bit above my programming skills.
Rigify is capable of handling very complex rigs, with the right scripts. But I haven’t been able to crack that code yet and create my own rig type for rigify.
I think highlighting the latest Weta developments sort of sums up my feelings on full blown muscle sims. Unless you have the RnD department and adequate staff to devote enough time to them. Full blown muscle sims are very hard to integrate effectively in most productions. I also feel that most of the time, budget or off the shelf muscle sims tend to draw attention to themselves too much and often look far from convincing. The pulsating jelly balloon look.
Some of the examples in Blender above are very impressive and commendable but has anyone tried to use these systems on a mid to small scale project with normal production deadlines?
I’ve never worked on any TV production or large scale Game cinematic that used full blown muscle sims. The time and set up and extra layer of complication is normally too prohibitive. It’s always been a mix of mainly joint driven shape keys or blend shapes and jiggle deformers. These can also be wired to sliders and other controls and adapted and animated for fast or slow movements on the fly. This can give really good and subtle reasonably convincing results when done well. It is also easy to finesse and control also keeps the rig fast and light to work with. It’s always been my preferred method by far.
If Blender was adapted by Weta or ILM as their main animation tool, then they would still be using their own proprietary muscle sims and other custom tech.
In Blenders case I always thought it should be reaching for a more flexible bones and armature system rather than a stand alone muscle sim. It would play to Blenders strength’s as a fast all in one production platform for small studios and teams. Looking at the new developments with B Bones I really think we are looking at the beginnings of a fast usable and very adaptable and flexible solution. Combined with some soft body dynamics ability’s B Bones could very probably become an amazing off the shelf muscle solution. As well as being capable of so much more.
Wow, can you spell condescending? Let’s all hand out backhanded compliments to people exploring various options, it makes for a much more positive atmosphere!
Personally, I’m not the least bit concerned with “normal production deadlines,” nor whether my R&D can be successfully applied to any but my own “small scale projects.” But, if nothing else, such individual, non-commercial, wholly impractical and to some seemingly worthless efforts can open up the possibilities, or lack thereof, a design approach may offer. But I guess bottom-liners only want solutions they can exploit right now. Deities forbid they actually devise their own solutions!
ohhh… I remember that there was a nice plugin for 3dsmax called metareyes. At that time it was already very interesting.
It would be nice to have something like that in blender.