Hello again everyone. I want you all to know that with your help I have officially been able to get away from Hexagon and work more with Blender. It has been great. I am still working on something as simple as a belt for my figure. This belt will be very circular as it is more robotic but that part isn’t important. What is important is that I am trying to get the belt 100% flush with my mesh. In the past I would make my circle and then move each point until it was just barely into the mesh. Unfortunately I still cant seem to get the belt tight enough for this reason. The belt is just a circle with thickness applied and I need it to stay a curve rather than a mesh so I can easily adjust things after. How do I get all points of a circle to perfectly fit an existing mesh? Thanks again for all of your help so far.
select the circle, go to modifiers, add a Shrink Wrap modifier, select the model u wish it to snap to, have fun.
note, you can NOT model outwards, so if u want to add volume to it then either add a solidify modifier AFTER the shirnkwrap OR apply the modifier before continuing.
Thanks so much for the reply. This is definitely how easy I want it to be, but the Modifier is doing weird things. It pushes some of the points on the z axis and makes the circle not straight at all. Is there any other way? I can get the circle flush with this modifier but then when I go to add my thickness to my curve it is not the same width as all of the others. I applied rotation and scale but it still dosnt work. Is there a different way to do this that the Shrink Wrap modifier or do I just need to tweak some settings on this modifier. Thanks again so much
To fix the Z-axis problem. Apply the shrinkwrap. Then in edit mode scale the circle to 0 on the z-axis, add another shrinkwrap modifier, and apply it. Lather, rinse, repeat. Each time you do that it brings it closer to straight.
To create an even thickness of the belt, in edit mode, select all, E to extrude, S to scale, Shift-Z to scale in just the X-Y plane, and scale it up big. Then Ctrl-R and click to cut an edgeloop in the new face loop, E for even width, and F to flip the direction if necessary. Slide the edge to where you need it and click. Then delete the outer ring of faces.
if u could give us the blend file then i can more easily assist you with your problem.
however, i suggest you try out the snapping tool, down in the middle there is a magnet, and next to that there is a dropdown thingy where you can set what it will snap to, form there, set it to Face.
also, tips, dont click the magnet, rahter set snapping to face, and when you wish to snap, simply hold down CTRL. you can kinda see it as caps lock, if u click the magnet its like pressing caps, but if u use CTRL its like holding down shift while typing.
now the workflow depends heavily on the model tho, so a screenshot or preferably the blend file would be GREAT for better being able to assist you.
I would post a blend file but I think the solution is already here. Using the snapping to face and holding CTRL is the by far the best thing I have seen. The only thing I am now running into is a ginormous amount of keys to hit for each point.
I select the point then press G, SHIFT + Z, And the hold CTRL. Is there any way to just disable the Z axis and then enable it again instead of hitting Shift + Z each time? I know I can use the manuipulator and just translate the x or y axis but I cant do both at the same time? I hope there is a way to do this without having to press shift + z.
Thanks to Finalbarage for the great snapping tips and thanks SkpFx for the scale the z axis to zero trick. I will be using that a lot in the future.
I think I’m set now. I played around with the manipulator and holding SHIFT while clicking on the Z axis will disable that axis. I can easily go to each point now and adjust the point. Hold SHIFT to constrain it, hold CTRL to snap it and then just repeat the process. I would love for their to be a manipulator similar to DAZ and Hexagon in the future but this workaround works just fine for me. Thanks again to everyone for their suggestions.
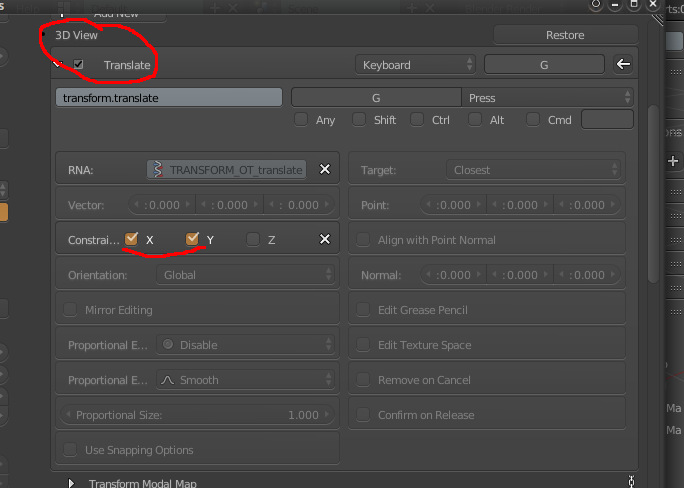
Also, if it’s easier, you can go into File->User Perferences->Input and search for “translate”. Under “3D View” translate is assigned to the G key. Check the constrain X and Y boxes. Just leave that window open and don’t click save settings. Click back into the main window to do your edits, and the window stays out of view so you can easily undo it when you’re finished.
alternative to the previous comment is to do G+Shift-Z
@finalbarrage, The OP asked “Is there any way to just disable the Z axis and then enable it again instead of hitting Shift + Z each time?”
ok sorry then, i didnt read everything.
Great suggestions everyone. I will use a bit of everything from this post. A task that would take me about 5 minutes in Hexagon now only takes me less than a minute with Blender. And with better results. The only thing its missing is a Daz to Blender bridge but I will continue to search for that or find a way to make it myself. Thanks again for all the help this is becoming really really fun.
I’m currently poking around at creating an importer for DAZ Genesis3…
https://blenderartists.org/forum/sho…o-Genesis3-Rig
It is far from being a finished project, but it might get you a long toward getting a rigged model.
NOTE: It was built in Blender 2.77a and it doesn’t work in the new 2.8 release candidates.
Really cool.