Hi
I have seen a couple of tutorials where there is a smooth transition between 2 materials, and this is essentially what i need, but the examples i have seen use some coordinate or vector to control the mix, and i need something less linear, because in my design there are lots of transitions back and forth between 2 materials on different locations on the object.
i was wondering whether there is some way to assign to each vertex some arbitrary value to be used as input for the mix, or some other way to achieve such flexible mapping.
Thanks!
Sounds like you are talking about texture splatting. I’m not entirely sure how to go about it with “arbitrary” mapping (any mapping choice will affect the outcome differently), but it seems that using masking textures with Add Shader to combine multiple Diffuse and other shader nodes would be possible. Greyscale masks would be used in the Factor input to control the expression of one or more Diffuse (etc.) nodes in the final shader output. The most effective mapping choice would be UV, I think, but that depends on a lot of circumstances.
Alternately (but perhaps more restrictive), using similar masks to modulate Color>Mix nodes before inputting to a shader node is something to explore.
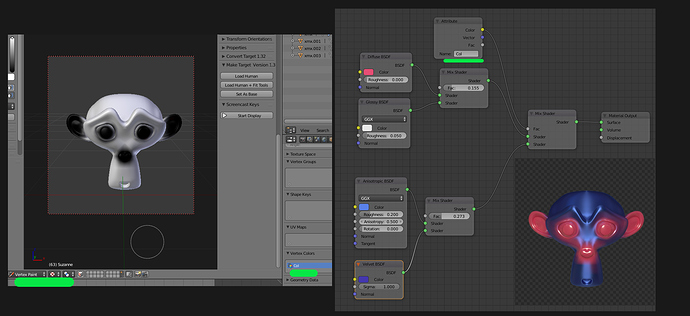
Yes, you can paint, in ‘vertex paint mode’, a black and white mask that can be used in the nodes (input, attribute, type in ‘Col’) ‘Col’ is the name by default of the first vertex paint data, that attribute is used a mix factor for whatever you want.
Here’s a demo of the technique in the attached .blend.
BlendingDemo.blend (888 KB)
There are two texture images - A and B, each with its own mapping to the cube. The application is controled by the vertex color layer called ‘Col’. Black vertices show image A, white ones show image B, and they blend in between.
Go to the Render view to see the effect in real time as you spin the cube.
Wayne
Hi.
To add to what Photox said, these are things you can use to be more precise with the weight of the vertices to generate the Vertex paint map:
You could also add a Color Ramp node after Attribute node to have better control of the transition.
Sorry, double post :spin:
I have been doing much the same procedure using greyscale masks produced in Texture Paint mode. This of course requires UV mapping for best results. Vertex Paint allows the “arbitrary mapping” aspect because it isn’t tied to a specific mapping process, just vertex location?
Yes, you can certainly use a uv mapped image for finer control on the mask in the same manner. In general use vertex mask for big, gross/quick stuff and an image texture for detailed stuff.
