Email account with 3 languages and manual

Dear Blender community.
I’m relatively new here and I like to present a small email account made with Blender 2.74 (started with 2.63 in multitexture mode) in GLSL shading mode.

Features
:

  • Contains emailin, emailout, draft, news and diary overview on one screen.
  • Camera rotation from overview screen to message screen and back.
  • Unreaden messages/news are marked with a red frame in the overview, already readen with a blue frame.
  • Progressive email account, e.g. you read your emailout and thereafter comes the answer to emailin. Then you read emailin and … so on.
  • The possibility to choose between 3 languages in the startmenu. I put english, german and spain.
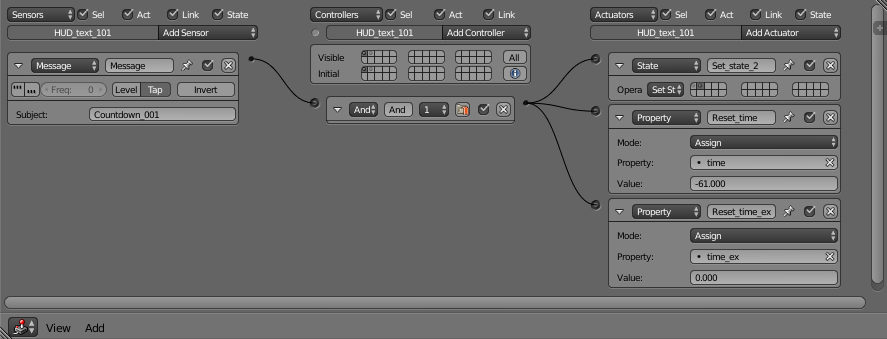
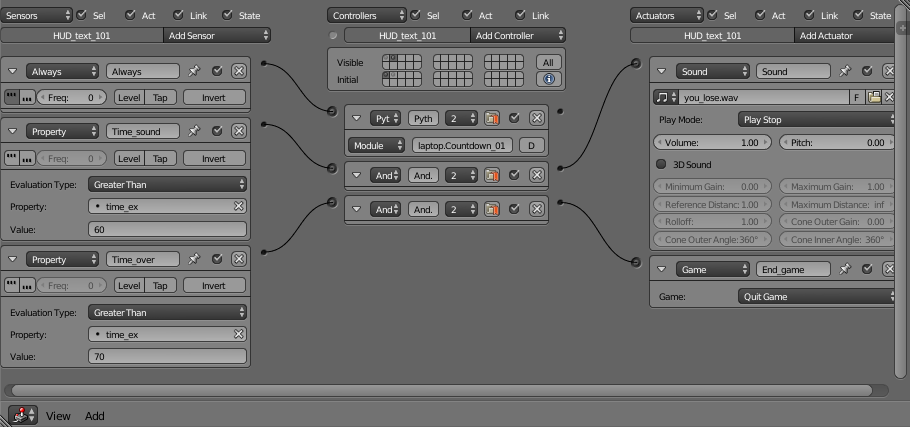
  • Countdown timer for sended messages from the draft is possible. It counts down in the laptop scene and also when you switch to the main scene. It can be used for limiting time of tasks starting from there.
  • There is no Save/load system, but the advances in the Laptop Overlay scene are permanent till you quit the game, because module mode is used.
  • With the first scene completed, in the Startmenu will be the possibility to load Scene 2 when you start the game. The advances in the first Laptop scene are moved to the second (laptop) scene. NOTE : The second laptop scene isn’t complete. You can use the same coding/methods as in laptop 1 to complete it.

I hope you enjoy (it).

Feel free to use it.
Feedback is welcome.
achisp

Revision history:
2016-12-14.: Email3lang_ex1stLvl_01.blend

2016-10-28.: Email3lang_11.blend

  • Code of the countdown timer optimized.

2016-10-27.: Email3lang_10.blend

  • The text of the timer has three language support now. (How to add this to your version see the NOTE 2 of “How to change the countdown time”)
  • Sound option added to the “game over” event of the countdown timer.
  • Contains the progress of Email3lang_09.blend.

2016-10-25/26.: Email3lang_06.blend, Email3lang_07.blend, Email3lang_08.blend and Email3lang_09.blend

  • Results of: Part 1 to Part 3B of “How to add an entry between others” of the Email3lang manual

    2016-10-25.: Email3lang_05.blend

  • fixed send button (2): the timer in the main scene can now only be trigger from draft_01.

20-Oct-16.: Email3lang_04.blend

  • fixed doorknocker in Home_player: now Mouse over works correctly.

19-Oct-16: Email3lang_03.blend

  • fixed send button: send for ticket now only from draft_01 possible.
  • added credits in the startmenu.
  • screenshot for main scene 1 activated.

18-Oct-16: Email3lang_02.blend

  • changed highlighting of the “Continue” button in the Startmenu: now only highlighted when available.
  • fixed diary: red frame now saved from Scene 1 to Scene 2

Contents of the manual

The Basis
The basic code
The startmenu -> 3111628The language selection
LaptopNotes about the laptop code
The logic of the normal entry from in between

How to add an entry between others -> 3112995

[INDENT=2]Notes about entries
[/INDENT]
Part 1 : Add Emailin 02

Part 2 : Add Emailin 022 to laptop_02 -> 3113001

Part 3 A : Save the red frame of emailin_frame_02 to emailin_frame_022

[INDENT=2]The logic for save the red frame to laptop 02
[/INDENT]
Part 3 B : Block Diary 01 till Emailin 02 is read -> 3113294
[INDENT=2]The logic for block the switch to scene 2
[/INDENT]
The countdown timer -> 3113299

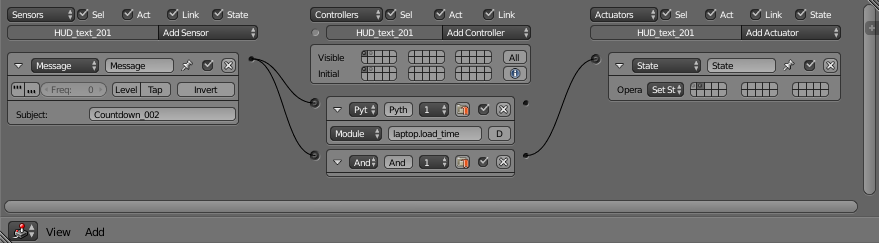
[INDENT=2]The same countdown time for two different scenes
[/INDENT]
[INDENT=2]How to change the countdown time
[/INDENT]
The main sceneThe switch to scene 2

General hints How to copy external data to Email3lang [NEW] -> 3129807

[INDENT=2]Change the appearance of the startmenu [NEW][/INDENT]
[INDENT=2]Prepare the main scenes to copy the new data [NEW]
[/INDENT]
[INDENT=2]Copy the new data [NEW]
[/INDENT]
[INDENT=2]Copy the logic bricks to your objects [NEW]
[/INDENT]
[INDENT=2] Adapt the new data [NEW]
[/INDENT]
ExampleExample of a first level with Email3lang [NEW] -> 3129809
Using a control scene

Providing sounds

[INDENT=2]Starting sounds
[/INDENT]
[INDENT=2]Toggle the background music on/off
[/INDENT]

Attachments

Email3lang_11.blend (1.29 MB)

Dear friends.
If you want to use Email3lang for your needs, you will have to further program it.
Change the text is easy, you can write what you want in the dictionaries in mess.py and it will appear in the laptop scene. But the when, how and where it appears, you have to program, if you don’t want to stay with the little I have preprogrammed. But luckily, you can copy the preprogrammed code, paste it where you need it and make some changes in and outside the pasted text to adapt it to your needs.

I like to write down something about the characteristics of Email3lang and about my experience with adding entries.
I hope it helps.


The Basis

Scene structure:

  • A startmenu, where the player can chose between three languages for the game, start new or continue with the second level. The last option is blocked till the first level is completed.
  • Two laptop scenes, one for level 1, one for level 2, where the player starts in the overview screen, from where he have access to the incoming/outgoing and old messages from the news, emailin, emailout and the diary or he can open the manual. New messages are marked with a red frame till they are read by the player. From the draft the user can send the message or not. Further is it possible to start a countdown timer when a button is pressed. When the player leaves the laptop scene he enters the main scene.
  • Two main scenes, the first contains the switch to enter the second level, i.e the second main scene. From the main scenes the player can open the laptop scene with the L key. The user of Email3lang have to develop the rest of the main scenes himself.
  • Two HUDs, one for laptop 1 and one for the main scene 1. The one for the main scene isn’t necessary yet, it would be enough to put a Textobject in the main scene where the HUD textobject is and quit the HUD. But when you add a moving camera to the main scene, that HUD will be necessary. Instead of the HUD of the laptop scene you can put two textobjects, one for the overview and one for the message screen. But then it would be necessary to add a third synchronized countdown timer.

Code structure:

  • The code is structured the most possible in the same order and the sections are named with a commentary, like “”" title_commentary “”".
  • The objects of the scenes with the same function are named similar, p.e. draft_frame_01, emailin_frame_02, emailin_frame_022, … So it is easier to change the names using the copy and paste method to add new entries or anything else.

The text:

  • The text for the messages is stored in three dictionaries, one for each language. It is easy to add, change or delete the text.
  • The text for the button titles are in the module files of the startmenu and the laptop scenes.

Saving/Storage:

  • The selected language is saved to/load from a textfile named lang.sav .
  • The laptop scenes use module mode, so the game progresses in there are stored till the player leaves the level.
  • The main scenes have nothing but the switch from level 1 to level two and a saveGlobalDict function to save some progress of laptop scene 1 to laptop scene 2.

### The basic code ###

All module files except mess.py start with import bge, a obligatory statement in module mode when Blender Python is used. mess.py contains only dictionaries, pure inbuilt Python, and don’t need this statement.

from mess import text_es, text_de, text_en
...
message_text_01['Text'] = text_es[12][1]

This code is inspired by https://blenderartists.org/forum/showthread.php?93213-calling-external-Python-scripts-from-internal-script post#1 / Monster, thank you.

The laptop files contain from mess import text_es, text_de, text_en, which imports the text from mess.py to use it here in the code as references, e.g. text_es[12][1] , where the numbers are the dictionary key and a list index.
In the dictionary (mess.py) one line is e.g.: 12: [“emailout_01”, “Hola Edith”],
where 12 is the key of the dictionary, followed by a list as dictionary value. emailout_01 is the index number 0 and Hola Edith the index number 1 of the list. So text_es[12][1] is Hola Edith .

message_text_01[‘Text’] = “string(s)” or message_text_01[‘Text’] = text_variable
The text_variable is in our case the reference to the dictionary, i.e. text_es[12][1]
Every Text object have the fix Text property [‘Text’], and we can set this property to the desired text like shown above. This will print on screen the text at the right side of the Textobject.
If you had edited the Textobject before, opened with Tab, written your text and closed with Tab, you will see that text always on screen. But it will be over written with the new Text property. If you have not set it before, the text will appear where before has been nothing, except the invisible Textobject. Beware that the Text object is in front of the objects in the Game, i.e. if it is behind a wall, you won’t see it if it appears.

cont = bge.logic.getCurrentController() is set one time. If a module functions needs this definition, it is enough to put cont in the parenthesis after the function name, e.g. def play(cont):

own = cont.owner defines the owner (= object) of the attached logic brick, here mostly the Python controller. If we use own in a module function, we need this definition and the cont definition (see above) at the beginning (before own ) in that module function.

scene = bge.logic.getSceneList()[0] is needed to make known (to the processor of the code) these objects, that we call from another object in one of the active scenes. The [0] is an index number, and 0 is the first active scene, 1 the second and so on.

Every object we call from another object is here defined, e.g. play_text = scene.objects[‘play_text’]

def init(): , set at the beginning of the module at indention level zero, contains the code we want to call at the start of this module, before the module functions are called.
Set at the beginning of a module function at indention level one, it contains the code we want to call at the start of this module function, before the code which depends of this initialization is called.
init() closes the initialization.


INITIAL_news_01_only_once = True
...
def newsback_01(cont):
    own = cont.owner
    propValue = own.get("news_01_only_once")

    if propValue is None:
        propValue = INITIAL_news_01_only_once
        own["news_01_only_once"] = propValue

This code is taken from https://blenderartists.org/forum/showthread.php?271514-Best-practices-for-unordinary-Properties-of-Objects&p=2236905&viewfull=1#post2236905 post#4 / Monster, thank you.

INITIAL_variable = value is another method to initialize in the module functions. It is set before the module functions at indention level zero, while the initialization is set in the module function at indention level one and higher, before the code of the module function which depends of this initialization is called.

MLang = message_text_01[‘lang’] defines MLang as the language variable we have loaded the last time from lang.sav to message_text_01[‘lang’] , i.e. en , de or es
MLang defines the language the player has selected before starting or continuing the game, and is used to print the selected language to the screen, e.g.


def news_title(cont):
...
    if MLang == 'es':
        news_title_01.text = "Noticias"
    if MLang == 'de':
        news_title_01.text = "Nachrichten"
    if MLang == 'en':
        news_title_01.text = "News"

So long,
achisp

### The Startmenu ###

### Fonts ###

In the startmenu is the WindsorBT-Roman font (TT0122M_.TTF) used. It is free, so far I know, so you can download it and use it. For a menu its a nice font.
To open a font select a text object in object mode (p.e. play_text of the start button), open the property editor -> object data tab (F) -> Font panel -> Regular and use the folder symbol to open the file/font browser. Open your desired font and then the selected text object will use this font. Further you can select this font by opening the pop up list at the left of the name field of the font panel.

The language selection

The empty object Control_start is the owner of def start_lang(): which controls the three language buttons in the startmenu and sets the language which is chosen in the startmenu or sets the default language (english).

First we need to set a language when the game starts the very first time, when only the blend exists in the user folder. The first code in def start_lang() make this.

def start_lang():
    try:
        file = open('lang.sav', 'r')
        toLoad = file.readline()
        Start_lang = toLoad
        file.close()
#        print('lang =', Start_lang)
    except:
        file = open('lang.sav', 'w')
        file.write('en')
        file.close()
        Start_lang = 'en'

This code is inspired by https://blenderartists.org/forum/showthread.php?202270-Save-Load-txt&p=1737688&viewfull=1#post1737688 Save/load text/post#10 / battery, thank you.

try: We try if lang.sav (the file where we save the language string) exists, because the very first time the game starts lang.sav do not exist.
If it exists, i.e. the game was started before, we load its content and write it to the property Start_lang

NOTE: print(‘lang =’, Start_lang) we can use for debugging, in this case we could see if a language string has been saved or nott, and which.
# print(‘lang =’, Start_lang) is deactivated, delete the # and it’s activated.

except: If lang.sav do not exist, we create it with open(‘lang.sav’, ‘w’) and write en to it. We close the file and then we set the property Start_lang to en , i.e. Start_lang = ‘en’ . So the game starts default the very first time with english if the user do not chose another language, i.e. starts without chosing.
When the user has used one time the game and later on, lang.sav, the textfile where we save the language variable, exists in the user folder. From then on we need to save the language variable every time when the user change it. The old value will be overwritten with the new one. And we load it from lang.sav when needed, e.g. before the start or the continue of the game.

if Start_lang == 'es':
Back_es_off['es_on'] = True
Back_de_off['de_on'] = False
Back_en_on['en_on'] = False
Back_es_off.replaceMesh('back_es_on')
Back_en_on.replaceMesh('back_en_off')

Here we chose the mesh of the language buttons to show which is selected. There are two kinds, one for the selected language (frame mesh) and one for the not selected languages (plane mesh).
Back_es_off[‘es_on’] = True is for the selected button, Back_de_off[‘de_on’] = False for the not selected.
Back_es_off.replaceMesh(‘back_es_on’) replaces to the frame mesh, Back_en_on.replaceMesh(‘back_en_off’) replaces to the plane mesh.
The same is done with if Start_lang == ‘de’: and if Start_lang == ‘en’:, but the replace mesh part isn’t needed for english, because it is the default mesh setting.

The next code is for the language buttons in particular.

The Spainish button


def es_off(cont):
    own = cont.owner

    mOver = cont.sensors["MOver"]
    mLeft = cont.sensors["MLeft"]

    if mOver.positive and mLeft.positive and own['es_on'] == False:
        own.replaceMesh('back_es_on')
        own['es_on'] = True
        Back_en_on['lang'] = "es"

Here we ask on Mouse button click over Back_es_off mOver.positive and mLeft.positive with the property Back_es_off[‘es_on’] if if the spanish button is not selected == False. And if it is so, we replace the plane mesh with the frame mesh, own.replaceMesh(‘back_es_on’ ). Next, we set the property Back_es_off[‘es_on’] = True and the language variable Back_en_on[‘lang’] = “es” . The later we save to lang.sav :


        file = open('lang.sav', 'w')
        toSave = str(Back_en_on['lang'])
        file.write(toSave)
        file.close()

This code is taken from : https://blenderartists.org/forum/showthread.php?220469-How-to-save-property-to-text-and-load-it&p=1872936&viewfull=1#post1872936 How to save property to text and load it/post#2 / battery, thank you.

to be present in lang.sav when later the language variable is asked and loaded to select the language.

To set the Button titles in spainish:


        play_text['Text'] = "Iniciar"
        cont_text['Text'] = "Continuar"
        quit_text['Text'] = "Salir"

Finally we replace the meshes of the other two languages to plane meshes (not highlighted) and set their properties: [‘de_on’] respectively: [‘en_on’] to False: = False (not selected):


        Back_de_off.replaceMesh('back_de_off')
        Back_de_off['de_on'] = False
        Back_en_on.replaceMesh('back_en_off')
        Back_en_on['en_on'] = False

The German button def de_on(cont): and the English button def def en_on(cont): work similar.


### Laptop ###

### Notes about the laptop code ####

### The elements of the laptop scene ####

  • overview screen
  • message screen
  • camera
  • entry back
  • entry frame
  • red and blue entry frame
  • Text object
  • Send, back, quit and manual buttons
  • countdown timer
  • switch to scene 2
### block and only once ####

block , p.e. emailin_back_02[‘ei_block_02’] blocks an entry (with or without title on the screen) to be entered by clicking on it. We don’t write the code for the entries while the player is playing, we have it written before. So the code is waiting to be activated by clicking (and Mouse over) the ‘entries back mesh’. But Email3lang is progressive, i.e. the player have to read/do first one thing to open/read/do then the next one. And so on … So we block the prewritten code till the player has reach the moment to open/use it. We will also use other blocks, with other names, but this block block comes/works together with only_once .

block is contrary to only_once . block is initialized = False , only_once = True. When block is set to True, normally it will stay True (don’t block never more), and when only_once is set to False, it will stay False (don’t be activated never more).
only_once , p.e. emailin_back_02[‘ei_02_only_once’] is for the first time when the player enters an entry. This first time change the own frame to blue, triggers the red frame of the next entry, … . But the next times when the player enters the same entry (the second, third and so on … time) we don’t want to trigger the red frame of the next entry, … . So we create a property to have a special first time. When the code of the first time is processed, at the end we have own[‘ei_01_only_once’] = False # to close the first visit , which sets this property to False. Now the code beneath the line if mOver.positive and mLeft.positive and own[‘ei_block_02’] == True and own[‘ei_02_only_once’] == True: will no more executed (till you set own[‘ei_02_only_once’] = True, but you won’t).

### The logic of the normal entry from in between ###

An example :

It shows the logical part of the the “in between” entry Emailin 01 and its relevant code from def init() and “”" Emailout 01 logic “”".


...
def init():
    ...
        ...
        # Initialization of <b>ei_block_01</b> to FALSE if it doesn't exist
        emailin_back_01['ei_block_01'] = False
        ...
...
    """ Emailout 01 logic """
    ...
    # First visit
    if mOver.positive and mLeft.positive and own['eo_block_01'] == True\
    and own['eo_01_only_once'] == True:
        ...
        # Sets the Emailin 01 frame to red = unread
        emailin_frame_01.replaceMesh('frame_red_01')
        # Opens Emailin 01
        emailin_back_01['ei_block_01'] = True
        ...
...
    """ Emailin 01 logic """

    # Initialization of <b>ei_01_only_once</b> to TRUE if it doesn't exist
    propValue = own.get("ei_01_only_once")
    if propValue is None:
        propValue = INITIAL_ei_01_only_once
        own["ei_01_only_once"] = propValue

    # setting the title of the next entry Draft 01
    if mOver.positive and mLeft.positive and MLang == 'es' and own['ei_01_only_once'] == True\
    and own['ei_block_01'] == True:
        draft_title_01.text = "Bilettes
de Entrada"
    ...

    # Here are <b>block</b> and <b>only_once</b> together = only first visit
    if mOver.positive and mLeft.positive and own['ei_block_01'] == True\
    and own['ei_01_only_once'] == True:
        # Replace its own frame from red to blue = entry is read
        emailin_frame_01.replaceMesh('frame_blue_01')
        # Replace the frame of the next entry to red = entry isn't read yet
        draft_frame_01.replaceMesh('frame_red_01')
        # Opens the next entry Draft 01 so the player can enter it the first time
        draft_back_01['draft_block_01'] = True
        # After the first visit <b>ei_01_only_once</b> is always FALSE
        own['ei_01_only_once'] = False # to close the first visit

I hope it helps.
achisp

### How to add an entry between others ###

NOTE : The process from “How to add an entry between others - Part 1 + 2” can also be used to add a new entry behind the other ones. In this case you won’t have to change elements number(s) in mess.py like we will do here with diary_01 nor change “”" Diary 01 text “”" in laptop.py, you just add your new text behind the last text entry of the email account in mess.py. And you won’t need “How to add an entry between others - Part 3”.

NOTES ABOUT ENTRIES : If you use an entry from in between as the last entry, you can cut the extra code and paste it to the one before, because it is now missing there for not being more the last entry and the now last no need it for being the last.
The normal entries from in between are the same, excepting for the different names and numbers. The first and the last entry in the logic *, also the entries from in between from where you open the scene switch or from where you start the countdown timer or which save their red frame to scene 2 have extra code and could miss other.

  • The logical order can be different from the succession you see on the screen.
    In the module file (and also in the script file) it is necessary to write the code in the logical order, because the interpreter reads and processes the code from above downwards. An exception are the module functions, he read them when they are called. So their logical order is the order in which we call them. The code in each of the called ones is naturally read from above downwards.

\

We will now make a new Emailin entry, and put it in the logic between the Draft and the Diary entry, so we have to change also parts of the draft entry and the diary text reference.

### Part 1 of How to add an entry between others ###

### “”" Add Emailin 02 “”" ###

The start blend: Email3lang_05.blend (is at the bottom of this post)

Open the Email3lang_05.blend and the Laptop_01 scene.

### Connect Logic bricks to emailin_back_02 ###

Select emailin_back_02 in Object mode, open the logic editor and add two Mouse sensors and a Python controller. Connect them all together. Rename the first Mouse sensor to MLeft, and the second to MOver. Change the Mouse event from the second sensor from Left button to Mouse over.
Set the Python controller to Module mode and enter in the Name field: laptop.eiback_02

### Change laptop.py ###

Open the texteditor and in there laptop.py.

### Create “”" Emailin 02 “”" ###

Go to “”" Send 01 “”" and write above the title: “”" Emailin 02 “”". Go to “”" Emailin 01 “”" and copy all from def eiback_01(cont): to ‘own[‘ei_01_only_once’] = False # to close the first visit’ and paste it under “”" Emailin 02 “”".
Change def eiback_01(cont): to def eiback_02(cont): , “”" Emailin 01 text “”" to “”" Emailin 02 text “”" and so on till the end of the copied block, except of 3 times message_text_01 (at the beginning) and frame_blue_01 and frame_red_01 (at the end), don’t change them. Now all others 01 's are changed to 02 's in this copied block.

NOTE : It is important to change all the indicated 01 to 02 's, because if p.e. emailin_frame_01 and emailin_frame_02 exists, some times there isn’t an error message in the console if the error is a 01 instead of a 02 , and it could be hard to find.

### Initialize Emailin 02 properties ###

Now go up to the top to “”" Camera “”". Above you will find INITIAL_ei_01_only_once = True , copy it, paste it under INITIAL_diary_01_only_once = True , and change it to INITIAL_ei_02_only_once = True .
More above in def init() you will find emailin_back_01[‘ei_block_01’] = False , copy it, open underneath a new line and paste it there. Change it to emailin_back_02[‘ei_block_02’] = False .

### Add Emailin 02 objects to getSceneList() ###

Once more up in getSceneList() copy emailin_title_01 = scene.objects[‘emailin_title_01’] , emailin_back_01 = scene.objects[‘emailin_back_01’] and emailin_frame_01 = scene.objects[‘emailin_frame_01’] , open underneath a new line and paste it there. Change 6 times 01 to 02 in the copied block.

### Change “”" Emailin 02 text “”" ###

Back to “”" Emailin 02 “”" go to “”" Emailin 02 text “”", change text_es[2][1] to text_es[4][1], text_de[2][1] to text_de[4][1] and text_en[2][1] to text_en[4][1] .

### Change “”" Diary 01 text “”" and Diary 012 text ###

Go down to “”" Diary 01 text “”" and change text_es[4][1] to text_es[5][1] , text_de[4][1] to text_de[5][1] and text_en[4][1] to text_en[5][1] .
Open laptop2.py and go to def diary_012(cont): . Do here the same as above in “”" Diary 01 text “”".

### Add Emailin 02 text in mess.py ###

Open mess.py and add in EACH language 4: [“emailin_02”, ], above from 4: [“diary_01”, “…”], and change the last to 5: [“diary_01”, “…”],


   3: ["draft_01", "..."],
   4: ["emailin_02", ],
   5: ["diary_01", "..."],

Insert in Espanjol (spanish) the first, in Deutsch (german) the second and in english the third text block, each one after [“emailin_02”, and before ],

"Hola Bernardo.

Lo siento pero voy a venir 15 minutos mas tarde.

Espera me por favor ante el Astoria.


Hasta pronto"

"Hallo Bernard.

Es tut mir leid, aber ich komme 15 Minuten spaeter.

Warte bitte auf mich vor dem Astoria.


Bis gleich"

"Hello Bernard.

I’m sorry but I come 15 minutes later.

Please wait for me in front of the Astoria.


See you soon"

### Cut draft_title_01 block, paste it to draft and change it to emailin_title_02 block ###

Open laptop.py and go to “”" Emailin 02 logic “”", cut the block from if mOver.positive and mLeft.positive and MLang == ‘es’ and own[‘ei_02_only_once’] == True and own[‘ei_block_02’] == True: until draft_title_02.text = “Cine tickets” and go up to “”" Draft 01 logic “”". Paste it here underneath of # print(own[“draft_block_01”])
In this block change 3 times [‘ei_block_02’] to [‘draft_block_01’] (you can copy draft_block_01 from here and paste it three times over ei_block_02 in the pasted code block); change three times ei_02_only_once to draft_01_only_once and change three times draft_title_02.text to emailin_title_02.text .
Now change Bilettes
de Entrada
to Retraso , Eintrittskarten to Verspaetung and Cine tickets to Lateness

### Cut “”" Emailin 02 logic “”" and paste it to “”" Draft 01 logic “”" ###

Go down to “”" Emailin 02 logic “”" and under the line if mOver.positive and mLeft.positive and own[‘ei_block_02’] == True and own[‘ei_02_only_once’] == True: cut draft_frame_02.replaceMesh(‘frame_red_01’) and draft_back_02[‘draft_block_02’] = True , go up to “”" Draft 01 logic “”" and paste it under draft_frame_01.replaceMesh(‘frame_blue_01’) . In the cutted block change [‘draft_block_02’] to [‘ei_block_02’] and then change two times draft to emailin .

### End of the first part ###

Open the Startmenu scene and test it now. If you have done all right, it should work.
If not, look in the console for error messages. Remember that you can activate #print(…) when debugging. I recommend not to activate all, would be a chaos, but test one by one what could be wrong using the correspondent print(…) command or write your own if you think it will miss.
NOTE : To test it you have to start with the Startmenu scene.

If it still don’t work and you are tired to search the error, open Email3lang_06.blend (it’s beneath), open the texteditor and in there latop.py. Use Text -> Save as and save it over laptop.py of your Email3lang_05.blend. If the last don’t exists (because you have never saved it), don’t worry, paste it anyway. In the later case open your Email3lang_05.blend, and the texteditor, and then Text -> Open textblock and open the just pasted laptop.py. Now test again and if it works save your .blend and if you like to also the laptop.py with Save as (The last you don’t have to do). In the other case, i.e. you have overwritten your old laptop.py, open your Email3lang_05.blend, and the texteditor, and then Text -> Reload, test it and if it works save your .blend.
If it still don’t work, do the same with mess.py,
or easier, load the Email3lang_05.blend.

### The result ####

Attachment : Email3lang_06.blend (at the bottom)

Laptop scene 01 is ready, but in Laptop scene 02 is missed the title, the camera rotation to the message screen and the message of Emailin 02. This will be the next we will do.

### The next ####

In “Part 2 of How to add an entry between others” we will add Emailin 022 to Laptop_02.

I hope it helps
achisp

Attachments

Email3lang_06.blend (1.28 MB)Email3lang_05.blend (1.27 MB)

### Part 2 : Add Emailin 022 to laptop_02 ###

### Create “”" Emailin 022 “”" ###

Open your blend with Part 1 finished or Email3lang_06.blend and then with the texteditor laptop2.py.
Go to “”" Manual 012 “”" and write above the title: “”" Emailin 022 “”". Go up to “”" Emailin 012 “”" and copy all from def ei_back_title_012(cont): to cam_rot(cont) and paste it under “”" Emailin 022 “”".
Change def ei_back_title_012(cont): to def ei_back_title_022(cont): and def ei_back_012(cont): to def ei_back_022(cont): .
Now change own.text = “De Edith” to own.text = “Retraso” , own.text = “Von Edith” to own.text = “Verspaetung” and own.text = “From Edith” to own.text = “Lateness” .
And change 3 times text_es[2][1] to text_es[4][1]

### Change the element number of the Diary 012 text ###

Go up to diary_012 and change text_es[4][1] to text_es[5][1] , text_de[4][1] to text_de[5][1] and text_en[4][1] to text_en[5][1] .

### Connect Logic bricks to emailin_back_022 and emailin_title_022 ###

Open the scene Laptop_02 and select emailin_back_022 in Object mode, open the Logic editor and add two Mouse sensors and a Python controller. Connect them all together. Rename the first Mouse sensor to MLeft, and the second to MOver. Change the Mouse event from the second sensor from Left button to Mouse over. Then set the Python controller to Module mode and enter in the Name field: laptop2.ei_back_022.
Select emailin_title_022 and add an always sensor and a Python controller. Connect them together. Set the Python controller to Module mode and enter in the Name field: laptop2.ei_back_title_022.

### End of the second part ###

Open the Startmenu scene and test it now. I hope it works.

### The result ####

Attachment : Email3lang_07.blend (at the bottom of this post)

When the player sends the message to buy the tickets the first time he enters Draft 01, Emailin 02 and Diary 01 are unread. The player can leave now scene 1, the scene switch is triggered by sending the message, and enter main scene 2 and laptop scene 2. In the later Diary 012 has now a red frame and Emailin 022 has a blue one, but the player have never read it. This will we change next.

### The next ###

Now I will show two different ways from this point to finish this chapter:

  • Part 3 A : Save the red frame of emailin_frame_02 to emailin_frame_022
  • Part 3 B : Block Diary 01 till Emailin 02 is read.

### Part 3 A of How to add an entry between others ### ### Save the red frame of emailin_frame_02 to emailin_frame_022 ### This way the player can read the Emailin 02 after he has read Draft 01, and the Diary 01 entry after he has send from Draft 01 the message to buy the tickets. Or, if he sends the message the first time he enters Draft 01, and when he lefts, he can read both. But he don't have to read them to complete the level. By sending the message the switch to scene 2 is opened and the countdown timer is triggered. We could alternatively program that the player have to read Diary 01 to open the switch to scene 2 instead by sending the message, but here we won't.

### Copy from Diary 012 the relevant code and adapt it ###

Open your blend with Part 2 finished or Email3lang_07.blend and then laptop2.py with the text editor. Go to def diary_012(cont): , copy from diary_frame_012.replaceMesh(‘frame_blue_012’) to # print(bl.globalDict[‘diary_block_01’) . Go down to def ei_back_022(cont): , open a new line under if mOver.positive and mLeft.positive: and before cam_rot(cont) and paste the copied block. In it change 7 times diary to emailin , then two times emailin_block_01 to ei_block_02 and three times 012 to 022 , but don’t change frame_blue_012 .

### Add Emailin 022 objects to getSceneList() ###

Go to the top of the module file and copy diary_back_012 = scene.objects[‘diary_back_012’] and diary_frame_012 = scene.objects[‘diary_frame_012’] and paste it underneath. Change in the copied block 4 times diary to emailin and 4 times 012 to 022 .

### Add emailin_check_01 ###

Go a little downwards to bl.loadGlobalDict() and copy from diary_back_012[‘diary_check_01’] = bl.globalDict[‘diary_block_01’] to diary_frame_012.replaceMesh(‘frame_blue_012’) , paste it underneath and change 4 times diary_back_012 to emailin_back_022 , 4 times diary_check_01 to emailin_check_01 , one time diary_block_01 to ei_block_02 and 2 times diary_frame_012 to emailin_frame_022 .

### Copy from “”" Diary 01 logic “”" the relevant code and adapt it ###

Open laptop.py and go to “”" Diary 01 logic “”". Copy from own[‘diary_check_01’] = False to bl.saveGlobalDict() . Go up to “”" Emailin 02 logic “”" and paste it underneath from emailin_frame_02.replaceMesh(‘frame_blue_01’) . Change 3 times diary to emailin and then one time emailin_block_01 to ei_block_02 .

### Copy from “”" Send 01 “”" the relevant code and adapt it ###

Now go a little down to “”" Send 01 “”" and copy from bl.globalDict[‘diary_block_01’] = diary_back_01[‘diary_block_01’] to # print(bl.globalDict[‘diary_block_01’]) , go up to “”" Draft 01 logic “”" and paste it underneath from emailin_back_02[‘ei_block_02’] = True . Change 3 times diary_block_01 to ei_block_02 , and 1 time diary_back_01 to emailin_back_02 in the copied block.
NOTE : The difference between Diary 01 and Emailin 02 is that Diary 01 is opened when the player sends the message to buy the tickets, while Emailin 02 is opened when the player enter Draft 01. But you can change it to your needs reprogramming it.

### End of the part 3 A ### Open the Startmenu scene and test it. If it works, you have completed the entry with the first final part. Congratulations.

### The result ####

Attachment : Email3lang_08.blend (at the bottom)

### The logic for save the red frame to laptop 02 ###

An example from Email3lang_09.blend:

NOTE : The difference in Email3lang_08.blend is that Diary 01 is opened by the sending of the cine ticket message instead by entering “”" Emailin 02 logic “”", so that part of the code is in def send(cont): .

The relevant code of laptop.py :


def init():
    ...
        ...
        # Initialization of <b>own['diary_block_01']</b>
        # The player can't enter Diary 01 until ['diary_block_01'] = True
        draft_back_01['diary_block_01'] = False
        ...
    ...

    """ Emailin 02 logic """
    ...

    # First visit
    if mOver.positive and mLeft.positive and own['ei_block_02'] == True\
    and own['ei_02_only_once'] == True:
        ...
        # Opens Diary 01
        diary_back_01['diary_block_01'] = True
        ...
        # Saves <b>diary_back_01['diary_block_01']</b> to <b>GlobalDict['diary_block_01']</b>
        # Now Diary 01 is open, but unread = red frame (diary_block_01 = True)
        bl.globalDict['diary_block_01'] = diary_back_01['diary_block_01']
        ...
        # Saves the GlobalDict
        bl.saveGlobalDict()
        ...
    ...

    """ Diary 01 logic """
    ...

    # First visit
    if mOver.positive and mLeft.positive and own['diary_block_01'] == True\
    and own['diary_01_only_once'] == True:
        ...
        # Initialization of <b>own['diary_check_01']</b>
        own['diary_check_01'] = False
        # Saves <b>own['diary_check_01']</b> to <b>GlobalDict['diary_block_01']</b>
        # Now Diary 01 is read and the frame will be blue (diary_block_01 = False)
        bl.globalDict['diary_block_01'] = own['diary_check_01']
        bl.saveGlobalDict()

The relevant code of laptop2.py :


# Loads the GlobalDict
bl.loadGlobalDict()
# Loads <b>globalDict['diary_block_01']</b> to <b>diary_back_012['diary_check_01']</b>
diary_back_012['diary_check_01'] = bl.globalDict['diary_block_01']
# Sets the red or blue frame to <b>diary_back_012</b>
if diary_back_012['diary_check_01'] == True:
    diary_frame_012.replaceMesh('frame_red_012')
if diary_back_012['diary_check_01'] == False:
    diary_frame_012.replaceMesh('frame_blue_012')
...
def diary_012(cont):
    ...
    # When player enters Diary 012
    if mOver.positive and mLeft.positive:
        diary_frame_012.replaceMesh('frame_blue_012')
        # Now Diary 012 is read
        own['diary_check_01'] = False
        # Saves <b>own['diary_check_01']</b> to <b>GlobalDict['diary_block_01']</b>
        # So the frame stays blue the next time when <b>GlobalDict['diary_block_01']</b> is loaded
        bl.globalDict['diary_block_01'] = own['diary_check_01']
        bl.saveGlobalDict()
        ...
    ...
...

NOTE : I have created diary_check_01 to distinguish it from diary_block_01’ , but I have saved both to/loaded from globalDict[‘diary_block_01’] , because their value is the same at the same time in the module file.

### The next ####

In “Part 3B of How to add an entry between others” we will block Diary 01 till Emailin 02 is read, another way to finish this chapter.

I hope it helps
achisp

Attachments

Email3lang_07.blend (1.28 MB)Email3lang_08.blend (1.29 MB)


### Part 3 B of How to add an entry between others ###

### Block Diary 01 till Emailin 02 is read ###

This is the other way to complete this chapter. The player have to read first Emailin 02 before The Diary 01 entry appears and is readable. So we have to block Diary 01 and open it when Emailin 02 is read. Also we will block the switch to scene 2 until the player has read Emailin 02 (and has sent the message from Draft 01).
If we won’t do the next to the last, and the player sends the message when he enters Draft 01 the first time, he could go to Scene 2 without reading Emailin 02 and Diary 01 (because the trigger to open the switch to scene 2 is on the send button, and the send button is blocked till the player has entered Draft 01). So we would need to save the red emailin_frame_02 to emailin_frame_022. And further more, in laptop scene 1 wouldn’t be the title of Diary 01, in laptop scene 2 it would be if we won’t change that too (or we won’t care about the last).

### Set the logic for the diary_title_01 in Emailin 02 ###

Open your blend with Part 2 finished or Email3lang_07.blend and then open in the text editor laptop.py. Go to “”" Draft 01 logic “”" and copy from if mOver.positive and mLeft.positive and MLang == ‘es’ and own[‘draft_01_only_once’] == True and own[‘draft_block_01’] == True: to emailin_title_02.text = “Lateness” . Go down to “”" Emailin 02 logic “”" and paste it underneath of own[“ei_02_only_once”] = propValue . Change 3 times draft_01 to ei_02 , 3 times draft_block_01 to ei_block_02 and 3 times emailin_title_02 to diary_title_01 in the copied block. Change Retraso to Cinema , Verspaetung to Kino and Lateness to Cine .

### Place diary logic from “”" Send 01 “”" to “”" Emailin 02 logic “”" ###

Go down to “”" Send 01 “”" and cut from diary_frame_01.replaceMesh(‘frame_red_01’) to # print(bl.globalDict[‘diary_block_01’]) . Go up to “”" Emailin 02 logic “”" and paste it under emailin_frame_02.replaceMesh(‘frame_blue_01’) .

### Clean “”" Send 01 “”" ###

Go down to “”" Send 01 “”" and delete from if MLang == ‘es’ and message_send_but_01[‘get_train_01’] == True and draft_back_01[“draft_01_check”] == True: to diary_title_01.text = “Cine” .

### Block the switch to scene 2 until the player has read Emailin 02 (and has sent the message from Draft 01) ###

Go to the top to def init(): and copy emailin_back_02[‘ei_block_02’] = False , go a little down to message_send_but_01[‘cine_tic_02’] = False and paste it underneath. In the pasted line change ei_block_02 to open_scene2 . Copy emailin_back_02[‘open_scene2’] = False .

Go down to Emailin 02 logic, open a new line underneath from diary_back_01[‘diary_block_01’] = True and paste it. Change emailin_back_02 to own and False to True . From underneath copy bl.globalDict[‘diary_block_01’] = diary_back_01[‘diary_block_01’] , open a line underneath and paste it. Change 2 times diary_block_01 to open_scene2 , and change diary_back_01 to own .

Now copy bl.globalDict[‘open_scene2’] = own[‘open_scene2’] and bl.saveGlobalDict() , go to the top to def init(): and paste it underneath from emailin_back_02[‘open_scene2’] = False . Change own to emailin_back_02 .

Open Playhome.py and go to def init(): . Copy own[‘set_scene2’] = False and own[‘set_scene2’] = bge.logic.globalDict[‘cine_tic_02’] and paste it underneath. Change the second cine_tic_02 to open_scene2 . Change 2 times set_scene2 to set_scene2a and 2 times set_scene2 to set_scene2b . Like this :


        ...
        own['set_scene2a'] = False
        own['set_scene2b'] = False
        own['set_scene2a'] = bge.logic.globalDict['cine_tic_02']
        own['set_scene2b'] = bge.logic.globalDict['open_scene2']
    def Update():
        if mOver.positive and mLeft.positive and own['set_scene2a'] == True\
        and own['set_scene2b'] == True:
            ...

Now add after if mOver.positive and mLeft.positive and own[‘set_scene2’] == True the code and own[‘set_scene2’] == True , add after the first set_scene2 an a and after the second a b , like shown above.

### End of the part 3 B ###

Open the Startmenu scene and test it.
If it works, you have completed the entry with the second final part. Congratulations.

### The result ####

Email3lang_09.blend (at the bottom of this post)

### The logic for block the switch to scene 2 ###

An example from Email3lang_09.blend:

The relevant code of laptop.py :


def init():
    ...
        # Initialization of <b>message_send_but_01['cine_tic_02']</b>
        message_send_but_01['cine_tic_02'] = False # to indicate that the ticket is not bought yet
        # Initialization of <b>emailin_back_02['open_scene2']</b>
        emailin_back_02['open_scene2'] = False
        # To block the switch when <b>message_send_but_01['cine_tic_02'] = True</b>
        # but Emailin 02 isn't visited yet
        bl.globalDict['open_scene2'] = emailin_back_02['open_scene2']
        bl.saveGlobalDict()
        ...
    ...
...
    """ Emailin 02 logic """
    ...
    # First visit of Email 02
    if mOver.positive and mLeft.positive and own['ei_block_02'] == True\
    and own['ei_02_only_once'] == True:
        ...
        # Now this part of the scene switch is set to open
        # The other part is <b>message_send_but_01['cine_tic_02'] = False/True</b>
        own['open_scene2'] = True
        ...
        # Saves <b>own['open_scene2']</b> to globalDict
        bl.globalDict['open_scene2'] = own['open_scene2']
        bl.saveGlobalDict()
        ...
""" Send 01 """
...
    ...
    # When the send button is pressed from Draft 01
    if mOver.positive and mLeft.positive and message_send_but_01['cine_tic_01'] == True:
        ...
        # Now this part of the scene switch is set to open
        # The other part is <b>emailin_back_02['open_scene2'] = False/True</b>
        message_send_but_01['cine_tic_02'] = True # to indicate that the message is sended
        ...
""" Countdown 01 """
def save_time(cont):
    ...
    # Saves <b>message_send_but_01['cine_tic_02']</b> to globalDict
    bl.globalDict['cine_tic_02'] = message_send_but_01['cine_tic_02']
...

The relevant code of Playhome.py :


    def knocker(cont):
    ...
    def init():
        ...
            ...
            # Sets the default settings, both parts are closed
            own['set_scene2a'] = False
            own['set_scene2b'] = False
            # Loads the settings from globalDict
            own['set_scene2a'] = bge.logic.globalDict['cine_tic_02']
            own['set_scene2b'] = bge.logic.globalDict['open_scene2']

    def Update():
        # When both parts are True, scene 2 will be loaded
        if mOver.positive and mLeft.positive and own['set_scene2a'] == True\
        and own['set_scene2b'] == True:
            ...
            bl.addScene('Scene_02')
    init()
    Update()

### The next ####

The next and last for now will be “The countdown timer & The switch to scene 2”.

I hope it helps
achisp

Attachments

Email3lang_09.blend (1.28 MB)

### The countdown timer ###

The countdown timer is taken from http://blender.stackexchange.com/questions/36474/how-do-i-invert-this-timer-in-bge-to-make-it-count-down “How do I invert this timer in BGE to make it count down” / user2859, thank you.
and the use of the states with it is inspired by http://blender.stackexchange.com/questions/58215/how-do-you-add-a-cool-down-timer Game engine - How do you add a cool down timer". / Monster, thank you.

### The same countdown time for two different scenes ###
The countdown timer counts the same in the laptop scene 1 and the main scene 1.
To realize this, one countdown timer is set to HUD_text_101 (for the laptop) and one to HUD_text_201 (for the main scene), and when the player leaves the laptop scene with the quit button, the actual time of the first countdown timer will be saved to GlobalDict and a message will be sent to HUD_text_201 to load that time from GlobalDict.
NOTE 1 : We can’t initialize the timer property with Python, so we have to set (= initialize) it in the Logic editor. But we can change this external timer property with Python and the Logic editor. Taken from : https://blenderartists.org/forum/showthread.php?271514-Best-practices-for-unordinary-Properties-of-Objects&p=2236905&viewfull=1#post2236905 Best practices for unordinary properties of objects/post#4 / Monster, thank you.

NOTE 2 : When the timer property is set, the timer begins to count and does not stop until the game is finished. I let the timer properties of our countdown timer at zero (default) and set it with a property actuators from object HUD_text_101 to the desired valued when the countdown timer is started.
We have four timer properties for the countdown timer:

  • time -> obj. HUD_text_101 : the countdown timer property of the laptop scene
  • time_02 -> obj. HUD_text_201 : the countdown timer property of the main scene
  • time_ex -> obj. HUD_text_101 : the property which triggers the timer events “game over” text of the laptop scene and quit game for both scenes.
  • time_ex_02 -> obj. HUD_text_201 : the property which triggers the “game over” text of the main scene

When the countdown timer is started in the laptop scene (in the main scene the player can’t do it), the properties time is set to -61 and time_ex to 0 , with two different property actuators of the object HUD_text_101. When the player goes to the main scene, the actual values from the properties time and time_ex were saved in the one scene and loaded to the properties time_02 and time_ex_02 in the other by laptop.save_time respectively laptop.load_time. So the countdown timer and the countdown timer event trigger of the main scene starts counting with that values when the player enters that scene.

By using states I have separated the countdown timer of HUD_text_101 from the setting of its two properties to the start values and the countdown timer of HUD_text_201 from the loading of the saved properties time and time_ex to time_02 and time_ex_02 , because without the separation it will not work with Logic bricks (So far I know). So we have in state 1 of HUD_text_101 the setting of its two properties, and in state 2 the countdown timer. In HUD_text_201 we have in state 1 the loading of the saved properties, and in state 2 the countdown timer.

Attachments of screenshots of the Logic editor at the bottom of this post.

### How to change the countdown time ###

Open Email3lang_10.blend *, then the outliner, click on the + before HUD_01 (if it is a - you don’t have to), go a bit down and select HUD_text_101 (click on it). Now open the Logic editor in another window. In state 1 change the value of the Property actuator named “Reset_time” to the desired value in seconds and put a - in front of the numbers to make the value negative.

In state 2 change the value of the Property sensor named “Time_sound” to the desired value less 1, i.e. the connected actuator plays the sound when the countdown timer is zero; and the value of the Property sensor named “Time_over” to the desired value plus 5, i.e. the connected actuator waits 6 seconds before quitting the game when the sound is played.
NOTE 1 : You can also change in state 2 the event which will take place after waiting the selected time, p.e. using instead of the Game actuator the Edit object actuator and his End object option. Or load a sample in the sound actuator, using the folder symbol behind the name field. Note that you_lose.wav don’t work, because I couldn’t pack it to the blend. (By the way, it is from the http://download.blender.org/documentation/gamekit1/ Blender GameKit CD). Or you use only one actuator here, deleting the other and its two connected bricks.

Open the texteditor, in there laptop.py and go to def Countdown_01(cont): . Replace in the line if own[“time_ex”] > 60 and MLang == ‘es’: 60 with your desired value from above, but subtract one second and don’t make the value negative. Repeat it for the other languages and in def Countdown_02(cont): .
The time of the countdown timer and its events are now changed. You can also change the text related with it:

If you want to change the text which appears when the countdown timer is zero until the game quits, go to own.text = “Game over” and change it to own.text = “your_text” . Repeat it for the other languages and in def Countdown_02(cont): .
If you want to change for the countdown timer on the screen the text before the time, go to the line own.text = ‘Rest {:%M:%S}’.format(time) and replace Rest with your text. Or if you don’t like text before the time delete the text. Repeat the one or the other for the other languages and in def Countdown_02(cont): .

  • In the older versions the timer text and the “game over” text are only in 1 language, the Property sensor could be unnamed, the time could be -121 and a sound actuator for the “game over” event does not exist, but the instructions above still work. I do not explain in those instructions how to do it for the older versions, but you will find through, I’m sure.
    NOTE 2 : For the older versions you can copy def Countdown_01(cont): and def Countdown_02(cont): from Email3lang_10.blend and paste them over def Countdown_01(cont): and def Countdown_02(cont): of your version to have 3 language support there too. But in Email3lang_01.blend to Email3lang_04.blend you must replace 4 times cine_tic_02 with get_train_01 in the pasted code. And in all except Email3lang_09.blend you must change 6 times 60 to 120. Please make a copy of your game before making the changes, to be in the sure if something went bad, but it shouldn’t (tested with Email3lang_02.blend, Email3lang_07.blend and Email3lang_09.blend).

### The main scene ###

The switch to scene 2 ###

The property of the switch to scene 2 is set_scene2 *.

In Email3lang_05.blend we have set in Playhome.py and there in def init(): the property set_scene2 * to False . Thereafter we load from the GlobalDict the value for the property. If the player has triggered in the laptop scene the switch to scene 2 to True with the property cine_tic_02 **, the loaded value will be True and the player can open scene 2 clicking on a trigger in main scene 1, i.e. the doorknocker.


   def init():
        if not 'init' in own:
            own['init'] = 1
            own['set_scene2'] = False
            own['set_scene2'] = bl.globalDict['cine_tic_02']

    def Update():
        if mOver.positive and mLeft.positive and own['set_scene2'] == True:
            bl.saveGlobalDict()
            scene.end()
            Laptop_01.end()
            HUD_01.end()
            HUD_02.end()
            bl.addScene('Scene_02')
#            bl.addScene('HUD_02')

NOTE 1 : bl.saveGlobalDict() we put here to save the values we want to save from level 1 to level 2, p.e the red frame of Diary 01.
NOTE 2 : When the first scene is not finished yet, GlobalDict will not exist and we have the error message : Warning: could not open ‘/…/Email3lang_05.bgeconf’ at the console when you start the game. Don’t worry, it isn’t needed at the new start.

The user of Email3lang can put the trigger property cine_tic_02 (and rename it) also in main scene 1. Then he don’t have to save/load the value with the GlaobalDict from laptop scene 1. But naturally he have to clean the code in laptop.py and in def init(): of Playhome.py, add code to main scene 1 for the trigger property cine_tic_02 (or its renaming) and build a trigger for the later.

  • Respectively set_scene2a and set_scene2b in Email3lang_09.blend
    ** Respectively cine_tic_02 and open_scene2 in Email3lang_09.blend

I hope it helps
achisp

Attachments


### How to copy external data to Email3lang ###

Dear friends.

I have taken Email3lang from my adventure game in progress. After the separation of both, I have developed Email3lang, and to continue my game using the new features I have copied them to it. If you like, you can copy the/some features of Email3lang to your game. It would be a procedure similar as the procedure described in the chapters ### Copy the new data ###, ### Copy the logic bricks to your objects ### and ### Adapt the new data ###.

The other way to save the new features would have been to copy my game to Email3lang. If you want to copy your game to Email3lang, open Email3lang_…blend and save the blend as your new game, but don’t overwrite the last save(s) of your game.NOTE 1 : In this description I assume that you will use the Startmenu scene, the laptop scenes and the HUDs as they are and that you make the changes only in the Home_player scene and Scene_02. Exception: ### Change the appearance of the startmenu ###
NOTE 2 : You will use the structure of the game .blend in which you will copy the data from the other. I.e. p.e. the amount of scene and their order, …
NOTE 3 : The described procedure beneath consists of two parts: copying the data from one .blend to another, and the second part is adapting the data of two different games to one game which works properly. The second part I will only describe superficially and the adaption itself will vary from case to case, so you have to find your way through it on your own.
NOTE 4 : You can also use parts of the described process to build a new game within the Email3lang.blend. Instead of copying the data of your old game, you would create it within the Email3lang.blend.

### Change the appearance of the startmenu ###

Open the Startmenu scene and select in object mode the background image Back_image_01 . Open the properties editor in a new window, select the texture tab and go to the image section. To unblock the file browser, use behind the name field the “packed file” button to unpack the actual image to your disk (you can delete it immediately). Now use the just appeared File browser symbol to open the desired image as your background. If necessary, adapt the buttons of the startmenu to the new background image, p.e. the color of them in the material tab of the properties editor.
Change also the text of the Text object Title to the title of your game. If you want to change its color, go to properties editor -> Object tab -> Display section -> Object color and change it there.

### Prepare the main scenes to copy the new data ###
Now delete all objects which you don’t want in your game except the ones which have Logic bricks in the Home_player scene and Scene_02. Which they are depends of the Email3lang.blend you have chosen.

Copy the new data ###

Then append your objects to the two scenes. First select the scene Home_player and open with Shift- F1 a file browser to append from a blend. Click two times on the last blend of your old game and then two times on the folder Object to open them in the file browser. In the object folder select the objects you want to append in the Home_player scene holding the Shift key down all the time to select more than one object at once. If you are ready, click at the right top of the file browser the button Append from library and the selected objects will be appended to the scene.
With the selected objects automatically the related object data, p.e. scene(s), script(s), etc. of your old game is/are copied to your new game. To delete these that are not directly related with your copied objects, save the new game to a .blend, load another .blend and then return loading the .blend of your new game. Now a lot of the not directly related object data should be deleted.The next paragraph is related to the paragraph above and taken from : https://blenderartists.org/forum/showthread.php?277933-Adding-Objects-from-different-Scenes&p=2279408&viewfull=1#post2279408 post#4 /Monster, thank you.
The objects are linked in Blender only. When loading scenes into the BGE the objects become independent instances. So they share the same design/structure but not the same data.

But it rest object data related with your imported objects which you probably don’t want, that can be scenes (p.e. HUDs), logic bricks, material, … . For that repeat the process of save, load another .blend y go back to the last .blend of your new game later, when following this description, you have deleted more data. But finally it is probably that you have to delete some object data manually.
Repeat the process from the first two paragraphs of this chapter for Scene_02 if you have objects and data for it.
If you have also selected camera(s) and/or lamps as objects, you have to delete manually these cameras/lamps (yours or mine) which you don’t want anymore.NOTES :
The next paragraph is taken from : https://wiki.blender.org/index.php/Doc:2.4/Manual/Data_System/Linked_Libraries #appending_library_objects_into_your_current_project / Blender Wiki team, thank you.
Of course, you can append or link many other things besides objects: all the ObData - cameras, curves, groups, lamps, materials, meshes, etc. - and even an entire scene … Note that there is a big difference between adding the object and the object data, such as mesh. If you append a Mesh datablock, you are only bringing in the data about that particular instance of mesh, and not an actual object instance of the mesh that you can see.

The next paragraph is taken from : https://blenderartists.org/forum/showthread.php?54455-how-to-move-an-object-to-another-blend-file&p=513954&viewfull=1#post513954 post#4 / Fligh, thank you.
If you append a mesh from the “Mesh” menu in Shift- F1, then only the MeshData is appended; you need to select it and assign it to an existing Object.

### Copy the logic bricks to your objects ### Now copy the logic bricks from Email3lang you want to use in your game to the objects of it which should hold them. For this, select in Object mode the object that need the logic bricks, then (keeping it selected) select the object that has the desired logic. Open Object -> Game and select Copy Logic bricks from the menu. Delete thereafter the object from Email3lang. Repeat the copy process of the Logic bricks if necessary with the other objects.

### Adapt the new data ###
Then you have to adapt the name of your object(s) to the name(s) used in the module file(s), i.e. the names of the just deleted object(s).

  • Test what you have done.

    PLEASE BE AWARE when testing the game:
    (1.) that you always have to start with the Startmenu (or if you use the Emailelang_pe1stLevel.blend with the control scene) and
    (2.) that you have to delete the .bgeconf file from your game folder if you have used the .blend before. This isn’t always necessary, but the saved data in that file could be loaded to the game and disturb it, p.e. some item are not in the scene and also not in the inventory.
    The .bgeconf file works only properly in a level when you start the game without it. If you interrupt the game with the Esc key and then start again with the Start button, the data of the level can be corrupted through the old bge.conf file.
    It is so because the .bgeconf file has saved the progress you have made before, and if you start a new game with it, the saved progress will automatically loaded to the game at certain points, which isn’t correct because you have started new without these progresses.
    NOTE : we are editing a game, this isn’t a publication of a finished game.
    If you play the game till the end of the first level, and interrupt the game in the second level without playing, you can later use the continue button without problems to play the second level with the .bgeconf file of the first level, more, you will need it to load the progress from level 1 to level 2.

  • If the test is negative,

    you have to adapt the module file(s) … I hope you get Error messages in the console to know where to search the problem, p.e. the object is not known by another object.
    If an error still exists, then you have to adapt the old module files/Logic bricks/objects to the imported logic brick(s), module file(s)/script(s) and object(s) of your game and/or your imported module file(s)/script(s)/Logic bricks/objects to the new situation.
    Probably there will be still some things wrong without you notice it at once, but with the time, when you are using/editing the game, you will meet them. Then is the time to correct them.

  • Summary

    If you copy a large amount of data, it can be complicated.

    I hope it works for you.
    achisp

An example of a first level with Email3lang

Dear friends.
Thank you for visiting this thread all the time.

I like to present now an example of a first level with Email3lang. The example contains Email3lang and extra logic for a simple Adventure game inventory, a rudimentary account current, some sounds, saving/loading of player position and orientation, a view block for the first frame of the home scene and character motion of the motion actuator for the player.
This is not an example for the graphical look of a level or for modelling it.

Have fun.

Attachment: Email3lang_ex1stLvl_01.blend (at the bottom of this post)

Credits :

### News ###
I have made a tutorial about the inventory of this example. You can find here: https://blenderartists.org/forum/showthread.php?412199-How-to-make-a-simple-adventure-game-inventory

Furthermore in this example :
Using a control scene
Providing sounds for this exampleStarting sounds
Toggle the background music on/off

### Using a control scene ###
I have added a control scene in Email3lang to handle data used in different scenes. It is launched first when the game starts and stay active all the time the game runs. So the data stored here is persistent as long as the game is running, while the data of a scene which is removed while the game is running, dies/is deleted from memory. And when starting that later scene another time, the scene will be restore in its original state, i.e. all progress in it is lost as long as we don’t use a save/load system.
For its characteristic a control scene could be part of a save/load system and/or contain code which is used over all scenes, p.e. a common game time for all scenes, which would be needed when you will use a day and night cycle.
I installed the control scene to have the same background music for all scenes (see ### Toggle the background music on/off ###).

### control.py ###
...
bl.addScene('Start_menu_01')
...

We start the game with the control scene, which starts the Start_menu_01 scene in the second frame, so we can’t see the control scene.NOTE : Another way to start the control scene is do it from the Startmenu, i.e. start the game with the Startmenu, and put in its header the code to start the Control scene as background scene ( bge.logic.addScene(‘ControlScene_name’, 0) ). This way the control scene is active since the second frame of the game.

OPTIONAL : I put a camera with the distance of 15 bu (z-axis) to the center to have the camera frame ( Num0 ) to know how far i have to zoom the scene to have the screen filled with it before starting the Game engine.

The Python controller is attached to an Always sensor and gets a pulse when the game starts. We call the onOff_bSound(cont) function to have music at the start, but the interpreter reads the entire module file and executes the code from indent level zero and the called function.
If we wouldn’t have a function to call at start, we would call control.py with the Python controller to start the Start_menu_01 scene.

In the next post I will explain how to activate the sound of the example .blend.

Greetings,
achisp

Revision history:
2016-12-20.: Email3lang_ex1stLvl_03.blend

  • (1.) Moved own.sendMessage(“Paid_01”, “HUD_text_102”) in laptop.py from def ei_back_03(cont): to def send(cont): to make sure that the account current in level 2 always works correctly and (2.) added support for 3 languages to the “The door is locked” statement nearly at the end of def knocker(cont): .

2016-12-15.: Email3lang_ex1stLvl_02.blend

  • (1.) Deleted hitName_01 = hitObj_01.name and if hitName_01 == “Doorknocker_01” and in the last ‘if statement’ of the knocker(cont) function at the bottom of Playhome.py and (2.) changed some text in mess.py to fit better to the example.

2016-12-14.: Email3lang_ex1stLvl_01.blend

Made with Blender 2.74

NOTE : To play the Email3lang_ex1stLvl_02.blend properly, you have to start with the Control_scene and you have to delete bgeconf from your gamefolder, if it exists and you want to use the Start button in the Start menu. For the Continue button you will need the bgeconf if you have played the first level to its end before.

Attachments

Email3lang_ex1stLvl_03.blend (1.7 MB)

### Providing sounds for this example ###

Email3lang_11.blend has only a game over sound, I have added to Email3lang_ex1stLvl_01.blend a background music, sound of footsteps and for taking/dropping items.

Note that the sound don’t work, because I couldn’t pack the samples to the blend.Btw, three of them are from the http://download.blender.org/documentation/gamekit1/ Blender GameKit CD (two from /Tutorials/Blenderball/samples), the sound of the footsteps is from https://www.freesoundeffects.com/free-sounds/human-sound-effects-10037/ . For the background music I have ripped a track from a music CD, but this is only legal for the private use. And normally they are great (I have used .flac and it have some MBs). So finally I have put a short sample from the Gamekit CD.

To use the sound :

  • open the Outliner and click on the + in front of Home_player (if there is a - sign leap this step), in the (now) open column select Player . Open the Logic editor, preferably in another window. In the actuator column are the sound actuators, named Footsteps , Drop_item and End_lvl .

  • For the background music go in the Outliner to Control_scene and underneath to Control_empty . If you LMB click on Control_empty , you will find in the Logic editor window the sound actuator named BackSound .

  • For the game over sound go in the Outliner to HUD_01 and underneath to HUD_text_101 . After you have LMB clicked on it, open in the Logic editor window the second state layer using the State panel at the top of the controller column to access the sound actuator named Game_over . If the State panel isn’t visible, LMB click on the + sign right from the object name HUD_text_101 at the top of the column to show it.

  • The sound actuators named Take_item are in the Home_player scene on Near_homekey and Near_tablet .

    On each of the sound actuators you can select a sound file LMB clicking on the folder symbol for opening a file browser. Select the desired file and then LMB click on Open sound to close the selection. Now you can see the selected sound in the name field and it should work. Used sounds are available LMB clicking on the music note symbol left from the name field.

    The next four paragraphs are taken from: http://www.tutorialsforblender3d.com/Blender_GameEngine/Sound/Sound_2.html / Clark Thames, thank you.
    Supported sound formats: wav, ogg, mp3, flac, aif. (Blender 2.59)3D Sound: wav and ogg. (Blender 2.59)

Play modes of the Sound actuator: Play : from beginning to end. Loop : continuously.
Pitch : The speed at which the sound is played. 0 = normal.

### Starting sounds ###
I have used Sound actuators started with Blender Python from the module file.

The next two paragraphs are taken from: https://wiki.blender.org/index.php/User:AnOrdinaryKitten/Doc:2.6/Manual/Game_Engine/Logic/Actuators/Sound/ #python_access / AnOrdinaryKitten, thank you.

owner.actuators["Sound"].startSound()

Plays the sound. It has no effect if the sound is already being played. All settings but Volume , Pitch and Play Mode are ignored.
For the background music I set Loop stop as Play mode for the Sound actuator, for the effects Play stop , the default mode.

To make the sound for get_homekey(cont) work we have to put the sound actuator named Take_item to Near_homekey instead of Homekey , because on Homekey the Sound actuator would be destroyed in the next frame together with Homekey . The same would happen with myTablet and its Sound actuator, so we act in the same form here.
To connect the Python controller of Homekey to the Sound actuator of Near_homekey , we put a Sound actuator to Near_homekey in the Logic editor, then we select both objects in the Outliner or 3D view with Shift- RMB (Shift pressed uninterrupted) to connect the two Logic bricks in the Logic editor thereafter.
A similar problem exists with the Game over sound in the def knocker(cont): function, in this case in the last if statement the scene ends in the next frame and the sound actuator will not work in that statement. To solve it I put the endLvl.startSound() call in the former if statement because I haven’t found a better solution.

### Toggle the background music on/off ###
The mechanism for the toggle switch is taken from: inventory_dropping.blend of the https://blenderartists.org/forum/showthread.php?363995-Short-Tutorial-Dictionary-based-inventory&p=2843613&viewfull=1#post2843613 post#15 / Smoking_mirror, thank you for that great tutorial.

The object is Control_empty .
Logic bricks : An Always sensor and a Keyboard sensor ( M key) connected both to a Python controller which calls the onOff_bSound function and is connected to a Sound actuator.

### control.py ###
...
own['OnOff_BackSound'] = True # Initialization of property

def onOff_bSound(cont):
    own = cont.owner

    key = cont.sensors["OnOff_BackSound"]
    BackSound = cont.actuators["BackSound"]

    # the toggle switch
    if key.positive:
        if own['OnOff_BackSound']:
            own['OnOff_BackSound'] = False
        else:
            own['OnOff_BackSound'] = True 

    if own['OnOff_BackSound']:
        BackSound.pauseSound() # The switch starts with this function
    else:
        BackSound.startSound() # this function starts when the key is pressed the first time,
                               # thereafter the key will toggle between the two functions

The game will start without music (the music is paused). If you put BackSound.startSound() beneath of if own[‘OnOff_BackSound’]: and BackSound.pauseSound() beneath of else: , the game will start with music.
The property OnOff_BackSound of the object Control_empty can also be set by the Logic editor instead in the header of the module file.

Greetings,
achisp