Cycles Optimizations with Indirect Baking

I have been looking at ways to optimize Cycles’ render times by faking light bounces, Global Illumination. The most common methods are baking the lighting and using ambient occlusion, but they have big problems.

  • Baking
    [LIST]

  • Lighting is static - glossy and Fresnel reflections don’t change while the camera moves

  • Doesn’t receive shadows

  • Ambient Occlusion

  • Doesn’t respect where the lights are

  • Doesn’t “conserve” energy at all (how much should be applied for a given lighting setup?)

[/LIST]

I’ve been thinking of ways that I could bake the Indirect lighting. Then, the direct lighting (including shadows) could be rendered on top of it. That would allow the camera to move while maintaining a good illusion. The lights could even move some, if you are careful.

Here are some things that I have learned from alpha testing.

REQUIREMENTS:

  • Baking needs to be applied to an environment/set where characters are linked in. Therefore, the characters cannot have baked lighting. The environment/set needs to throw ambient color onto the characters.
  • The realistic appearance of Cycles needs maintained.

HOW CYCLES WORKS

  • The final image is (direct light + indirect light) X color
  • If indirect light is ignored (no bounces), the final image is (direct light X color)
  • Indirect light may be added: (direct light X color) + (indirect light X color)
  • Cycles can bake just (indirect light X color) or (indirect light)
  • Multiplying baked (indirect light) by the color input to the shader gives (indirect light X color)
    [LIST]
  • Either way works

[/LIST]

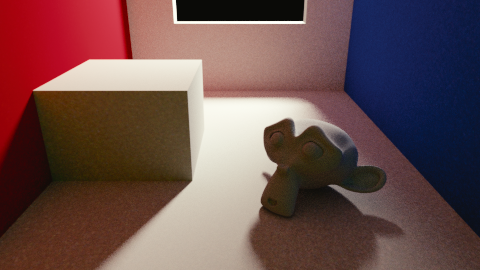
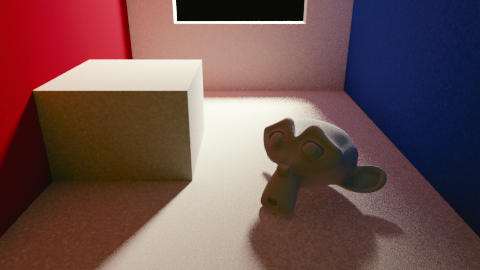
SETUPThis is a GI lit scene. Suzanne will be the character, so I removed her and baked the (indirect light + color). If you want to clean up the noise in a graphic program, I suggest just baking the indirect light. The details are in the color pass and the direct lighting pass. So, removing the color makes cleaning up the light much easier. I didn’t clean up the noise. In all images using baking, I will render them with Suzanne place in the scene to show how it interacts with baked objects. I baked the lighting with 512 samples.


Samples: 256; time: 3m46s;

IDEAS

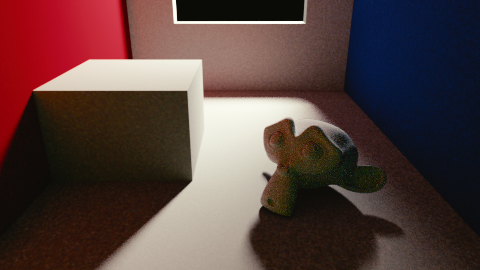
  • For good lighting of characters, more than one light bounce is needed. But, computing bounces on the environment when they are baked is a waste. So, a material may be restricted to no bounces by using the “Is Reflection” output of the light path node. This is how to do it.

  • Using an Add Shader node, add the actual shader to an emission shader of strength 1.0

  • Set the emission color to the baked indirect light X color

  • Put the Add Shader output into the top input of a Mix Shader node

  • Put the “Is Reflection Ray” output from the Light Path node into the Fac of the Mix Shader

  • This looks perfect from the camera’s perspective, but the environment doesn’t interact with anything in the scene.


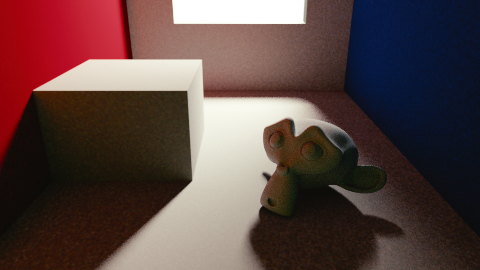
Samples 256; time: 2m42s;

  • To add bounce light to the scene, use the emission shader with a strength of 2.0 for light rays that are reflections. However, this means that the actual shader will be illuminated by the emitted indirect light, but this indirect light is already being added in the material. So, we need to only use the emission shader for materials that don’t have baked lighting. Unfortunately, I haven’t figured out how the material with the baked textures can tell the difference between light bounced off itself and light bounced off of other objects. It needs to somehow ignore light bounced off of itself. And, it has to allow light to bounce off of itself to illuminate other objects and receive direct light. But, this is at least what it looks like to the character.

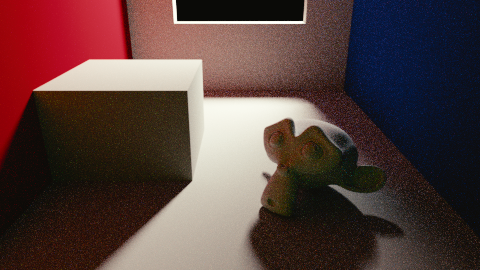
  • Add another Emission shader and set its strength to ???. Connect this to the top input of the Mix Shader. A strength of 3.5 worked for this scene, and I expect that it will depend upon the scene.

[INDENT=2][/INDENT]


Samples: 256; time: 3m15s

  • For this last part, I wanted the indirect lighting to be darker around the character. This is an AO effect, but I don’t want AO to affect everywhere. So, I baked an AO pass without the object in the scene. Then, I replaced the emission shaders with AO shaders. But, here is the trick. I divide the color input to the AO shaders by the baked AO. This brightens all the areas that the AO shader will darken, so they cancel out. This makes the AO only affect the areas influenced by objects that were not in the baking. This is good because the real occlusion has been baked into the indirect lighting. This is the result:


Samples: 256; time: 3m16s;

Keep in mind that the time doesn’t matter that much. What this does is eliminate the vast majority of noise from indirect lighting. So, the samples can be much less. The gains are not as obvious because my baking didn’t have very high samples, and I didn’t clean the bakes in another program. However, I should point out that GIMP can’t clean up the bakes because it only handles sRGB 8-bit images. It really needs to be 16-bit linear, like an OpenEXR or TIFF.

CONCLUSION:Even if the over-brightness of the material containing the baking was correct, it still has major issues. It loses all the dramatic lighting from the direct light. Render layers may be able to fix this. But, I don’t want layers that take a long time to render.

BONUS (With Renderlayers):So, I did it with render layers. The background is the material+(indirect X color) and ignores reflected light WHEN it is in the background render layer. The foreground renderlayer uses the normal material and the character with full GI. But, I only render the character in the foreground. And, I only render the set with the baked textures in the background render layer. Then, I layer it all. I put the materials on the object rather than the data. So, I can link-duplicate the data while having different materials. This keeps everything clean and optimized.


Samples: 256; time: 2m50s;

The downside is that the character requires a lot of samples for a clean render while the baked elements do not. So, instead of using the base material to light the character, I made it a hybrid. I set it to be the base material + the AO node with the (indirect light X color) for its input color. And, I limited the material to no more than 1 bounce through the nodes. So, this is how it’s setup:

  1. Environment/set material WITH character
    [LIST]

  2. Mat + AO

  3. AO has (indirect X color) bake for color input

  4. This is without the AO correction using the baked AO, but the correction certainly could be made.

  5. Forced to only 1 bounce (limits the noise from actual indirect light)

  6. Environment/set material WITHOUT character

  7. Mat + AO

  8. AO has (indirect X color) bake for color input

  9. AO must be corrected, otherwise the occluded areas will be too dark

  10. Only used for the camera (or non-reflection rays)

[/LIST]
This is the result:


Samples: 256; time: 3m10s;

The time isn’t significantly less, especially when considering the bake times. But, the noise is much less. The GI image may need 2048 samples to look good. And, that would be for every frame. After some baking and cleaning up the bakes, 256-512 samples would be plenty for every frame. If you use better lighting rather than intentionally trying to push GI, you could get a perfectly clear image in even less samples. There just needs to be enough samples to render the direct light and the AO. You could even render the renderlayers with different numbers of samples as needed.

The problem will be the size of your baked textures. Previously I mentioned that it’s best to bake only the indirect light and to multiply it by the color in the material. This is because it’s easier to clean up just the indirect light bake since the details are in the color. Well, for this same reason, you can bake the indirect lighting pass to a much smaller resolution image than if you included the color in the bake. Of course, this doesn’t matter if your material is very plain, like in my examples. But, I expect that most people will be using good detail in your color maps.

In all my examples, I am only using diffuse. But, it could easily be applied to glossy as well. But, you’ll have to bake a separate texture for each. Then, you multiply them by the appropriate colors and add them together. This sum is what will go into the AO color. Easy.

I will definitely explore this further for my own projects. It looks very promising. It takes extra time trying to setup, but that is a small price to pay when trying to render an animation. I think that I can streamline this into my pipeline.

May i redirect you to this tutorial?
It basically makes cycles act as if it had some sort of irradiance cache, for diffuse indirect bounces it sobstitutes the actual shader with an emission connected to the baked texture. Glossy and transparent nodes have to be calculated though