[ Original Reply has been Edited ]
[ Original Reply has been Edited ]
When I read you’re following a tutorial, I wanted to advise not to model exact the same character as in the tutorial, but to use a different concept art, because then you have to think more by yourself and not just follow blindly. But then I took a look at the tutorial and realized that you do that anyway (deducing from the different shape of eyes). So no advice from me so far.
Now I’m just curious about the concept art you’re using.
Also at this stage, it would be nice to see wireframe screenshots. One wire tells more than 5 eyes.
Oh and about the tutorial, if you’re going to rig/animate, better make the feet in a standing position (standing flat on the ground), not stretched as in the tut, much easier to rig. If you’re going for just the model, the stretched position is ok.
[ Original Reply has been Edited ]
Speak the name of the devil, and he shall appear. What’s up?
On a side note, I keep reading DK as Donkey Kong. It’s just something that amuses me and not really that important, but whatever.
There’s not much to say here, mostly because there isn’t much to begin with. Eyes so far don’t have any glaring errors, but the wide nose reminds me a lot of western style animation rather than anime. That’s not an inherently bad thing, but if you really want to capture the anime look, you should probably aim for a thinner, sharper nose.
In terms of updates, you shouldn’t pace yourself on Donkey Kong’s tutorial progress. He can spend several sections on something simple and trivial only to make huge progress in a later single section. Only upload whenever you finish something relatively large, like make an update once you finished the head, another one you finished the torso and legs, another for arms (including hands because those can be pretty complicated), another in hair, another in clothing. It’s easier to judge and point out parts where you can improve if you aren’t halfway through working on something.
I’ll probably continue lurking from the shadows as I do in almost all anime or cartoon WIPs, but there’s nothing more I can really say until you finish at least the head.
[ Original Reply has been Edited ]
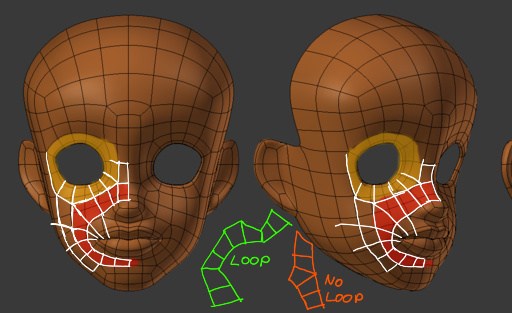
Bad topology around the corner of the mouth. The loop around the mouth is not complete, disrupted by some weird quad. Also, you should kind of topologically separate top mouth from lower mouth (including the surrounding skin), by a moreless horizontal (slightly downwards) edge loop starting at the corner. Note that in babies and cute women, the skin above that edge loop will slightly overlap the lower part.
Take a look at this video
at the very end of part 1, the edge loops are beautifully visualized and you see how the loops go around the mouth.
[ Original Reply has been Edited ]
Watch the loop which is red in Sergi Caballer’s video (and the dark green one as continuation), starting at the bridge of the nose and going around the mouth. It’s an important one and missing in your topo. It’s crucial for face animation. Go to your bathroom and look in the mirror, then open your mouth very wide, as for shouting or yawning. You will see the loop.
Kreuter has this loop too, although in a slightly different position and less pronounced, but it’s there.
Mouth corner looks better now, also I think the extra loops below the nose are not necessary if the model should be more simplified than his, so keep going.
[ Original Reply has been Edited ]
Well it’s not my WIP thread, so you should feel free to upload whenever you want. Personally, I do enjoy frequent updates, so that’s something to look forward to. There are some things I want to bring up first.
I hope you don’t mind, but I quickly mapped out the topology of your head model using your picture above and edited it to show you some possible improvements you could make in topology and anatomy. I placed both examples side by side for reference, untouched original on the left, my version on the right.

First of all, the top of the head and part of the ears are too sharp and rough. You need to smooth and round the head model out a little more. A little quick usage of proportional editing should make it an easy fix. (The O key = proportional editing)
I cut out a few extraneous edge loops near the mouth and nose area for a simplified topology. It should give you a smoother result with subdivisions. A few vertices with three or five connecting edges were also moved or changed to have four. 3 and 5 point vertices are unavoidable, but good topology tries to limit and reduce the number to only when they’re necessary. The chin and possibly other parts of the face are rounder now, but if you want to have more straightened and masculine features like in the first picture, proportional editing can help there too.
I also spaced the distance between the nose and mouth because they were too close together. A few things that still need to be fixed is the forehead from the 45 degree view and side view is bulging outwards too much and should be smoothed inwards more like in the front ortho example. The eyes in the side view are at a “/” slant when they should be rotated to be more upright like “|”. I didn’t feel like replicating the whole thing and creating a fixed version because I got a little lazy towards the end.
Other than that, you’ve made a fair amount of progress. However, you shouldn’t worry about facial expressions or movements just yet. Wait until you finish modeling the rest of the person before you start stuff that involves rigging or shape keys.
For the corners on top of the head, sometimes it helps to go into sculpt mode (if you have a tablet), and correct it there. Without multires modifier or anything, just the model as it is. Then you won’t be distracted by edges or vertices and can concentrate on just the shape.
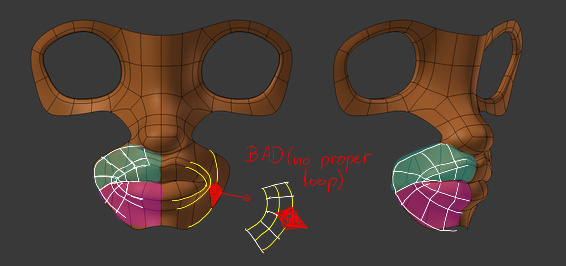
Uhm, no? You didn’t? Where? And btw. the green one is not necessary if you keep the ala of the nose as simplified. The red one I would really recommend.
A loop looks like a bent ladder. If it kinks around a corner, it’s not a loop any more. You can check loops with Alt Select on Face level, Blender will select all of the loop you klicked.
I would really suggest going for a good topology, even if you don’t animate. The shapes will just be easier to handle, because it’s easier to smooth and correct along a loop (if it’s in the right place), than along some zigzag topo. You can subdivide (and un-subdivide) loops easily without adding new edges all around. And you will learn good modelling practice for your following, perhaps more complex or realistic faces.
Correcting the loops doesn’t mean more geometry. It just means rearranging. Actually it helps to keep the model low poly, because it makes the shape easier to handle and to add geometry only where it’s necessary.
Here’s an overpaint with the red loop. The chin area was already overpainted by The Omnilord so I left it out, but I agree with his topo there.
[ Original Reply has been Edited ]