I have been learning Cycles. I have done some daytime renderings. I need to a nighttime rendering. My background is Maxwell Render. Night scenes are so easy because of the Maxwell’s physically based camera approach and real world lighting settings. But I want to do this next project with Cycles. I did a series of day renderings which turned out ok. I will post them. I started playing with the night rendering. Trying an HDRI, using the sun lamp by using the sun positioning add-on with lat and long, time of day etc… I can’t anything to look good. Just not sure how to approach this in Cycles. Any tips would be great. The night rendering will be from the same view as the daytime eye level perspective I posted below.
Here are the daytime renderings I did using Cycles.
Why would you use sunlamp and HDRI for a nighttime render?
What kind of specific look are you going for? I’ve have no experience in this, but I would (for a long exposure closed aperture setting) go for star and glow in post based on material ID masks of the light sources. Not sure if that would come up in window reflections.
If you have sodium based lighting, you might render out influence of those separately from any LED lighting, as colors react more differently to it than just a yellow cast. But I have no idea how it actually works.
These are actually early evening renderings, not true night images. I was trying to introduce low ambient light into the scene with sun and HDRI. Here is one of my Maxwell Render evening scenes. I would like to achieve this with Cycles. Just not sure how to start.
I don’t know Maxwell, but I’m guessing it has a good sun&sky system as well as easy ways of setting indoor lighting and one/two click solutions to color balancing. I’d say stick with Maxwell for production. Cycles is just too much work to get good results. And I’ll stress again that this is far outside my comfort zone, probably others have better workflows and tips. But my start would be to get the indoor lights correct; proper and absolute brightnesses and color temperatures. Then add sun light & sky system, also to proper and absolute brightnesses and color temperatures. If you use filmic addon you get kind of immediate “tone mapping” feedback without messing about in post. If having tons of indoor lightsources, I might consider baking them out and add that lighting info as emission texture instead of relying on insane sampling counts.
If you render out indoor lights using brute force, you may want to separate indoor and outdoor lighting into different passes and comp them in post. If you need to tweak color temperature, there is no rendertime way of doing this either.
So basically, setup indoor and outdoor lighting systems accurately independently, adjust sun & sky for balance because you only have to deal with two (kind of manual tonemapping), and adjust for color temperature in post. Here is a relevant read on values, but I’m clueless if it’s accurate. Reasoning sounds valid though.
Edit:
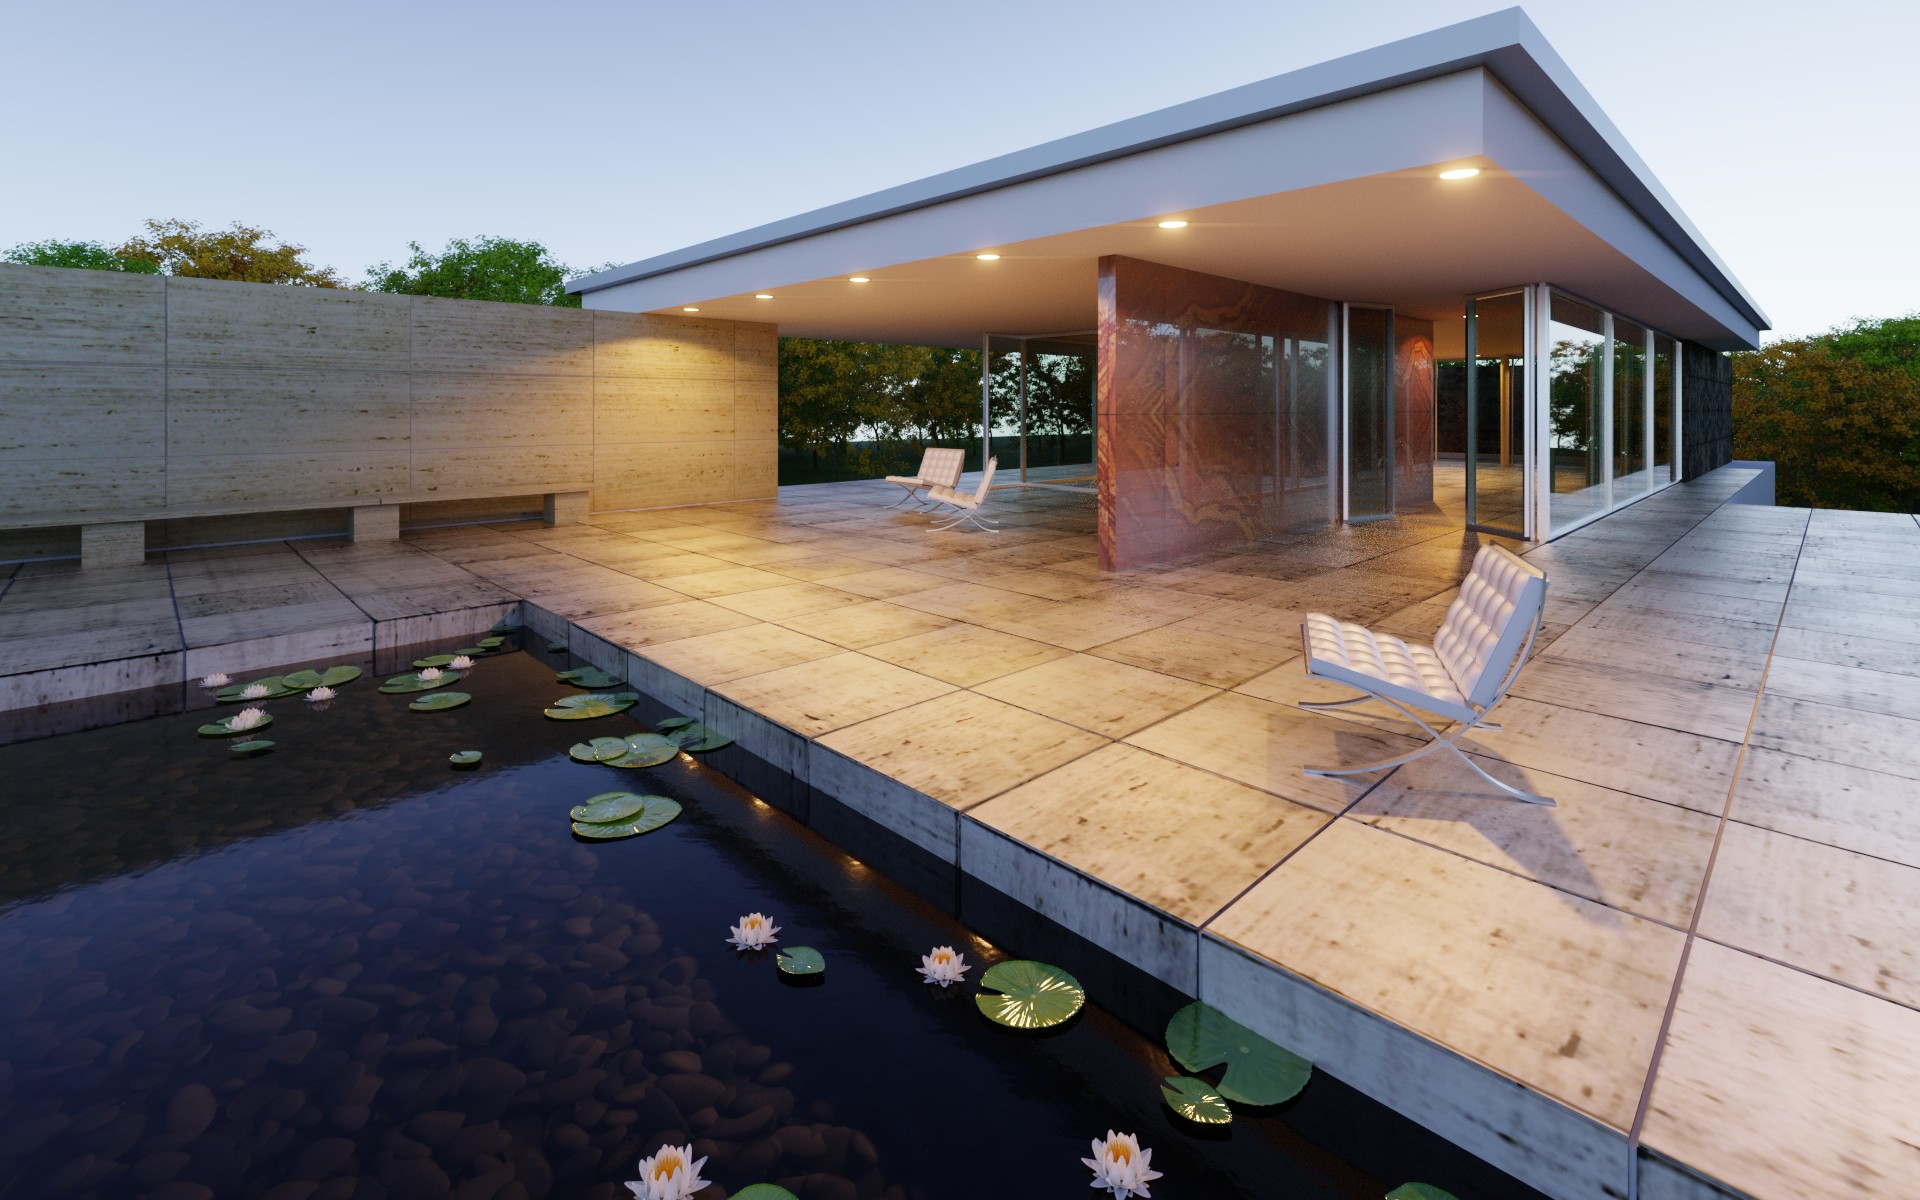
Since I’ve never done this before, I decided to have a go on the freely downloadable pavillon_barcelone exterior building scene. Changes to the original setup: 1) Background image replaced with re-toned builtin sky texture generator, 2) Window glass now fresnel based (and fixed) and transparency+glossy instead of glass, 3) Water surface transparent+glossy instead of glass, 4) fake glass uses shadow transparency instead of caustics, 5) volume absorption on the water material, 6) added tons of 2700-3000 blackbody/60w0.13 - 40w0.13 efficiency lights, 7) disabled the lantern lights since not visible in this camera angle. I’m using filmic high contrast exposure 3. So lowered intensity (“manual tone mapping”) sky texture but no sun, and at 2500 samples this is the end result:
Post: Glare nodes only, color balance untouched, no baking but brute force without noise handling requiring quite a lot of samples to handle all the lights (4 bounces).
Nice rendering. That is the look I am going for. Thanks for the info. Yes, Maxwell does have does have a good sky and sun system. Combined with the physical camera approach. it makes lighting very easy to set up all around. Plus it has the multi light functionality. Leaning Cycles has been fun. I will keep trying with the evening scene. Did you use the ies add-on for your light fixtures? The ies lights actually clear up quite nicely.
No addon, no. Just regular spot lamps, so no throw pattern. I tried the IES addon a long while ago, but it felt weird having to rely on addon which could suddenly break if not maintained. I’m awaiting proper IES support eagerly.
That is one reason I am trying to learn Cycles as well. The add-on for Maxwell render for Blender, B-Maxwell, is 3rd party developed. So I can’t rely on the add-on always being updated. I forgot to mention, I did use filmic with medium contrast on the day renderings.
Don’t forget the old Hollywood trick of “night by day.” Nighttime scenes were in fact shot during the middle of the day, by using color filters and various film-processing techniques to reduce contrast and color saturation. Many of these things were done, in the technology of the day, “in post.”
Night colors are more contrasty but much less saturated. They are more monochromatic. There is usually a bluish cast. Sources of artificial light are by comparison noticeably yellowish.
Experiment with using pure post-processing techniques … the color/saturation filters in the compositor, for instance. Also consider ways to use compositing to allow you to combine different color treatments in different areas of the scene especially with regard to distance from the lens. Anything that is illuminated, and any illumination that is “cast” (say, out of a window) should be “comped in” and handled separately.
I suggest that you spend some time outdoors at night. If possible, go to(!) similar representative real-world places both by day and by night. Bring your trusty light meter with you, along with a legal pad and a handful of pencils, and start taking samples of the light values that you see. Then, go back to the same positions at night, and repeat.
(Use the sort of light meter that can be pointed at-a-distance at a particular distant point to measure the light at that point.)
I’m not sure I would recommend “day for night” as a solution. They only did that in the movies because they couldn’t easily light nights with the film stock available. There are issues with shadows and AO as well as light contribution from sources. Remember to try Filmic Blender as that makes exposure so much easier and more like traditional medium,s that you may be familiar with.
Day for night won’t work because of lights in and on the buildings and light posts. At least if grading existing renders.
Nothing “old” about it. Still use it in productions of today. Like out in desolate areas or in apocalyptic scenarios where electricity is out.
Actually, “day for night” techniques just might work if you separate-out things like the “practical lights” and the pools of light that the (appear to …) cast. Compositing immediately comes to mind.
Typically, and thankfully, I don’t have to deal with “glossy windows,” but I do encounter things like looking into the window of a blacksmith’s shop. And, I’ll “comp” it into three separate things:
The exterior of the shop.
The interior of the shop, clipped by the window.
Any appropriate “fall of light out the window,” rendered plausibly onto some nearby light-catcher.
Everything is rendered into MultiLayer OpenEXR files with a maybe-silly number of layers.
And then there’s a fairly-elaborate (sometimes …) “noodle” network that combines these things into a believable scene.