Hi,
So I started an animation, I’ve always wanted to animate but i’m impatient and don’t have much/any experience. I found a video of someone doing a “Makako flip”, so I decided to use it as reference. After finishing the animation I felt that it looked jittery, as if you could very obviously see each frame. I am in linear interpolation mode, I have also tried Bezier mode. I understand that this is not a bug or anything, it is something that is missing from my workflow or that will come with practice but, can anyone help me out on how I can clean up my animations to be smoother and look more natural. I feel like I should be doing something with the graph editor however, I lack the experience and knowledge to use it.
I rendered out the animation quickly for you to see and I have also linked the blend file if you want to take a look and mess around with it.
Pick up a copy of Tradigital Blender by Hess or some Blender Cookie animation tutorials. Hess is a little out of date but the principles are the same and most of the tools are still the same. This helped me smooth out animations and add some flexibility. He will give you two or three ways to do this, plus help you understand the graph editor. You really need the to use the graph editor to get smooth curves. To your blend. Your not on your frames. If you look at your dope sheet you can see past frame one that you have not put key frames on your frame numbers. This will make it very difficult to adjust your animation and will produce unwanted results such as jitter in any interpolation. That’s your jump from frame to frame. Linear is not what you want. Here is how I’d start fixing it. Select all your key frames in the dope sheet. Hit G with snap set to nearest frame, which it is. Set interpolation to Bezier. Switch to graph editor, and smooth key frames. Result is starting to improve slightly. Now you have something you can work with. Add some flexibility by moving parts of your body on different frames to add flexibility. Try it you’ll like it.
It sounds counter-intuitive, but fewer key frames are easier to control and make for smoother transitions. Packing frames too close together will often lead to “snappy” movements. Gradually moving from key to key will yield better results. That’s where the graph editor comes into use.
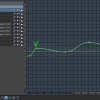
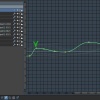
An example:
Between frame 18 and 40 on the hip bone, on the Y rotation channel. If I remove some of the points, there’s no appreciable difference in the motion, but it’s a lot easier to see and edit. And you can then refine it a little using the curve handles.
Original:
And snapping to the nearest frame either from the graph editor or the dope sheet will also speed things up, in terms of editing.
You’ll get less snappy/jerky movement from ik chains if you keep a little bend in them. Don’t allow limbs to straighten out fully, because they will move too quickly into the locked out position.
Thanks for the advice! The reasoning behind the keyframes being off the frames themselves is due to the fact that I tried to slow down the animation and accidentally did this in the process. I appreciate the help though!