I am new to Blender, not to 3D modeling in general or hardware tech.
I just did the “donut” tutorial on YouTube to get my feet wet, and I was sad to find out that even using cycles and the “optimized” modeling techniques mentioned (like modifiers and smoothing), my Xeon / Quartro workstation could not render the donut scene instantly. It took about 20 seconds.
Are you kidding me? 1 object with 1 light source? My heart sank. I have big plans!! but not if things are going to happen this slow. I got good stuff under the hood, what gives?
Please tell me… is this normal?
Am I just doing something wrong or are my expectations totally invalid?
Cheer up! You can post the scene file, images, settings,… describe your machine specs in full - for others to examine… or complain endlessly
You know, everything takes time & IMO, except M6000/P6000, Quadros aren’t that fast with path tracing.
Thank you for the reply.
sry if I came across so negatively… I was just excited about my progress and future prospects, but mixed feelings/ sad my machine wasn’t performing better. I wasn’t really expecting such a technical reply, more of a “yeah, that sounds about right”
but…
since you asked, I have attached my blend file (be gentle, its my first you know) rendering layer 1 only.
Machine specs:
Xeon E3-1505M vs @ 2.8Ghz
32 GB memory
64-bit Windows 10 PRO
Nvidia Quadro M5000M
Let me know if your PC goes beyond ludicrous speed to: “instant donut” haha.
If you have more techy hardware suggestions and recommendations, I’m all ears. Internet can be spotty at my house so cloud rendering is out. I dream of render farms in the basement, but 1 donut doesn’t seem like reasonable justification for that… yet… haha. (based on your quadro comments, I’m not even sure what CPU/GPU would be best for a farm at this point)
Just to be sure: That file (with those very settings/resolution) took you 20 seconds to render?
On my very (very) outdated PC that scene took 12 seconds to render on the CPU and 5 to render on the GPU. And as already stated, that machine is quite old and has never been high-end to begin with.
But then again - you’re on a notebook, right?
Did another quick test on my notebook for a fairer comparison (i7-6700HQ, 2.60 GHz / GTX 960M):
8 seconds (GPU), 10 seconds (CPU)
What tile size are you rendering with and how many samples - CPU works best with a tile size of around 32x32.
My i7-5390k @ 3.5gz renders your file in 7 seconds with the tile size above and 128 samples.
One thing though - 128 samples does seem a bit high for this scene. I tried with 64 samples - and the noise was minimal and even at 32 samples it was still pretty acceptable.
Reducing the number of samples will dramatically cut your render time. Only render with enough samples to get noise to an acceptable level - any higher and you are simply wasting your time.
I compared your processor to mine on the site below - yours is quite a bit slower and has fewer cores (8 vs 12) - so that will be one reason for your observed render times.
There are some enhancements coming in upcoming versions of Blender (AO after x bounces, denoising and sobol scattering distance) that can dramatically cut render times. The BMW benchmark scene for example went from over 2 minutes on my CPU to around 40 seconds (a speedup of ~5x). There are some test builds around incorporating these features if you take a look at the thread below.
Yeah… it does seem like I have a bit of a problem somewhere, huh.
Could it be Windows 10 Pro vs. Win7 ?
Where can I choose CPU or GPU in Blender?
The “notebook” is a “top of the line mobile workstation” haha… not so much, considering what I spent on it, but I will say it has been the most rock-solid stable windows computer I have ever owned.
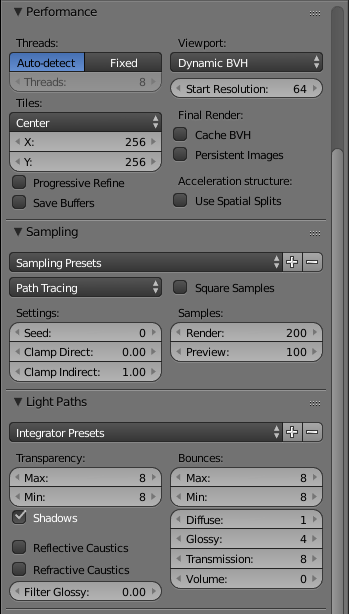
The tile size is on the Render tab under “performance”
CPUs tend to like rendering in lots of small tiles - so as to take advantage of their multi-core nature. Tile sizes around 16x16 or 32x32 pixels tend to give you the lowest render times.
GPUs on the other hand are the opposite - and tend to give the fastest renders when using large tile sizes (rendering the entire image as a single tile - or breaking it into say 4). As the number of tiles goes up - so do render times.
Getting the tile size wrong can have a dramatic effect on render times.
So rendering your donut scene on CPU using 32x32 tiles gives a render time of around 7 seconds on my system, but increasing the tile size to 256x256 almost triples this to around 19 seconds.
Conversely on GPU 256x256 tiles renders in just under 4 seconds, whereas 32x32 tiles takes a whopping 10 times longer at 34 seconds.
There is an addon called “Autotilesize” which will help select the optimal tile size for your render and CPU/GPU - activate it from preferences.
I have used your suggestions and found great success. My hardware does in fact hate high tile numbers.
It was totally worth taking the time now to figure this out… now everything I do from this point on will take FAAARRRRR less time. You guys are the best and I hope to share amazing finished products some day soon !!
My final changes for best repeatable quick render times are:
Fixed Threads = 8
Tiles = 28x28
Use Hair BVH = OFF
Bounces: min 5 MAX 10
with the above settings… the Samples numbers are basically a power of 10 for render times for me now:
samples: 16 = 1.6 sec render (I pretty much achieved “instant donut”. yeah!)
samples: 32 = 3.2 sec render
samples: 64 = 6.4 sec render
etc…
etc…
I am not entirely sure what “Square Samples” does, but I checked that box once and render times went on vacation, so I won’t be using that for now. hahaha.
Anyway, Thanks a ton!!!
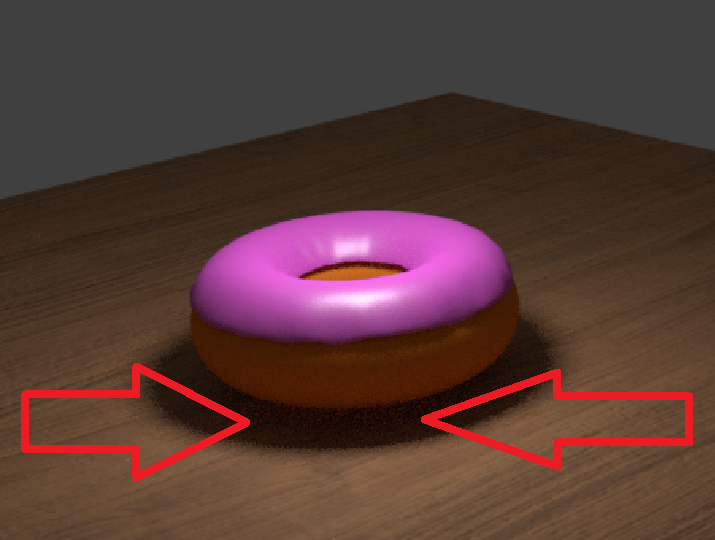
P.S. After rendering this thing like 200 times tonight, I noticed no setting seems to correct the red noise that appears in the donut’s shadow… I will fight the quality battle later though… it was just an observation I had on this noob tutorial project. Speed is currently much more important to me while I go thru weeks and weeks of tutorials…
Uncheck the caustics options in Sampling panel, red noise is most probably due to caustic bounces. And btw, to speed things up more, lower your number of bounces. 5 min, 10 max is very high, I usually go with 1 and 3 and rarely set them higher.
Square samples does exactly what it says on the tin - it squares the number of samples you specify
If you enter 10 samples and check “square samples” - you’ll actually render with 100 samples.
If you enter 20 samples and check “square samples” - you’ll actually render with 400 samples.
If you enter 50 samples and check “square samples” - you’ll actually render with 2500 samples.
I rendered your file and don’t see anything particularly troublesome in the shadow area. There is a bit of noise due to low samples - but the red/brown colour of this noise is due to the indirect reflection of the body of the donut and is to be expected.
You can eliminate this by setting the light path to “Direct light” - this will eliminate all bounced light - but it wont look very realistic and kinda defeats the purpose of using a GI renderer like cycles.