I’m having a problem with SSS shading with my exported Daz characters. I just started experimenting with SSS shaders, and am using the CGBlender SSS one… but the results are lackluster, at best, and I am not sure why. I’ve basically copied the setup used for the demo on the shader’s blend file, but the results are quite different on the Daz character.
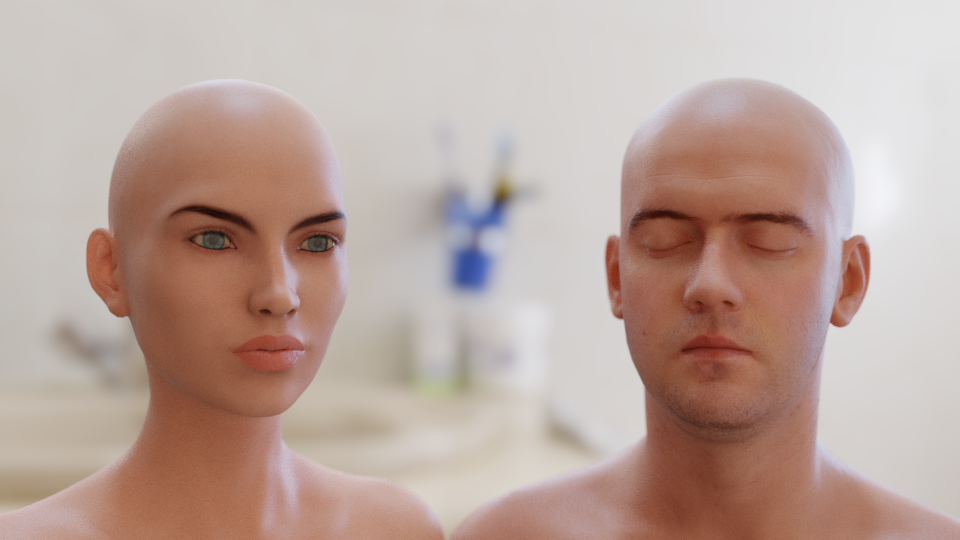
This is a headshot of the Adaline character (can be found on Daz3d.com) – I’ve set up the nodes the same way as with the demo. I’m also using an HDRi map, which was included with the shader.
Yeah, getting decent results from some daz/poser type figures can be tough, let alone photo-realistic results. A bunch of issues to check for here.
First, take a good look at the diffuse texture side-by-side with the one for the sample bust. It may be similar resolution but not have the same level of detail (smooth “make-up” skin vs mottled photo-based skin, for instance.) That’s my first guess - look at all the hairs, moles, and skin folds that the sample bust has vs the uniform skin color in the DAZ figure. Second, you might have to deal with baked-in specular highlights rather than having a pure diffuse texture. I’m not really seeing that here, but it’s something to watch out for in general. Also compare the DAZ diffuse with the sample in terms of saturation, brightness, and contrast. The sample seems to have pretty dark darks while your render is uniformly much brighter - that might be gamma or other color management settings, see below, but check the texture as well.
Next, examine the bump and specular maps. Again, not sure about this particular asset but many vendors will include cheaty bump/spec maps that are just the diffuse map with a contrast filter applied to it rather than a true separate map. That’s better than no map at all, but can contribute to a render looking plastic/CG.
Looking at your node setup, make sure everything’s plugged in appropriately. As @Daedalus_MDW pointed out you’ve got at least one red texture - check that it’s loading correctly. Also, you have a texture plugged into the “SSS Overall Weight,” but from the naming conventions I’ve seen with DAZ stuff that might actually be a specular map. Make sure it’s really a Subsurface Weight map.
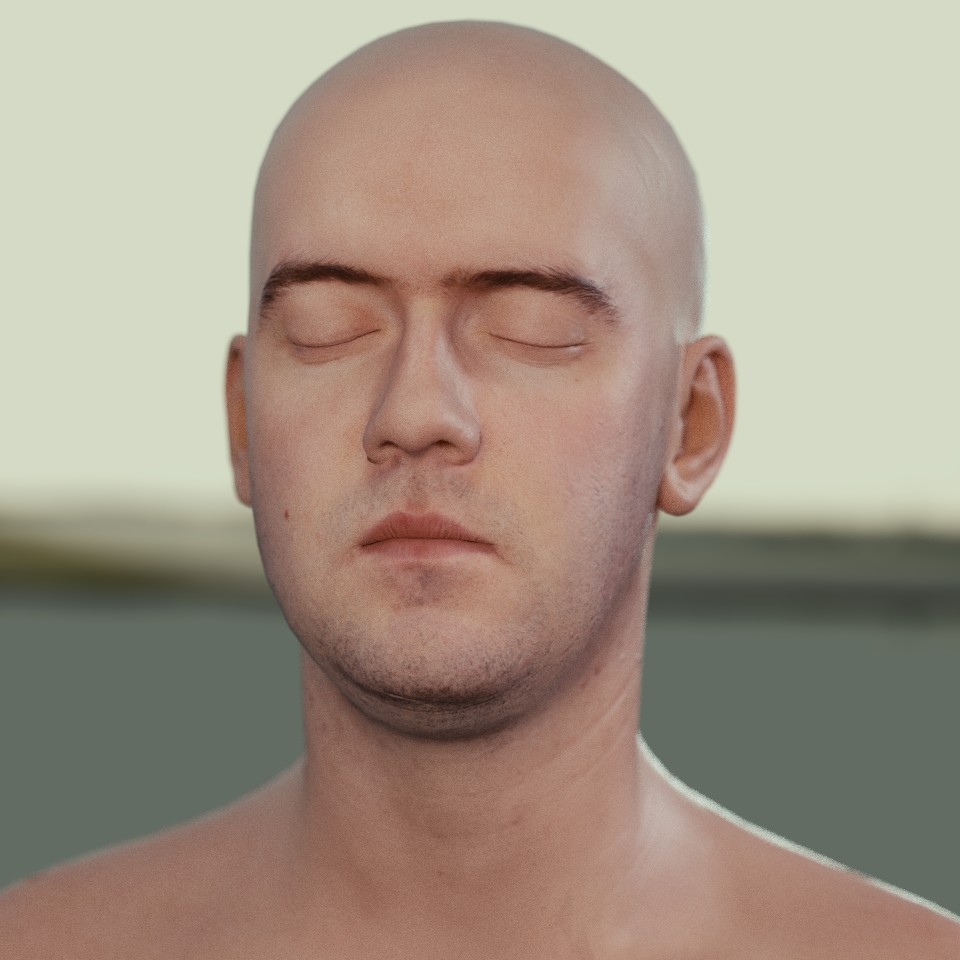
Finally, I also agree that this might be partly due to a difference in render settings. The sample render has a lot of realism-enhancing tricks going on such as color grading (might be filmic?) as well as DoF blur. That bust also makes the smart move of closing the eyes which are a huge point of failure for realistic humans. I’d suggest doing the same until you get your skin to a place you’re happy with, then tackle more realistic eyes (not sure if the DAZ figure has sufficient geometry but you can at least get some good reflections going).
As always, posting a .blend with packed files would be ideal for people to check what’s going on.
Can you go into more detail? I’m assuming you’re talking about the much stronger normal-mapped ridges visible on the lips, which are definitely a factor. The DAZ model might have a high-resolution normal map but if it doesn’t have the dramatic imperfections that the Lee Perry Smith maps have it doesn’t do much good.
In other words even when you sort out all issues with textures, reflectivity, SSS etc. the DAZ figure is more likely to look like a photo-realistic render of a silicone doll rather than a human since the textures don’t include pores, blemishes and various imperfections that a human would have.
That said, I know there are photo-based textures for DAZ figures out there that might have more in the way of detailed imperfections.
Edited to add a minor rant: I find it a bit frustrating when skin shader packs are advertised with photo-scanned head models like this. You can throw the most basic diffuse/glossy fresnel shader onto that model and have it look pretty darn realistic without any SSS, even.
[QUOTE=spiderbrigade;3190360]Can you go into more detail? QUOTE]
Indeed like what you said.
For photorealism you need:
An image plane containing a picture. (eh joking, but gives also to think )
Ok here’s what I think the important ingredients:
A) Detailed geometry (real or fake ) , and together with geometry: detailed textures, good shaders.
B) Variation in light. (You have to put it that way that there is a variaton of light on the object, shadows, highlight and midrange)
C) Camera (FOV, DOF, etc)
And finally Colormanagement: is there still a little bit detail to see in the shadow, details in the highlights?
About SSS-shader: gives only result when there is backlight. A solidified plane with SSS on top of a cube looks the same as a diffuse shader.
About skin: Skin is quite a complex tissue: microdisplacement, pores, spots, wrinkles, tiny hairs… It needs quite some attention.
I decided to give an example of what I think what the stages are of photorealism:
From Left to right :
A) Simple light, geometry, and shader
B) Add some detail in geometry
C) Add good (pbr)shader with texture(s)
D) Add more variation in light (HDRi for example)
E) Camera work: for example add DOF, change VOF, Angle,etc
F) Colormanagement. :
I’m working on setting up a .blend file I can upload to Dropbox here. I’ll get it up within an hour… Then others can look at what’s going on.
As for the red slot in the Image Texture shader, it was apparently the SSS file provided by the author that did that. I’ll include that texture in the .blend…
It took me awhile to get this set up, as sometimes Blender would crash when I copied materials setup. Anyway, I have finally got it done, and posted it to Dropbox -
I was a little worried about the copyright issue, with distributing copyrighted material, but it’s not worth very much as it’s not a complete figure. I cut off the body of the figure so it’s just a bust, with the associated textures.
Anyway, I’d appreciate if you guys would take a look, and see what’s going on… I’m not real experienced with materials. Meanwhile, I’ll probably go on DeviantArt and look for images rendered in Blender with Daz figures, and ask around…
edit: I just looked at the diffuse texture for Adaline’s face. It doesn’t have much contrast, so I went into Darktable and used the equalizer to greatly boost the contrast and detail. I’ll see what difference that makes, here. I’ll do the same with the SSS and normal maps too.
second edit: Here’s the results from rendering with the high-contrast textures, bump & SSS images –
So a few things jump out at me looking at your .blend. Thanks for posting that, by the way.
First, you have the subsurface scattering map from the Lee Perry Smith model in your nodes for the DAZ figure. That’s not going to work since the UV map is completely different. I tried just removing this map, but that makes the eyebrows look painted on since they shouldn’t have SSS applied. In this case I was able to use the specular map as you had originally, since it masks out the eyebrows.
Second, your environment map is a .jpg so you miss out on a lot of the “variation in light” that robwesseling talks about above. There are tons of free HDRI maps out there, and it makes a big difference for realism.
When it finishes up I’ll attach a render I made from your file with some tweaks. I removed all the lights and loaded an HDR environment map. I also used the filmic color managment setup which again helps a lot. For the shaders, I modified the reflective materials in the eye to have a very simple fresnel-driven glossy instead of a fixed factor like you had. Read up on that if you want to improve your reflective materials. I also brought the contrast slightly up and the saturation slightly down in the skin texture (using nodes rather than editing the image itself).
At this point I think there’s not a lot more you can do with shaders - you’re up against the limits of how realistic the geometry and textures are, which just struggle to compete with something scanned from an actual person’s head.
Edit to add: this is of course with the base texture file, not your tweaked version. Using that version in addition to HDR lighting I think you can get to a pretty solid result.
I tried another HDR map - a real one - and boosted the contrast/detail in the texture images, and got much better results. Did you see my post on DeviantArt? It’s a far cry from what I posted earlier…
As for the subsurface map that was misplaced, that was a mistake… or I just forgot to change it when I copied over the nodes…
Oh yes, I agree with this! That’s what I was trying to say with my last paragraph as well. But it’s not just level of details but also what kind of details…at some point the DAZ model is too idealized and “smooth” because they usually aim at a glamour-type aesthetic. Even with a very wrinkly/detailed normal map the overall shape of the face is…unusual for a realistic human.
